
Please note if you are using DSM7.2 or higher you should use the Container Manager version of this guide from the menu.
This guide has reached the end of its updates as most people are now on the latest DSM update - This guide is correct as of 08/12/2023 however no further updates will be added.
| Update | Date |
|---|---|
| Added a note in relation to enabling the RCON port and if you expose it to the internet you MUST change the default password. | 22/04/2023 |
In this guide I am going to take you through the steps to get a Minecraft JAVA server up and running in Docker on a Synology NAS. If you are looking to host a server for a Console or Mobile you will want to see my Bedrock edition guide.
The fantastic documentation on how to use the server once it is running can be found here
https://docker-minecraft-server.readthedocs.io/en/latest/
Let’s Begin
In order for you to successfully use this guide please complete the setting up a docker user guide, or have your ID details to hand.
Step 2: Setting up a restricted Docker user
Step 3: Setting Up a Docker Bridge Network
Downloading the Container
Open up Docker within DSM and navigate to the ‘Registry’ tab and search for ITZG in the keyword box.
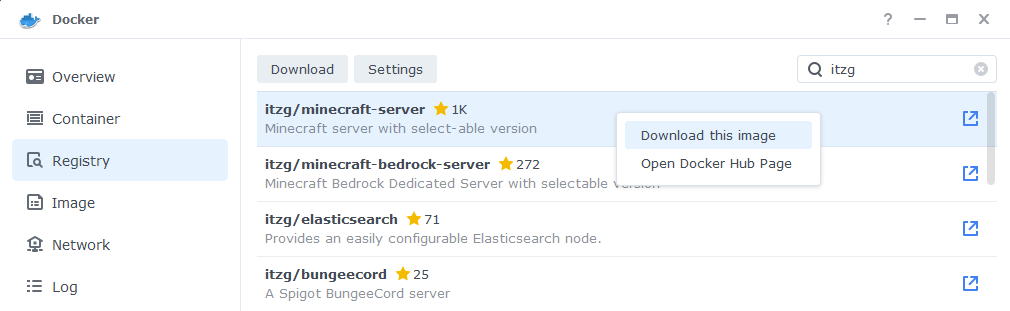
Within the results right click and download the ‘ITZG|Minecraft-Server’, When it asks which version number to download select the one that you require based on the table below
| Minecraft Version | Tag to Select |
| v1.18x and up | Latest or JAVA17 |
| v1.17x | JAVA16 |
| v1.16 and below | JAVA15 |
Setting up the container
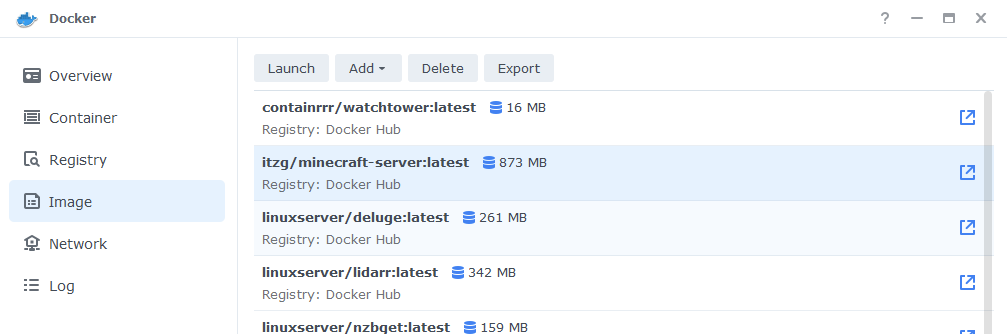
Now we have downloaded the container and got hold of our user IDs we can move onto the next stage.
Go back into Docker and click on the ‘Image’ tab, in the list of your containers select the ITZG Minecraft server, and click on ‘Launch’
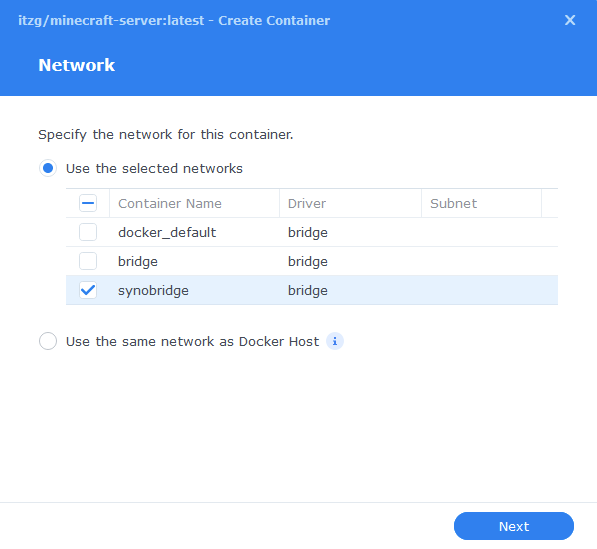
You will be greeted with the Network screen, we will be using the ‘synobridge’ network we created earlier select it from the list and click Next.
Next you will be greeted with the General Settings screen, this is where you can start specifying some of your preferences.
Minecraft can be fairly CPU heavy so if you are running the server on a lower specification Synology box you will probably want to set limits around the CPU priority or Memory Limit. This will ensure DSM is still usable when the server is running.
You can change the name of the container to anything you like, and you may want to enable Auto Restart as this will ensure the server starts automatically if you reboot your NAS.
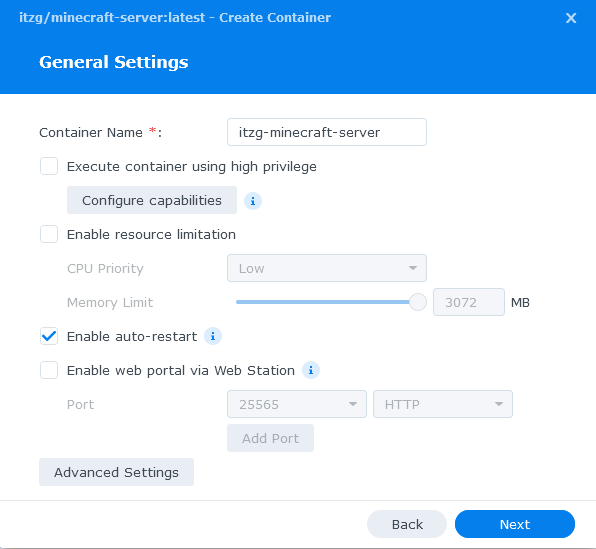
Next up we are going to click on the ‘Advanced Settings’ button, this will take you to a new window with a number of tabs which we are going to work through.
Environment Variables – GID, UID, Server Type and EULA
We are now going to set up the specific options for the server including what type of server you would like to run and even a specific version.
Each of the values below are added by clicking the ‘Add’ button at the top of the screen and then entering each of the values below
Please note if you decide to enable the RCON Port please change the default password especially if you open your server up to the Internet! See the GitHub for more details.
| variable | Value | Comment |
| UID | This will be prefilled with 1000 change it to the UID you obtained earlier | |
| GID | This will be prefilled with 1000 change it to the GID you obtained earlier | |
| EULA | TRUE | This accepts the Minecraft EULA, without this the server will not run |
| TYPE | SPIGOT | You can change this as per the list below |
| VERSION | LATEST | You can change this to any a specific version if you want e.g 1.13 |
| JVM_XX_OPTS | -XX:+UseG1GC -XX:+ParallelRefProcEnabled -XX:MaxGCPauseMillis=200 -XX:+UnlockExperimentalVMOptions -XX:+DisableExplicitGC -XX:+AlwaysPreTouch -XX:G1HeapWastePercent=5 -XX:G1MixedGCCountTarget=4 -XX:G1MixedGCLiveThresholdPercent=90 -XX:G1RSetUpdatingPauseTimePercent=5 -XX:SurvivorRatio=32 -XX:+PerfDisableSharedMem -XX:MaxTenuringThreshold=1 -XX:G1NewSizePercent=30 -XX:G1MaxNewSizePercent=40 -XX:G1HeapRegionSize=8M -XX:G1ReservePercent=20 -XX:InitiatingHeapOccupancyPercent=15 | These variables are used to increase the performance of the server – Copy and paste this exactly |
| MAX_MEMORY | 2G | Amend the number to the amount of memory you want to allocate to the server this will depend on your system or server type you are running |
Server Types
- VANILLA
- BUKKIT
- SPIGOT
- PAPER
- TUINITY
- MAGMA
- MOHIST
- CATSERVER
- SPONGEVANILLA
- FABRIC
See the full list here
Links / Execution Command
You do not need to set up anything on these tabs.
Press ‘Save’ to go back to the initial setup screen, then press ‘Next’
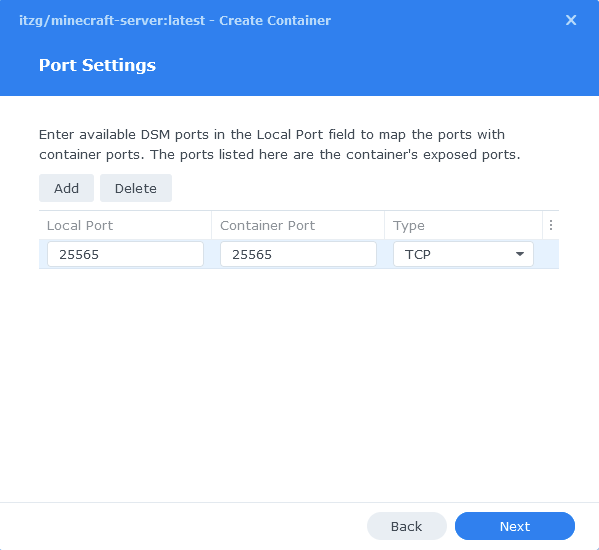
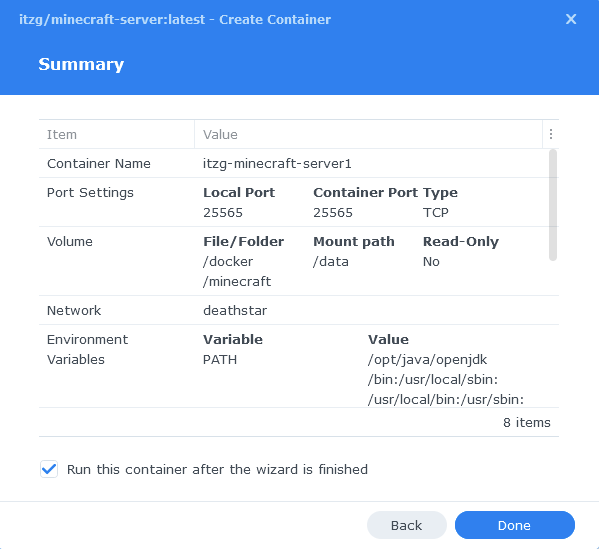
Port Settings
You will now see the Port Settings screen. You will need to type in the ‘Local Port’ to match the ‘Container Port’ shown on the right-hand side this will avoid the container being assigned random ports when it is started. When set press Next.
As per the earlier note if you decide to enable RCON you will need to add its port mapping here.
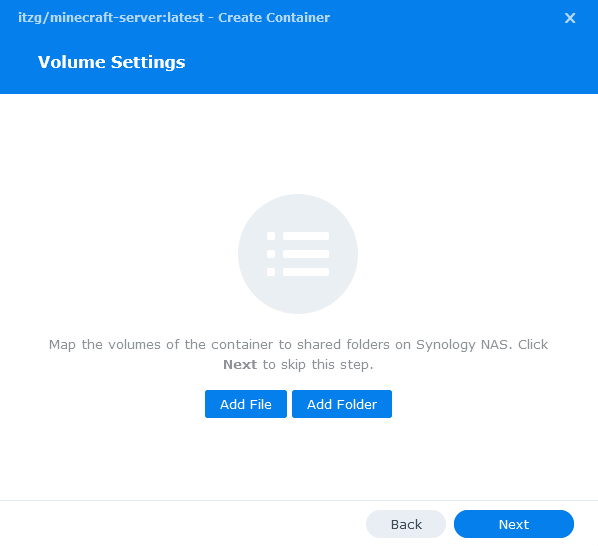
Volume Settings
We can now specify the directory where Minecraft will store its configuration files.
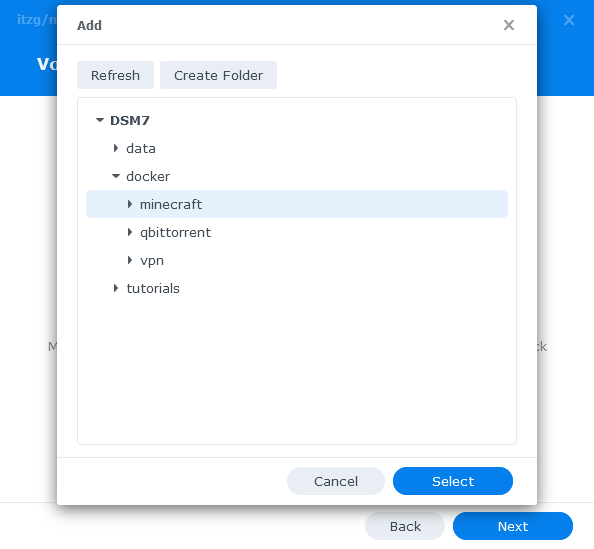
Click on Add Folder, click on the docker folder and create a new sub-folder called ‘minecraft’ select this folder and click ‘select’
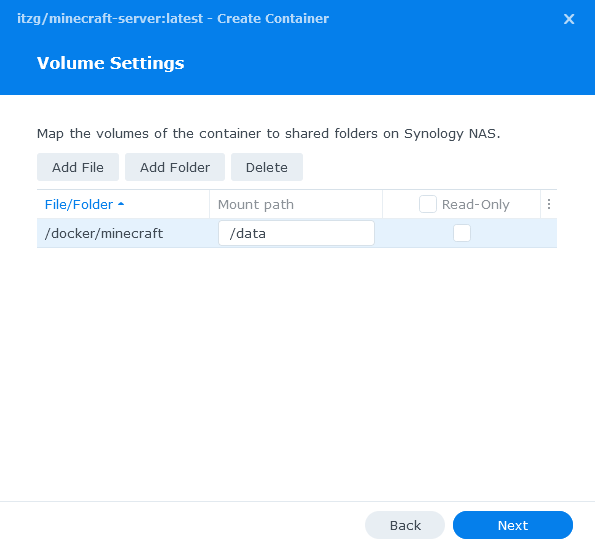
Now we need to specify where this folder will be mounted inside the container. As per the screenshot/table below, enter /data into the ‘Mount path’.
| File/Folder | Mount path |
|---|---|
| docker/minecraft | /data |
Click on Next and you will be taken to an overall summary screen, just do a quick sanity check to make sure the options are correct. If you want to launch the server immediately check the box and click on Done.
Server startup time
The first time the server launches it may take a few minutes for the server files to download and the world to be generated. You can track the progress by going into the ‘Containers’ tab and clicking on details for the Minecraft container, then either viewing the terminal or log tabs.
All other server settings can be configured using the standard Minecraft server.properties file, I won’t be covering that here as there are extensive other guides out there.
| Update History | Date |
| Added Docker Compose details | 03/05/2021 |
| Updated to show which version of the image to download | 09/06/2021 |
| Cleaned up the Environment Variables section and included some new JAVA optimisations | 24/11/2021 |
| Screenshots update to DSM7 and tweaked the guide wording | 22/01/2022 |
| DSM7.1 Update with new screenshots and steps | 24/05/2022 |
| Added new port settings and Docker Bridge Network | 23/07/2022 |
| Fixed the missing port settings section! | 16/11/2022 |
| Removed port 25575 (RCON) as could pose a security issue if exposed to the internet – You can add manually if required | 12/03/2023 |
| Compose version number removed 3.x not required, and some minor wording amendments. | 08/04/2023 |
| Amended the path to save the compose file – this is for security, so the container has no access to the file contents. | 14/04/2023 |
Buy Me a Coffee or a Beer
If you have found my site useful please consider pinging me a tip as it helps cover the cost of running things or just lets me get the odd beverage. Plus 10% goes to the devs of the apps I do guides for every year.


Thanks for a great guide! I’m getting the server up and running on my DS920+, and the Docker log file doesn’t output any error messages as far as I can see. But I’m not able to connect to the server. I can ping my NAS from my laptop, and I can ping my laptop from inside the console of the minecraft server Docker container. But I’m still getting no connection to the server. The ping indicator in Minecraft is red, and I’m just getting a “can’t connect” error when trying to connect to it. Any idea how I can troubleshoot this?
Hey, does the server show that it is up and running in the log for the Minecraft container? Also, just to check you are trying to connect with the Java edition of Minecraft not the Bedrock edition?
It’s late now, so I can get the container log tomorrow. But MC Java vs MC Bedrock was news to me. I’m using Bedrock, and that’s not likely ro change. I’m setting the server up for my son, who plays on tablets and Switch. Can this server not be used for Bedrock?
If you can hold a day I will get the Bedrock guide published early as its very similar. – Quick Edit I am having trouble getting the Bedrock edition running at the moment https://github.com/itzg/docker-minecraft-bedrock-server.
Once I have figured on the issue I will be publishing the guide. Reach out via discord and I can give you early access.
HI, Thanks for the tutorial as it was very helpful. I followed it and all went well. The issue is that when I start the server it gets stuck on this line. Any thoughts on what’s going on?
Thanks,
Will
2022-02-08 02:09:58 stdout [02:09:58] [Worker-Main-2/INFO]: Preparing spawn area: 0%
Hey, do you see the world files being created in /docker/minecraft? Also this part can take a little while depending on what model NAS you have
I do see that the Worlds folder was created. I was thinking I don’t have enough RAM for this too work all that great. I DS220+ with only 2 GB of ram currently. What are the minimum requirements for RAM with MC?
You should still be able to run it, I would recommend capping it’s memory usage to 1GB, it should still create the world folder, you might want to check your permissions to ensure the UID and GID are correct. Keep in mind that it will use the full amount of memory allocated so it could make your overall system slower.
I did cap the memory to 1 GB. I’m not sure exactly what’s going on then. When I turn the MC container on and let it run, it makes the Docker unresponsive. Then when finally get to where I can turn the MC container off it gives me some error that it cannot turn it off because the docker is too busy. I have to restart the NAS just to continue. All the while the console just says the same thing, “Preparing spawn area: 0%” I let it run for 30 minutes and it still says that. Should I let it run longer or is there something else going on? I will be putting in more memory here shortly so hopefully that will help some.
Thanks,
Will
Sorry, I lied. I just checked the last log before i shut it down last night and this is what it said.
[00:19:02] [Worker-Main-5/INFO]: Preparing spawn area: 87%
[00:19:18] [Server thread/INFO]: Time elapsed: 2123866 ms
[00:19:18] [Server thread/INFO]: Starting remote control listener
[00:19:20] [Server thread/INFO]: Thread RCON Listener started
[00:19:20] [Server thread/INFO]: RCON running on 0.0.0.0:25575
[00:19:22] [Server thread/WARN]: Can’t keep up! Is the server overloaded? Running 2244ms or 44 ticks behind
[00:19:40] [Server thread/WARN]: handleDisconnection() called twice
[00:19:41] [Server thread/WARN]: Can’t keep up! Is the server overloaded? Running 3236ms or 64 ticks behind
[00:24:19] [Server thread/WARN]: Can’t keep up! Is the server overloaded? Running 3439ms or 68 ticks behind
[00:24:53] [Server thread/WARN]: Can’t keep up! Is the server overloaded? Running 20729ms or 414 ticks behind
[00:25:11] [Server thread/WARN]: Can’t keep up! Is the server overloaded? Running 3039ms or 60 ticks behind
Thanks,
William
Looks like the server is running, try and connect to it. The ticks message is where the server is lagging, you will likely get this until a decent chunk of the world is created when you start playing.
Sorry I could not reply to your most recent message. I did get the server running and was able to connect to it and I was playing for maybe 5 minutes and the server crashed…
Logs said
[Server Watchdog/FATAL]: Considering it to be crashed, server will forcibly shutdown.
2022-02-11 02:24:30 stdout [02:24:27] [Server Watchdog/FATAL]: A single server tick took 60.24 seconds (should be max 0.05)
Do you think that is due to the low memory or something else?
Your CPU should be able to handle a basic server, I was running one on my much older 1815+ but with 16gb of RAM, even a bump up to 6gb total means you could dedicate more the minecraft. The more the better really as it all helps performance of the NAS.
Hi there, thanks for the guide, I am wanting to run a early version of MC for my son, v1.0 it seems to be more difficult than I thought as it does not find the version to download, in the Version bit in variable I put in 1.0 but this may be wrong, any help much appreciated
Hey, nice idea let me check how that would work and come back to you.
OK figured it out – I couldn’t get 1.0.0 to download via the container as it doesn’t seem to exist in the official repos, however you can grab the original file from here
http://files.betacraft.uk/server-archive/release/1.0/1.0.0.jar
Rename it to minecraft_server.1.0.jar and place it into the ‘minecraft’ directory
The image (TAG) will be JAVA8 and in the environment variables TYPE will be ‘vanilla’ and Version will be ‘1.0.0’
See below a log extract showing the issue…
date stream content
2021-12-23 18:46:38 stdout [37mDEBU[0m[0041] Forwarding signal [37msignal[0m=”window changed”
2021-12-23 18:46:06 stdout [INFO] Server started.
2021-12-23 18:46:04 stdout [INFO] IPv6 not supported
2021-12-23 18:46:04 stdout [INFO] IPv4 supported, port: 19132
2021-12-23 18:46:04 stdout [INFO] IPv6 not supported
2021-12-23 18:46:04 stdout [INFO] IPv4 supported, port: 19142
2021-12-23 18:46:01 stdout [INFO] opening worlds/Bedrock level/db
2021-12-23 18:46:00 stdout [2021-12-23 18:46:00 INFO] Difficulty: 1 EASY
2021-12-23 18:46:00 stdout [2021-12-23 18:46:00 INFO] Game mode: 0 Survival
2021-12-23 18:46:00 stdout [2021-12-23 18:46:00 INFO] Level Name: Bedrock level
2021-12-23 18:46:00 stdout [2021-12-23 18:46:00 INFO] Session ID fa7f3c55-2782-4017-83b5-f2e62db87b11
2021-12-23 18:46:00 stdout [2021-12-23 18:46:00 INFO] Version 1.17.2.01
2021-12-23 18:46:00 stdout [2021-12-23 18:46:00 INFO] Starting Server
2021-12-23 18:46:00 stdout NO LOG FILE! – setting up server logging…
2021-12-23 18:45:59 stdout Starting Bedrock server…
2021-12-23 18:45:59 stdout 2021/12/23 18:45:58 Unable to find an element with attribute matcher data-platform=serverBedrockLinux
2021-12-23 18:45:59 stdout WARN Minecraft download page failed, so using existing download of 1.17.2.01
Are you using the Bedrock Edition as this is a guide for the Java edition?
‘Unable to find an element with attribute matcher data-platform=serverBedrockLinux’
Yeah Bedrock. Sorry seem to be in the wrong place. I could have sworn I’d followed your guide to set the thing up… Clearly not. Doh.
Merry Christmas!
Just double checked. I DID use your guide but just chose bedrock rather than Java as an option. Everything else was exactly the same and worked perfectly. So, two guides for the price of one… Hadn’t thought about that since. This was a link I used, no longer working:
https://drfrankenstein.co.uk/2020/08/19/minecraft-java-server-in-docker-on-a-synology-nas-including-mods/
Anyhow, still don’t know why 1.18 won’t update!
Check the Java version you are using for the TAG as 1.18 moved up to a newer version. (I have updated the requirements at the top of the guide)
this is so awesome. Thank you so much.
I set the server to restart once a day, should i set version to a set version instead of LATEST to prevent the server from updating without me knowing ?
The version you specify in the Environment Variables will stick the server at that version, the Latest tag just relates to the actual container, for things such as bug fixes or updates.
yes i meant the LATEST tag in the VERSION environment variabeles
Yes, that is correct. I forgot it said latest by default.
Hi – I have “latest” set, however getting an error “Minecraft download page failed” in the log, so stuck at version 1.17 but need to upgrade to 1.18. Any advice on solving this? Thanks..