
Last updated on 28 February 2025
Important or Recent Updates
| Update | Date |
|---|---|
| New guide update for DSM7.2 and Container Manager | 06/05/2023 |
| Moved from UI setup to Project Setup which is more flexible and easier to maintain. | 21/10/2023 |
| Added an addition element to the compose to restrict the container from gaining additional privileges and also umask environment variable | 25/10/2023 |
What is SABnzbd?
SABnzbd is a binary newsreader, it is used to download files from Usenet, and where required will also repair and extract releases. It works on its own or in conjunction with other tools such as Lidarr and Radarr.
Useful external links for this guide
Linuxserver SABnzbd Container GitHub
SABnzbd Forums
SABnzbd Wiki
Let’s Begin
In this guide I will take you through the steps to get Sabnzbd up and running in Container Manager. We will be using the new Projects (Docker Compose) feature to get this running as it will save you time vs manual setup using the normal UI
In order for you to successfully use this guide please complete the three preceding guides
- Docker Package, SSD and Memory Recommendations
- Step 1: Directory Setup Guide
- Step 2: Setting up a restricted Docker user
- Step 3: Setting up a Docker Bridge Network (synobridge)
Folder Setup
Let’s start by getting some folders set up for the containers to use. Open up File Station create the following.
/docker/projects/sabnzbd-compose
/docker/sabnzbd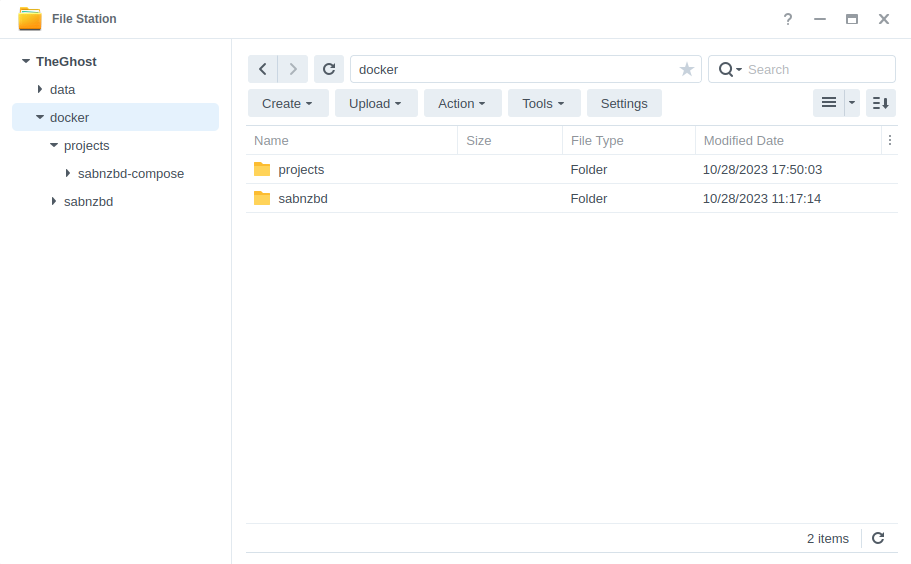
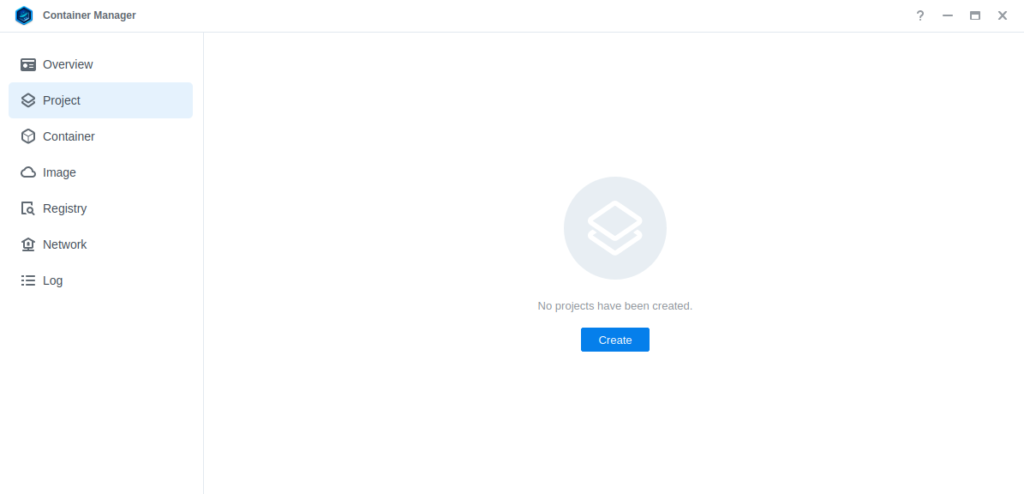
Container Manager
Next we are going to set up a ‘Project’ in Container Manager. Open up Container Manager and click on Project then on the right-hand side click ‘Create’.
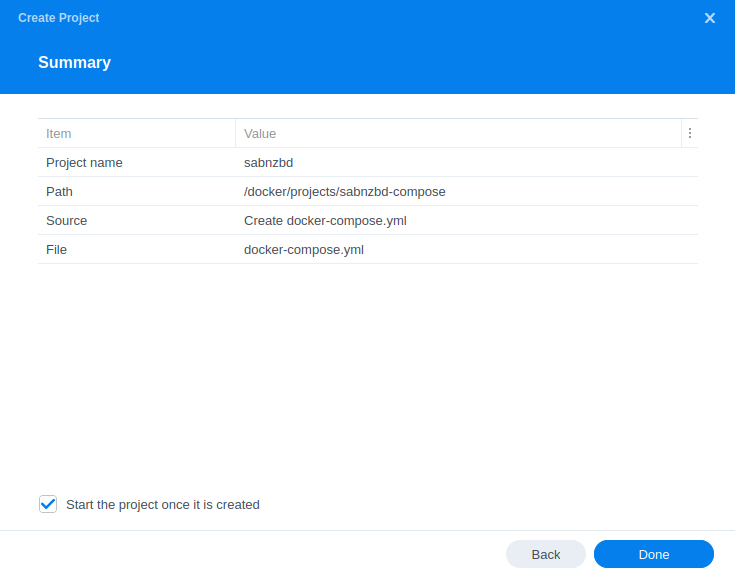
In the next screen we will set up our General Settings, enter the following:
| Section | Setting |
|---|---|
| Project Name: | sabnzbd |
| Path: | /docker/projects/sabnzbd-compose |
| Source: | Create docker-compose.yml |
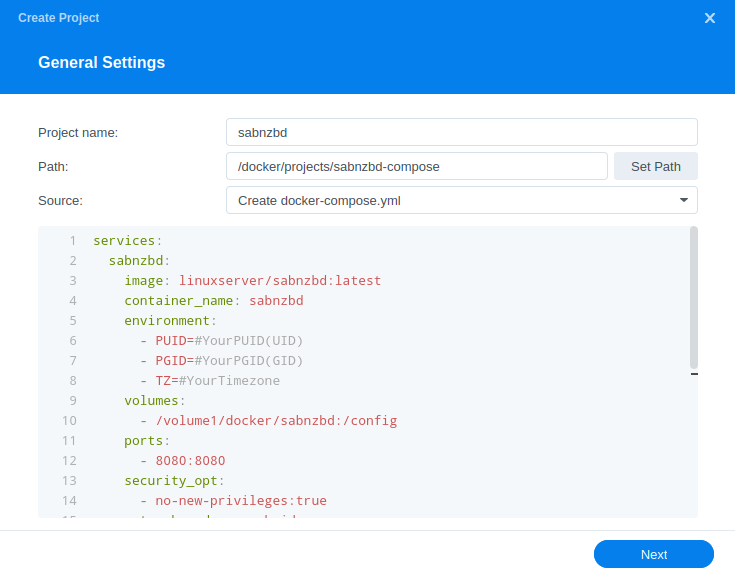
Next we are going to drop in our docker compose configuration, copy all the code in the box below and paste it into line ‘1’ just like the screenshot.
services:
  sabnzbd:
    image: linuxserver/sabnzbd:latest
    container_name: sabnzbd
    environment:
      - PUID=1234 #CHANGE_TO_YOUR_UID
      - PGID=65432 #CHANGE_TO_YOUR_GID
      - TZ=Europe/London #CHANGE_TO_YOUR_TZ
      - UMASK=022
    volumes:
      - /volume1/docker/sabnzbd:/config
      - /volume1/data/usenet:/data/usenet
    ports:
      - 8080:8080/tcp
    network_mode: synobridge
    security_opt:
      - no-new-privileges:true
    restart: always
Environment Variables
We are now going to amend some key variables to make sure the container has access to our folders and also knows where we are in the world. Don’t change any other settings other than those I mention.
| Variable | Value |
|---|---|
| PUID | (required) The UID you obtained in the user setup guide |
| PGID | (required) The GID you obtained in the user setup guide |
| TZ | (required) Your timezone wikipedia.org/wiki/List_of_tz_database_time_zones |
Once you have made the edits you can click ‘Next’
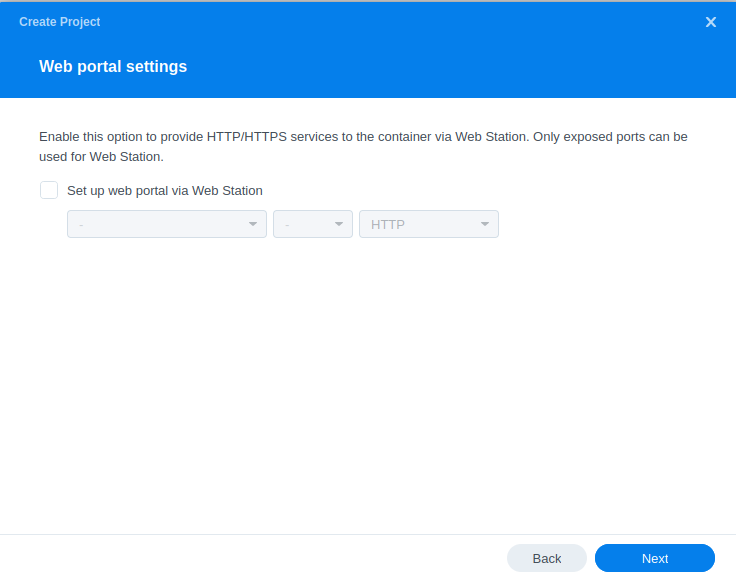
You do not need to enable anything on the ‘Web portal settings’ screen click ‘Next’ again.
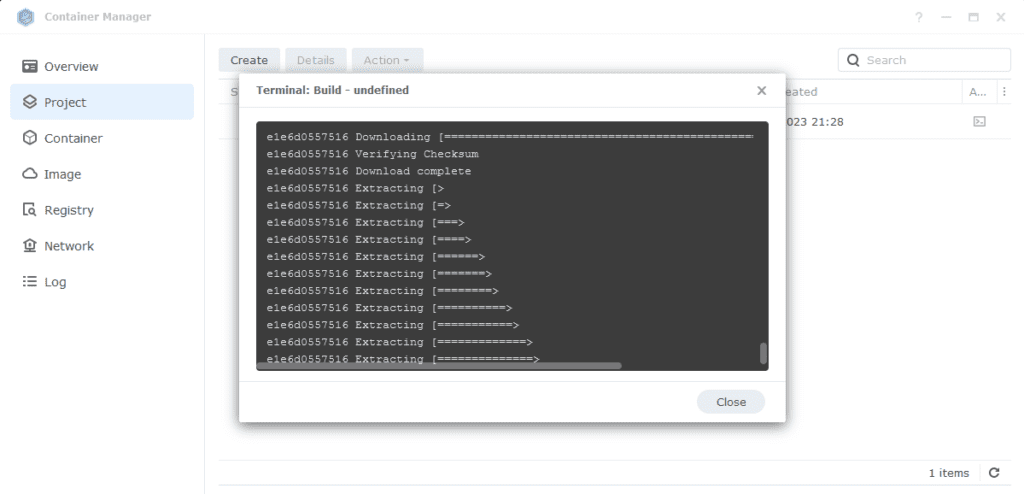
On the final screen click ‘Done’ which will begin the download of the container images and once downloaded they will be launched!
The image will now be downloaded and extracted. You should see ‘Code 0’ when it has finished.
Firewall Exceptions
(Skip if you don’t have the Firewall configured)
If you have the Synology Firewall enabled please see this additional guide for further info on exceptions and correct set up.
Some final steps
SABnzbd will now be running on port 8080 you can connect to it by going to the IP address of your NAS with that port
e.g. 192.168.0.40:8080
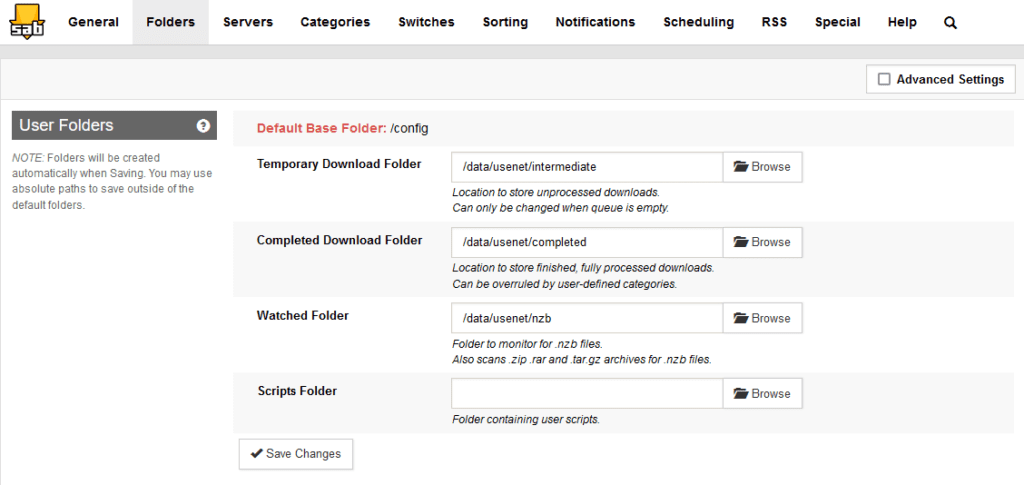
Once you have completed the setup wizard, go into the settings and amend your folders to the following
| Setting | Path |
|---|---|
| Temporary Download Folder | /data/usenet/intermediate |
| Completed Download Folder | /data/usenet/completed |
| Watched Folder | /data/usenet/nzb |
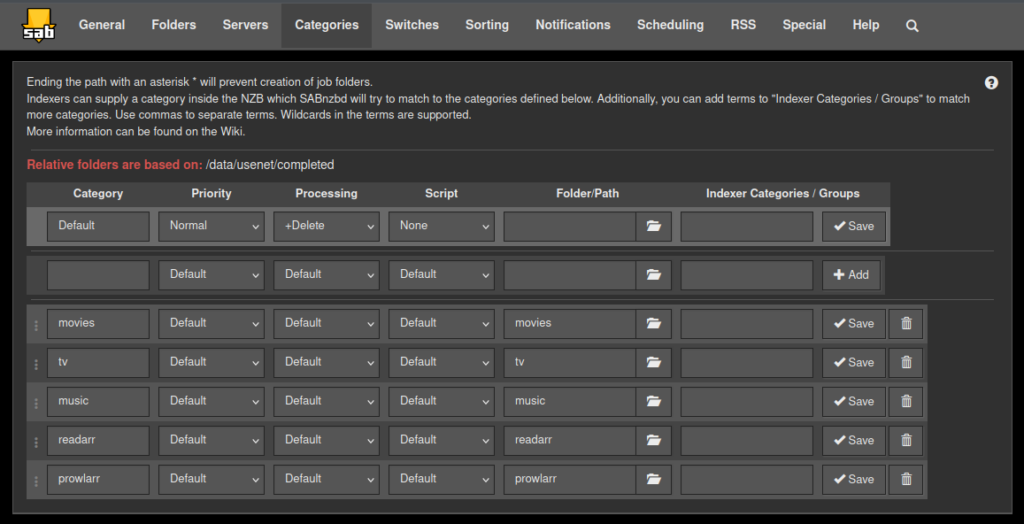
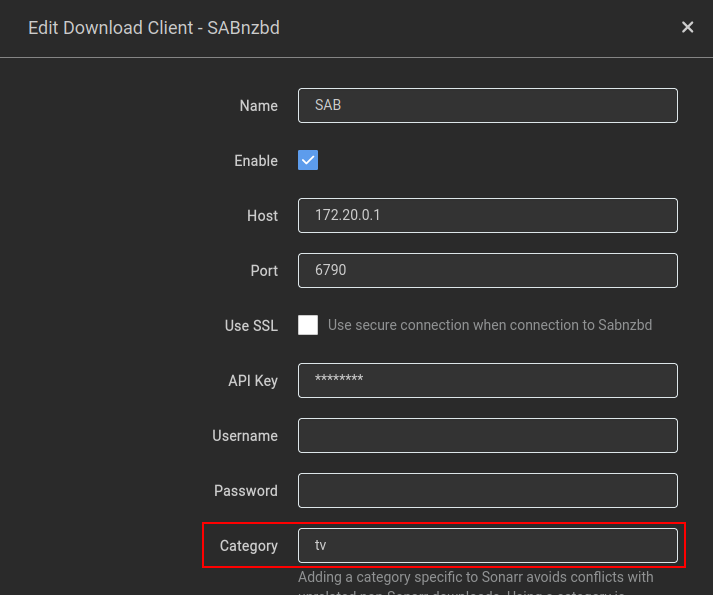
If you are using SABnzbd for your download client in the Arrs you will want to add some categories and paths as shown below. When adding SABnzbd to each of the Arrs match up the category in the download client settings, like the example below in Sonarr.
Categories will look like below, note that the path is purely the name of the folder with no other information, you will need to create each of the category folders in your usenet completed folder manually.
You are now configured to get downloads working, there are quite a few options in the configuration sections of the app that can both improve and hinder performance. These really depend on the capability of your NAS so keep this in mind.
Looking for some help, join our Discord community
If you are struggling with any steps in the guides or looking to branch out into other containers join our Discord community!

Buy me a beverage!
If you have found my site useful please consider pinging me a tip as it helps cover the cost of running things or just lets me stay hydrated. Plus 10% goes to the devs of the apps I do guides for every year.


For some reason when I try to assign the folders I am getting the following error message: download_dir directory: /data/usenet/intermediate error accessing
It seems like it is probably a permission issue but from what I can tell based on your setup guides it looks like it should have appropriate permissions.
Hey – have a read through the Permissions Issues section in the left menu near the top it should get you sorted.
These guides really are incredible, thank you very much. I’ve followed everything pretty much exactly for my DS423+ but there are a couple questions I was hoping I could get your insight on.
1. I’ve been working on optimizing my SABnzbd download speeds and one of the recommendations I’ve seen seems to suggest that the folders configured in SABnzbd should live on an NVME, as opposed to the main storage volume that Plex accesses. I think what I’ve understood is that having SABnzbd download to one folder in the storage volume and then move it to another folder in the same volume isn’t great for the disk and could hurt download speeds, but maybe I’m misunderstanding? Do you have any thoughts on whether downloading to the NVME and then moving to the storage volume is more optimal for speeds and/or disk health?
2. It’s not super clear to me how to add Prowlarr to Gluetun. Would I simply add something like “- 9696:9696” under ports? Or “NASIP:9696” to FIREWALL_OUTBOUND_SUBNETS? Both?
Hey DP
1) – It depends, with 4 disks you may find that your throughput is sufficient depending on your Internet speed, however with a lot of people moving to gigabit and up this does become an issue and where an SSD in the mix helps. The key part is the Intermediate folder as this receives the 10000s of tiny writes, so having this folder on a faster drive will help massively, however putting this on your NVMEs will chew through their lifespan very quickly and in RAID1 (SHR) you are killing both drives at the same rate. While my 1821 can easily soak up writes across drives I have been using a cheap crappy 480GB drive on esata for this purpose, You could grab an inexpensive 1TB SATA drive and small USB3 caddy and download to that.. It should be able to keep up speed wise, look for one with a decent size SLC cache (https://ssd-tester.com/sata_ssd_test.php) – It’s easy to mount it to the container. I am moving to Gigabit in just under a months time, so I can actually do some real world testing at that point!
2) Have a look at the separate guide on the side menu, it steps you through what to add where.
https://drfrankenstein.co.uk/prowlarr-and-flaresolverr-via-gluetun-in-container-manager-on-a-synology-nas/
Of course there’s already a guide, thank you! Will you be posting your learnings once you get gigabit? Would love to stay tuned in to that so i can mirror any new recommendations.
Yeah should be interesting to see if I see any bottlenecks across drives, will likely chat about it over on Discord as a few people are already beyond those speeds!
I would really love a branch of this instruction: install sabnzbdvpn in a Synology container. The extra vpn security would add some extra 🙂
Hey
You could layer this into the GlueTUN configuration, its not really needed for Usenet though. Basically set up GlueTUN and then add the ports for SAB to its config and set SAB network mode..quick example below…
https://paste.drfrankenstein.co.uk/?002fd5bfa1f01cc7#HMj1HM9m99XWC9urKFc8pWbXGyciUY72tW3c3MvE6rSP
Hi thanks for these guides! I followed the Initial Setup guides and this one to the letter on my DS923+, but when I try to get to 8080, my browser says it “can’t make a secure connection”.
Container manager indicates that the container is running, so why can’t I get in there?
Sorry I’m very new to this. Thanks!
It sounds like you are using https:// if its saying it can’t make a secure connection, just use plain http://
I have started with a complete re-do of my 920+. I removed drives and replaced with larger sizes. Replaced DSM 6.2.2 to latest 7.2.2.x. Created all new acct, etc. I just wanted a fresh start. Started following your guides in order and his a snag on installing sabnzbd. I completed the setup wizard, and amending the folders. First it wont let me type in the folders you listed for temp, completed, watched folders. They are prefilled with Downloads/incomplete, Downloads/complete etc. I click on the browse button and navigate to the data folder > usenet. Thats as far as I can go. It seems the folders lower dont seem to exist. I verified the folders completed, intermediate, etc are there in File station. I am wondering though in your guide, step 1, where it says to create the folders, are these regular folders or shared folders and would that cause my issue of not seeing them in sabnzbd?
Hey – so it sounds like the /data folder needs a permissions fix. See the left menu in the Initial Setup section for guidance on what to do, this will sort it for you.