Last updated on 31 December 2024
Important or Recent Updates
| History Updates | Date |
|---|---|
| New guide for Container Manager | 25/04/2023 |
The new Container Manager makes updating container images super easy, it can all be done via the UI and no need to SSH into your NAS for updating Docker Compose projects!
Let’s Begin
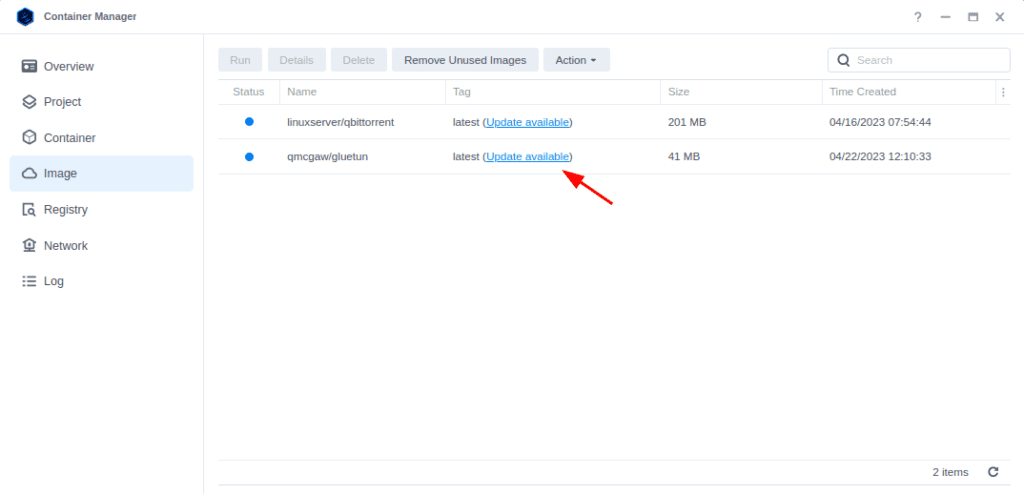
Head over to the Image tab in Container Manager, in the list of images you will see updates next to the ‘Tag’ field.
You will only be notified of updates for images that you have selected a general tag, such as Latest or Nightly, if you have a specific version number it will remain as is. It is also worth noting that images from GitHub or other sources outside of hub.docker.com will not receive update notices.

Click on the ‘Update available’ button next to the images you want to update, then the screen below will appear, click the Update button.

Then confirm the Update and you will see the image download in the main list.

Container Manager will automatically stop and update your running containers.
Sometimes you may find the container doesn’t get reset correctly with the new image. If this is the case take the extra couple of steps. Stop the container you are updating, then from the top menu click Action > Reset.
Your container will now be running the latest image.
Extra step for Containers part of a Project
If you update a container within a Project it can cause the overall project to fail if that container relies on another. For example updating Gluetun will break the network connection for containers running through it.
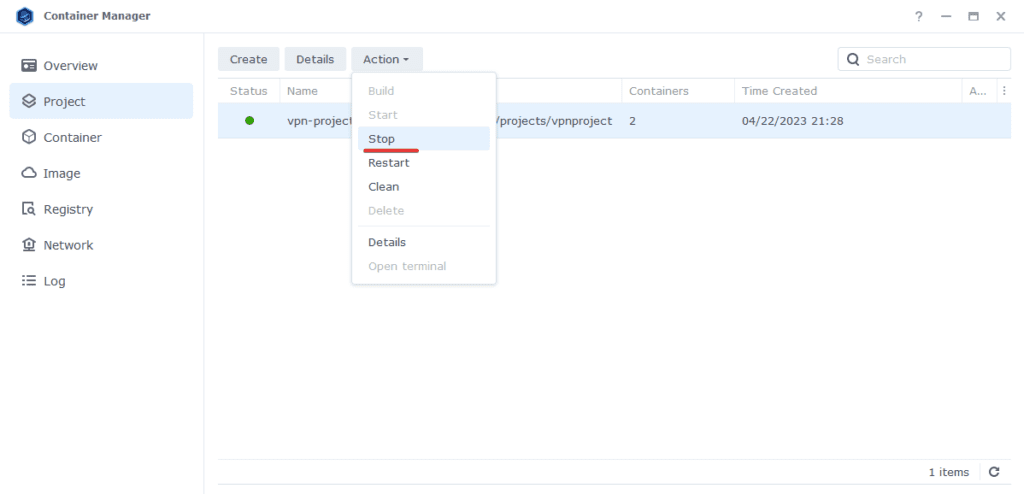
Go to the Project tab and select the project you wish to rebuild, then from the Action menu press Stop.

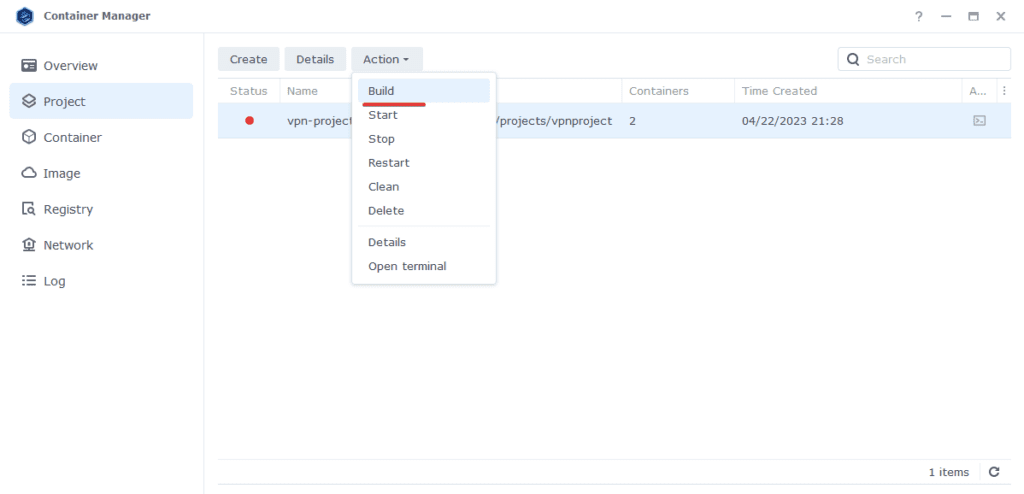
Next click the Action Menu again but this time select build – This will remove the containers and then rebuild them with the updated images.

That’s it, going forward you can easily update containers using this method.
Looking for some help, join our Discord community
If you are struggling with any steps in the guides or looking to branch out into other containers join our Discord community!
Buy me a beverage!
If you have found my site useful please consider pinging me a tip as it helps cover the cost of running things or just lets me stay hydrated. Plus 10% goes to the devs of the apps I do guides for every year.


I built the media management project from your other guide and everything was going great, but I noticed that a number of the containers like radarr, overseerr, and others have been duplicated on the “image” tab. The instances with a blue bubble which means “in use” have a tag of none, and are running outdated software. The ones with the tag of “latest” are not “in use”. Whats the right way to get these containers restored with the “latest” tag
Hey very strange – try stopping the Media project and see if it lets you remove the non tagged images from the image tab. Double check the project does have the latest tag on the images as well. This must be a bug.
If it doesn’t let you delete the images you may have to delete the project then delete the images, then set the project back up – it should have the compose already saved ready to go in the projects folder.
I noticed that my containers have lost their ‘latest’ tags and aren’t updating. I exported my container config and saw that the ‘latest’ tag is in there. My Projects are unaffected. I can’t find the page in Container Manager that allows you to change the container configuration. How can I fix the tags so my images update?
Hi Spinach
Are these containers you have built outside of the Project interface, if so you would of selected the image when initially setting them up. They should appear just like other images in the Image section of container manager. You may need to export the config, delete the existing image in the list of images and when re-importing it should pull the latest version of the image…
Hi, I’ve been having a strange behavior in container manager for a while now. When I stop a container and update the image, an image with the tag is created and the image with the tag is downloaded, when I restart the container it uses the image with the tag . To fix this I have to stop the project and rebuild it, this way it uses the image with the tag and I’m free to delete the one with the tag . In the past this didn’t happen but everything happened automatically when I updated an image. Would you be so kind as to help me?
Hey Shark79 I spotted you sent me a Friend request on Discord – Jump into the main server and it can be easier to chat through than via the comments..
Let me test as well in case as I know some behavior has changed in the latest container manager update.
I can’t deliver your messages on discord
You need to join the Server where everyone else is located 🙂
https://discordapp.com/channels/861680221530095616/861680221530095619
Hi, i just found your site few days ago, so maybe you will be able to help me?
I have a weird bug with Container Manager where everytime i start a Project, it’s container does not start. It happens for a new project or after i update the image tag. Starting the Container shows a popup stating the container started, followed immediately by another popup about the container stopping unexpectedly.
The only way i found to fix this is to go to the Container, not Projects, and to do a Reset on the container. Starting it afterwards works 100%. I have no idea why, i did follow your guide on seting up the /docker/data and /docker/projects forlders, and this only happens for containers with volumes. I tried setting the user and group in the Project, and also without it, and in all cases, there is no difference.
The container never even starts long enough to post a single log line in it’s own logs.
After the Reset on the container – it all just works.
I would love to understand why this is happening and if i am doing something wrong.
Very odd I have never seen this and no one has mentioned on Discord either. Maybe there is some kind of issue with the Package itself. Have you updated to the latest version that came out very recently?