Last updated on 6 April 2025
Please note if you are using DSM7.2 or higher you should use the Container Manager version of this guide from the menu.
This guide has reached the end of its updates as most people are now on the latest DSM update - This guide is correct as of 08/12/2023 however no further updates will be added.
| Update | Date |
|---|---|
| Adjusted the Reverse Proxy for WebSockets | 28/08/2023 |
What is Vaultwarden/Bitwarden?
Vaultwarden is a rewrite of the official Bitwarden server using the Rust language, it was created to reduce the need for the number of containers required for the official server.
It is compatible with all the official Bitwarden apps and Browser extensions. It is a great way to self-host a password manager it gives you complete control over your passwords and allows you to have automatic syncing across web, desktop and mobile apps.
Let’s Begin
This guide contains three parts:
- Part 1 — Setting up the container via the DSM GUI
- Part 2 — Setting up DDNS, Reverse Proxy and SSL
- Part 3 — Setting up the Bitwarden Clients
Before we start head over to the short guide below to set up a Bridge Network
Part 1 — Container Set up (DSM GUI)
Downloading the Vaultwarden Image
Open up Docker within DSM and navigate to the ‘Registry’ section and search for ‘vaultwarden’ in the search box and download the ‘vaultwarden/server’ version
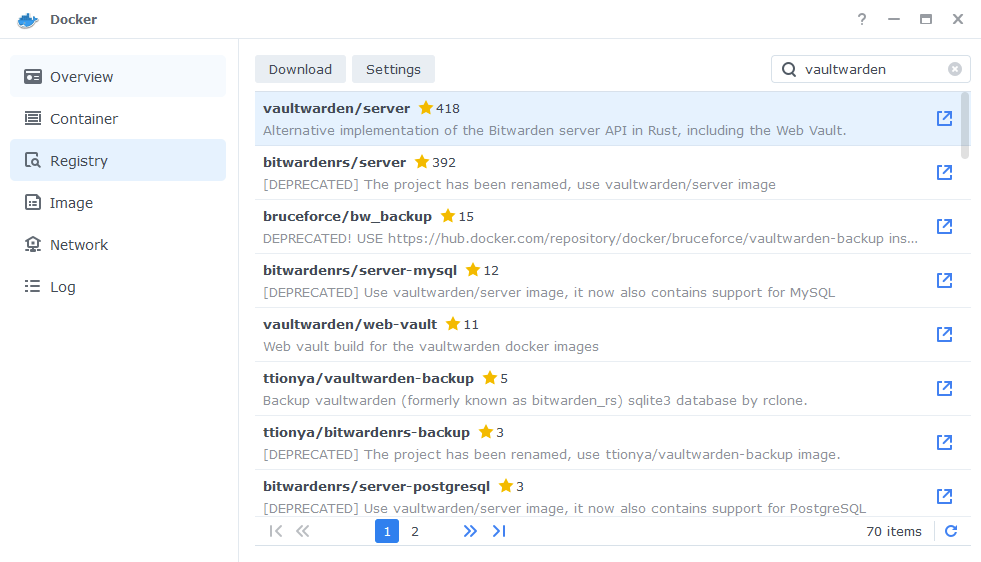
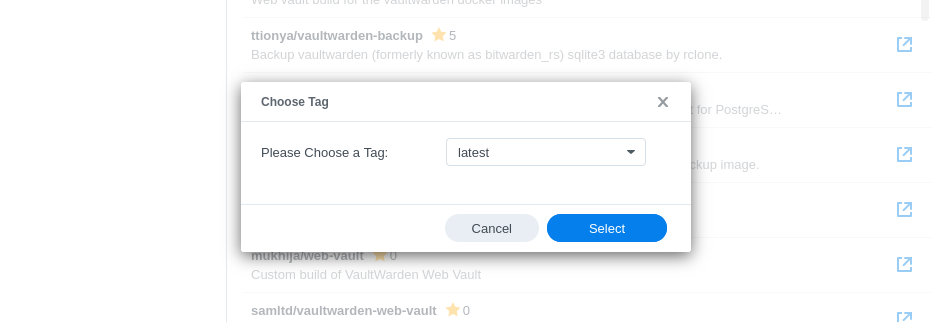
The pop-up box will ask which version you want to download, make sure you choose ‘Latest’ from the list of available versions.
You can check the status of the download over on the ‘Image’ tab.
Setting up the container
In Docker click on the ‘Image’ tab, in the list of your containers select the ‘vaultwarden/server’ image and click on ‘Launch’
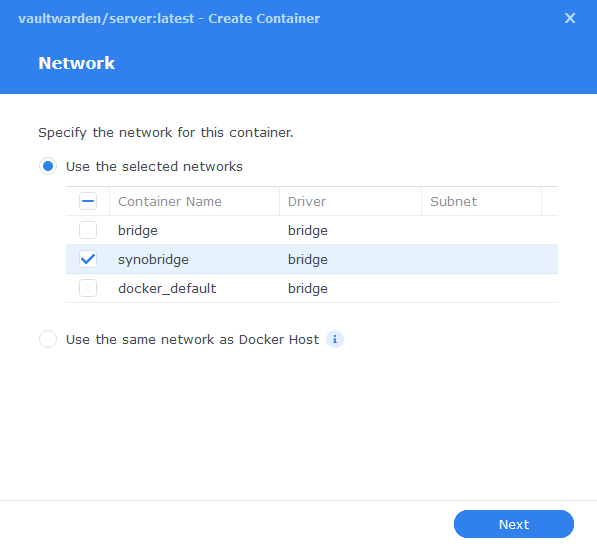
You will be greeted with the Network screen, we will be using the ‘synobridge’ network we created earlier select it from the list and click Next.
General Settings
Next you will be greeted with the General Settings screen, this is where you can start specifying some of your preferences.
You can change the name of the container to anything you like, and you may want to enable Auto Restart as this will ensure the container starts automatically if you reboot your NAS.
You will also notice a Configure capabilities button — don’t change anything in here!
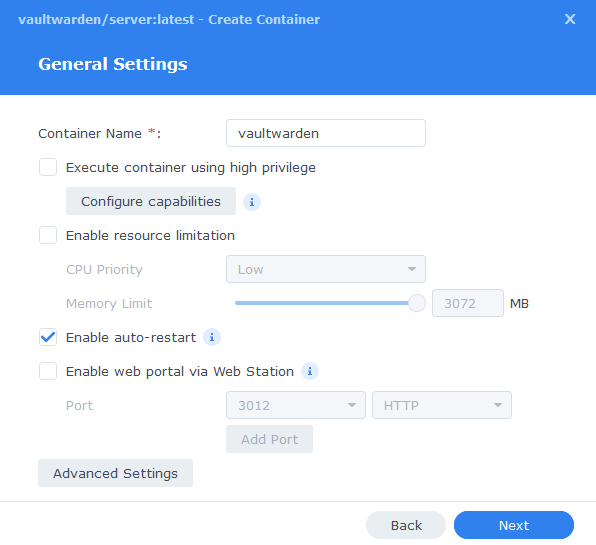
Next up we are going to click on the ‘Advanced Settings’ button, this will take you to a new window with a number of tabs which we are going to work through.
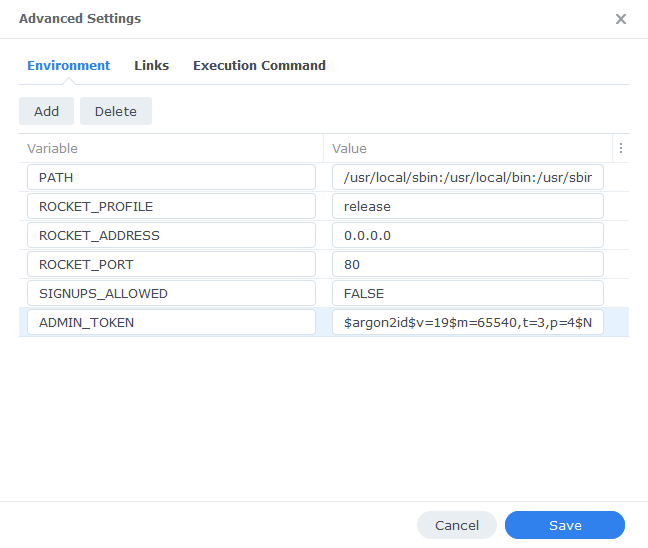
Environment
We need to add two additional variables, the first disables any random person signing up for an account on your personal hosted version, the second enables the Admin panel which allows you to invite users.
Argon2 Hashing
As of version 1.28 of Vaultwarden it is recommended to create an Argon2 hashed admin token rather than using a plaintext one. We will be doing this via the Argon2 Hash Generator online if you wish to do this via SSH follow the instructions here.
Go to https://argon2.online/ and enter the following variables into the form and then press ‘Generate Hash’.
| Option | Variable to Select or Enter |
|---|---|
| Plain Text Input | Enter either a long string of characters or a secure long ‘password’ aka token, you will use this to log in to your admin panel, so it needs to be secure, and you must remember it! |
| Salt | Press the Cog it will generate a random string of characters |
| Parallelism Factor | 4 |
| Memory Cost | 65540 |
| Iterations | 3 |
| Hash Length | 64 |
| Three Argon Versions | Select Argon2id |
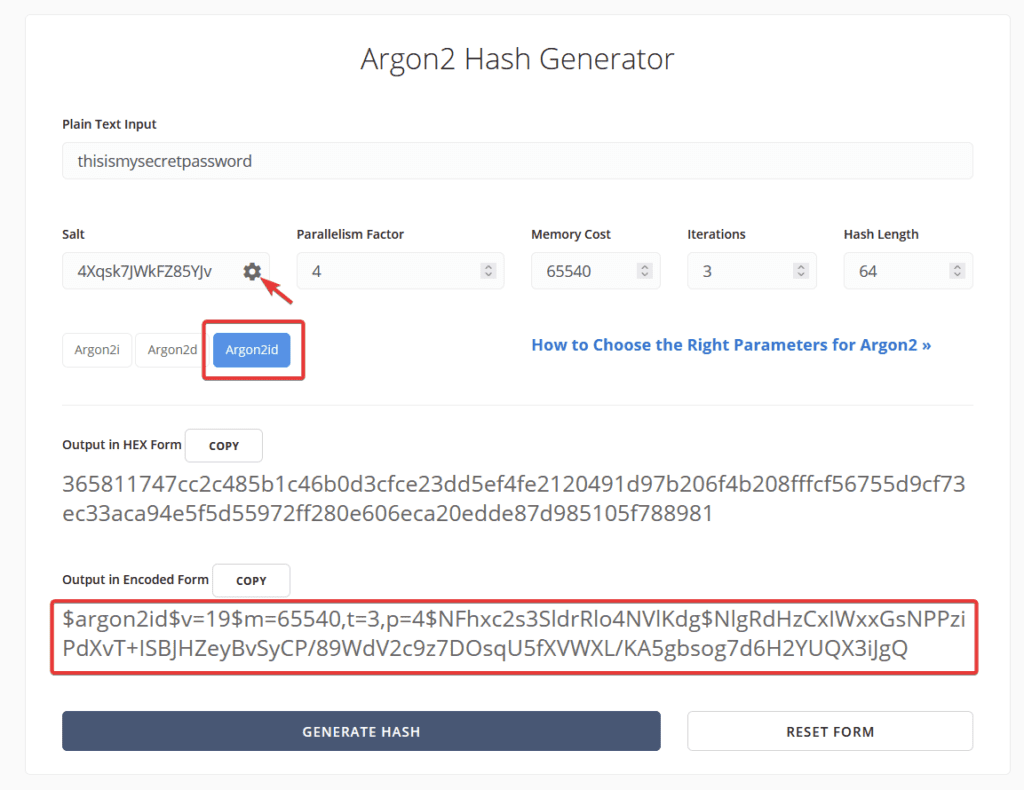
As you can see above we have generated our hash.
We can now enter the amended hash into our Environment section.
| Variable | Value |
|---|---|
| SIGNUPS_ALLOWED | FALSE |
| ADMIN_TOKEN | Your hashed admin token from above |
Links / Execution Command
You do not need to set up anything on these tabs.
Press ‘Save’ to go back to the initial setup screen, then press ‘Next’
Port Settings
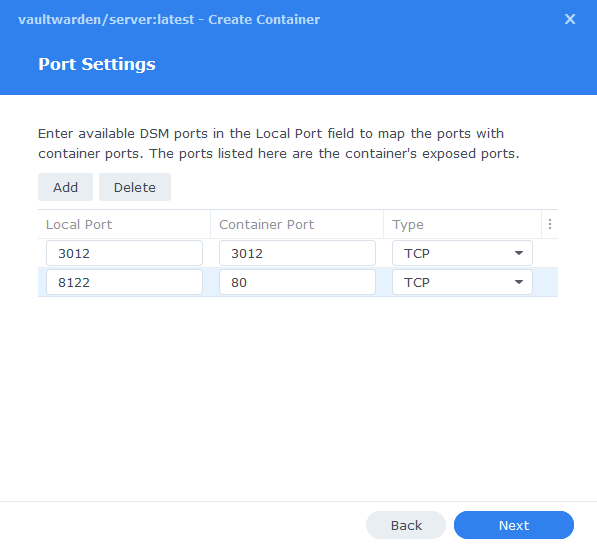
As Vaultwarden uses port 80 for its web interface by default we need to change this to ensure we don’t have any conflicts with DSM’s web functions.
You will see the Container Port section prefilled you must not change these ports. Change the ‘Local ports’ from ‘Auto’ to the values below.
| Local Port | Container Port | Type |
|---|---|---|
| 3012 | 3012 | TCP |
| 8122 | 80 | TCP |
Volume Settings
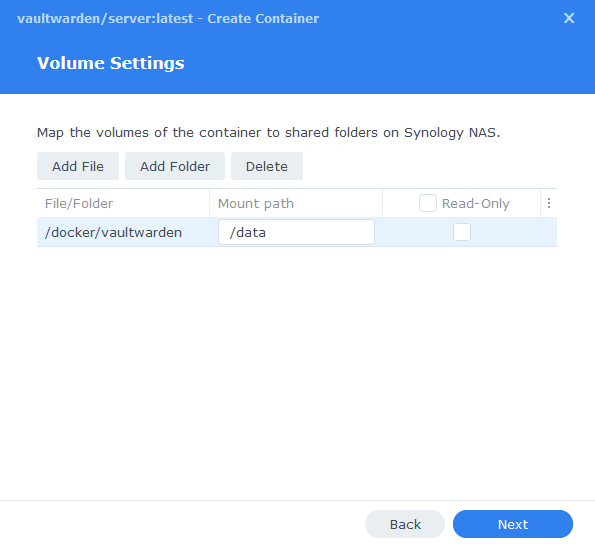
We will now be specifying the directories where Vaultwarden will store its configuration files and database.
Click on Add Folder, click on the ‘docker’ share and create a new sub-folder called ‘vaultwarden’ click on this folder and click ‘select’
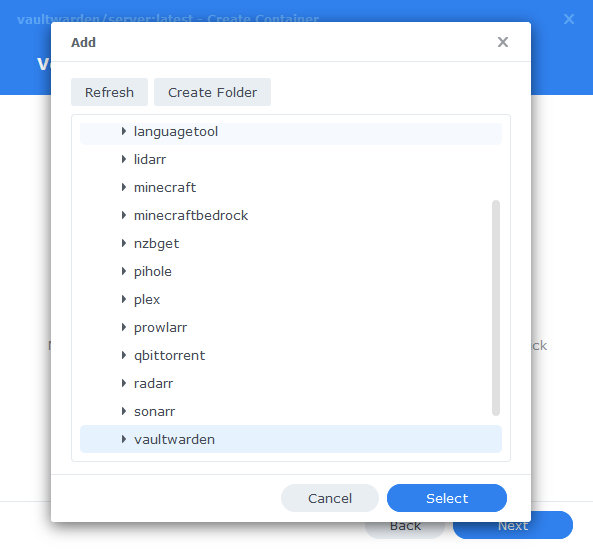
In the Mount path section for this folder enter ‘/data’ it should now look like the screenshot below, click next.
Summary
You have now completed the setup of the container.
You will be shown an overall summary of the settings we have specified, this is a good time to double-check everything is correct. Finally, click on Done and the container should start to boot.
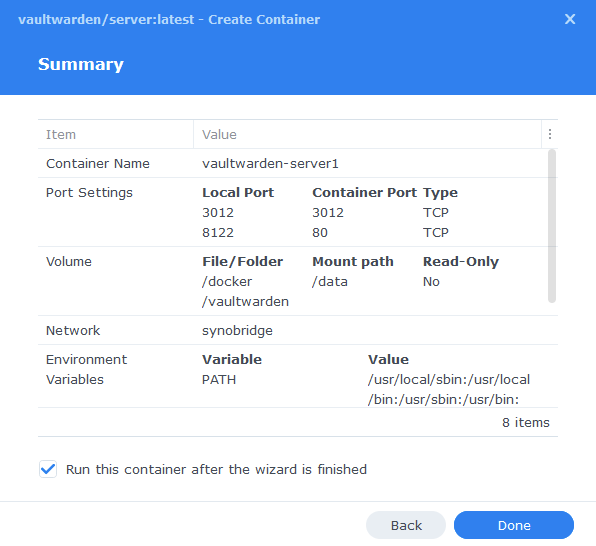
You should now be able to access the web interface via the IP of your NAS followed by the port 8122
e.g 192.168.0.40:8122
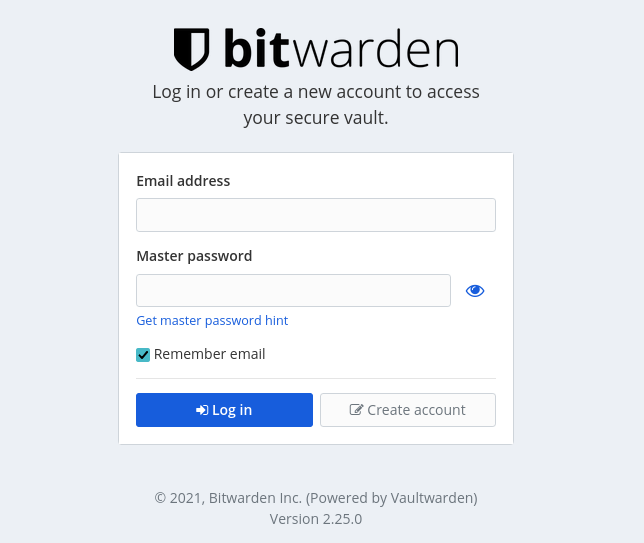
You will not be able to register an account yet, as you must have a valid SSL certificate in place.
External Access
You have some choices when it comes to making your new container accessible from outside your home network, these come with different levels of security and convenience. This mini section is generic but covers the basics of getting this guide up and running and is entirely optional.
- Synology’s DDNS (Dynamic Domain Name System) with a TLS Certificate and Reverse Proxy
This is useful if you have some family members or friends that need access to something like Overseerr or Jellyseer and is covered below. - Tailscale or Wireguard VPN
If just you are accessing these services, and you don’t want to expose them to the internet this would be the more secure choice. See my other separate guides. - Cloudflare Tunnels
I don’t currently use these, so I would recommend watching the Wundertech guide on how they work.
A note on Double NAT or CGNAT
Unfortunately more ISPs are moving to these methods of address allocation as the IPv4 address space is getting low on available addresses. If your ISP is doing this your choices are more limited.
You can test if this is the case by checking the WAN IP on your Router/Modem settings and then comparing it to the one shown on portchecker.co. If they are different you are likely Double NAT and will either need to see if you can pay your ISP for a standard IPv4 address or use Tailscale or Cloudflare Tunnels for access.
Using the built-in tools on DSM
The first step of this process is to forward port 443 on your Router to your NAS IP Address, how you do this will depend on your router model, so please refer to its manual.
Router (External):443 > NASIP (Internal):443
Next make sure you have registered for a Synology Account as we are going to be using their DDNS service. https://account.synology.com/en-uk/register/ If you already have this set up move to the next step.
DDNS (Dynamic Domain Name System)
A DDNS address allows you to get external access to your container via an address provided by Synology, this is useful on home internet connections where your ISP will change your IP address on a semi-regular basis.
In the DSM Control panel go to ‘External Access’ and then to the ‘DDNS’ tab
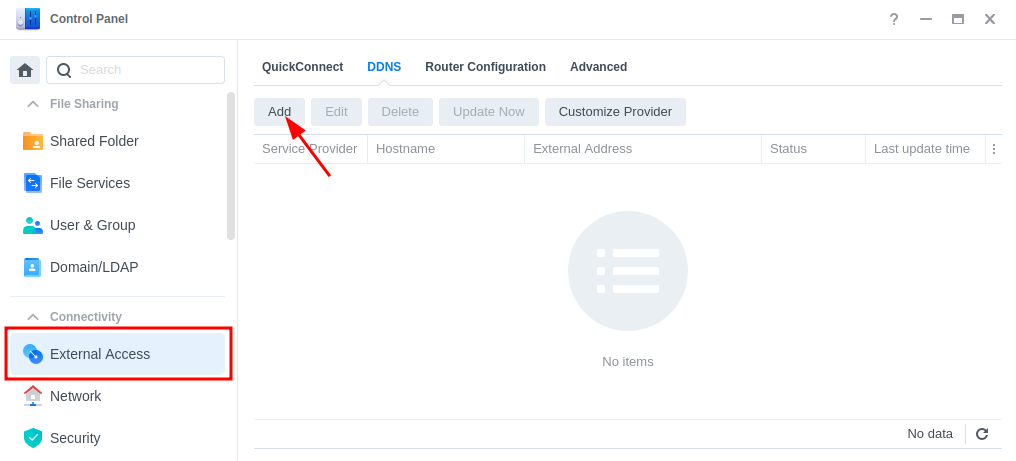
Click on ‘Add’, then fill out the following sections.
| Section | Value |
|---|---|
| Service Provider | Synology |
| Hostname | This will be the unique address just for you so keep the name generic. minecraft.synology.me = BAD myawesomenas.synology,me =GOOD |
| Email: | Log into your Synology account |
| External Address (IPv4) | This should be filled in automatically |
| External Address (IPv6) | This should be filled in automatically if your ISP is using IPv6 |
| Get a Cert from Let’s Encrypt | Tick this box |
| Enable Heartbeat | Tick this box |
Now press OK, DSM will apply your settings. It can take a few moments to set up and the DSM interface will refresh. You will likely receive a certificate error which you will need to accept to get back into DSM.
Reverse Proxy
We are going to set up a reverse proxy subdomain for the address you just register. This means you and your users can access the container without using a port number as it will route all traffic through the secure 443 port.
Go back into the Control Panel and access the ‘Login Portal’ then in the ‘Advanced’ tab click ‘Reverse Proxy’ and then click on ‘Create’.
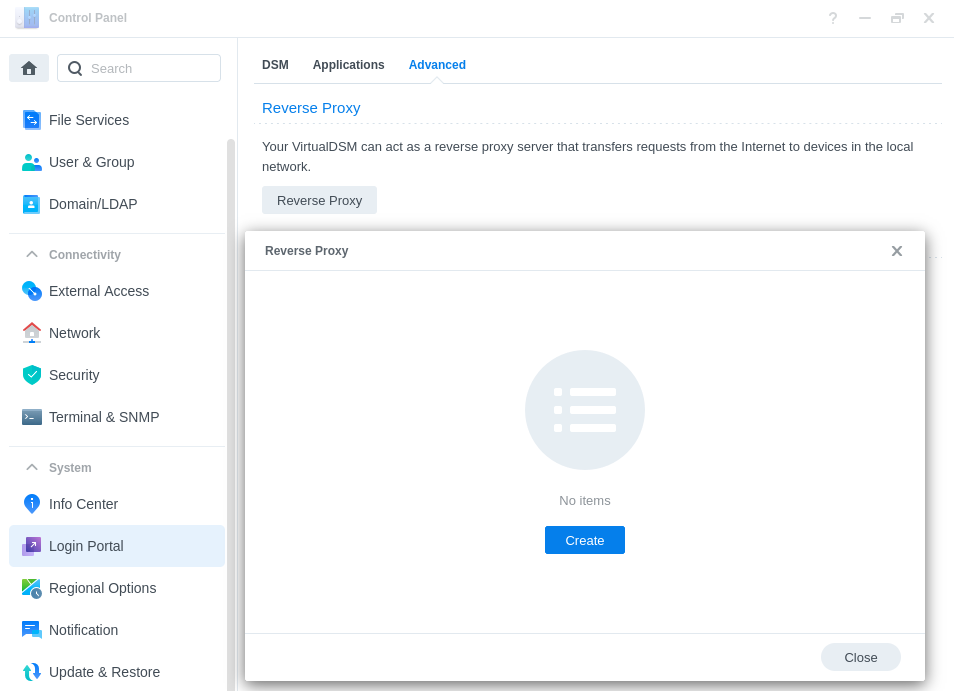
We are now going to enter some rules, so when you or your users access the URL specified the request will automatically be sent to the containers web UI.
Use the settings below, you will need to amend the Hostname sections in line with the hostname you registered earlier, and the IP of your NAS.
| Setting | Value |
|---|---|
| Reverse Proxy Name: | Give it a meaningful name in line with the container you are setting up. |
| Protocol: | HTTPS |
| Hostname: | containername.xxx.synology.me ‘containername‘ will be the name you want to use to access this container ‘.xxx.synology.me‘ will be the exact name you registered earlier |
| Port: | 443 |
| Protocol: | HTTP |
| Hostname: | ‘localhost’ or your NAS IP address |
| Port: | The UI Port Number from the yaml in the guide you are following |
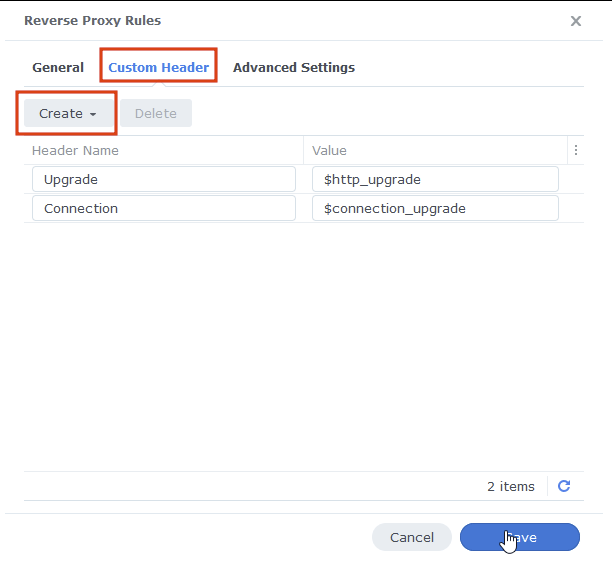
On the second tab ‘Custom Header’ click on Create then WebSocket, this will add two entries for WebSockets to function correctly, you can now press save.
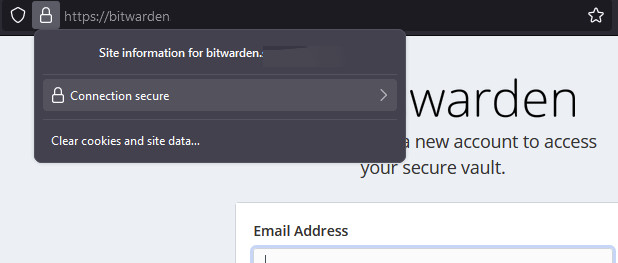
You should now be able to access the web UI of the container by going to the address you just set up in the reverse proxy, it will be a secure connection, and you should have no certificate errors.
You should now be able to access the Bitwarden (Vaultwarden) web UI by going to https://bitwarden.yourhostname it will be a secure connection, and you should have no SSL errors.
Setting up the Admin Settings
As we disabled sign-ups via the main log in screen you will need to invite yourself and any other users from the admin panel.
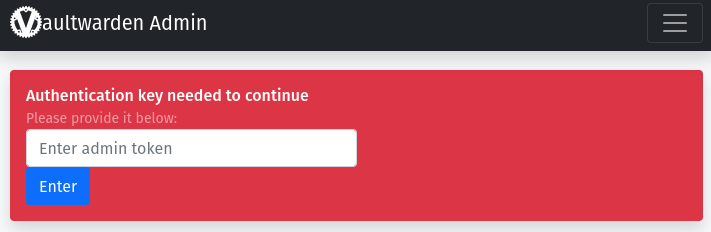
Go to bitwarden.yourhostname.me/admin
Enter the admin token which is the string of text or ‘password’ you used to create the Argon2 token (you don’t use the actual Argon2 string).
We need to change a few options to enable user sign up emails. (Please note that you will not be able to use Gmail SMTP in this step as they have disabled ‘unsecure’ 3rd party application login. Also, if you plan on using Yahoo you will need to set up an app specific password – as shown in this guide)
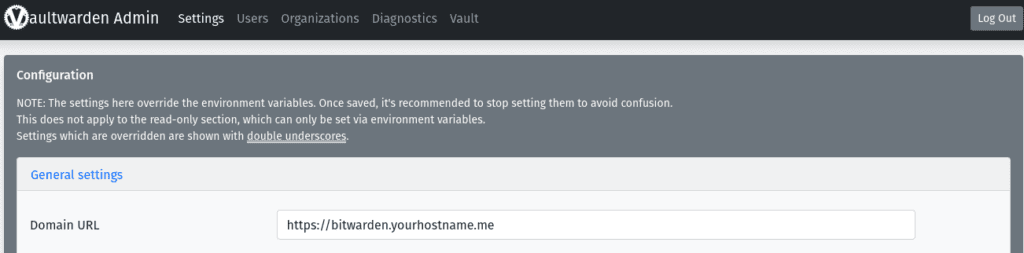
In General Settings. Amend the Domain URL to your own.
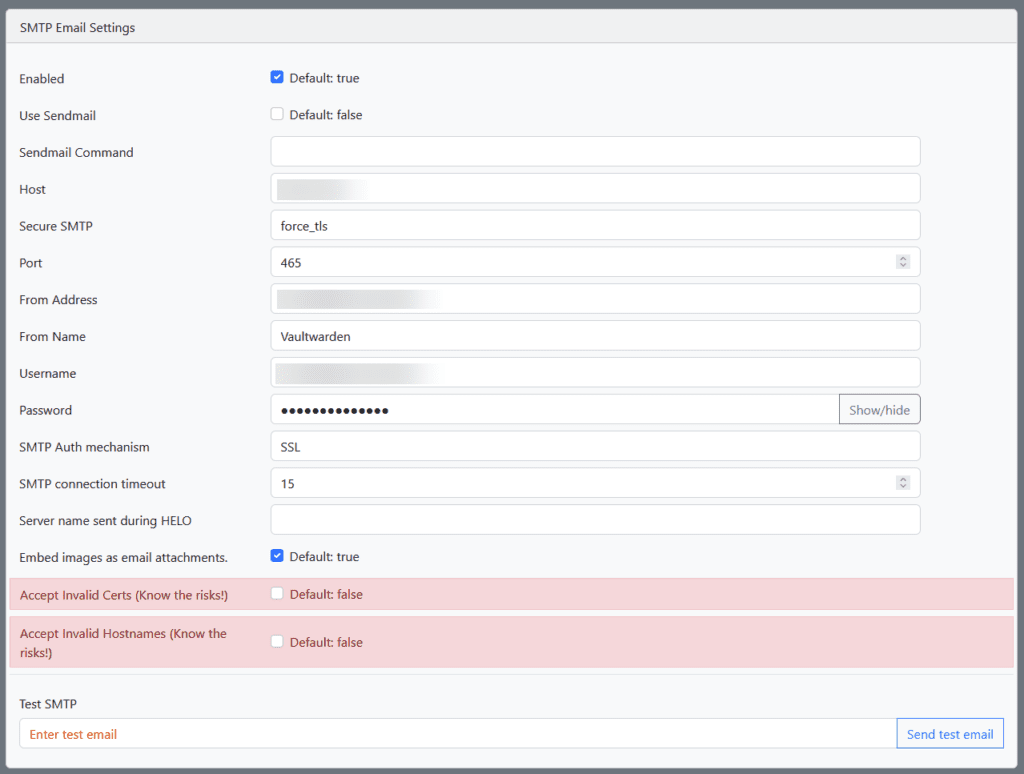
Next you will need to amend your own email settings in the SMTP Email Settings section.
This will need to be in line with your email provider, once you have entered the details click Save at the bottom of the screen, you can then send a test email to yourself to ensure its working.
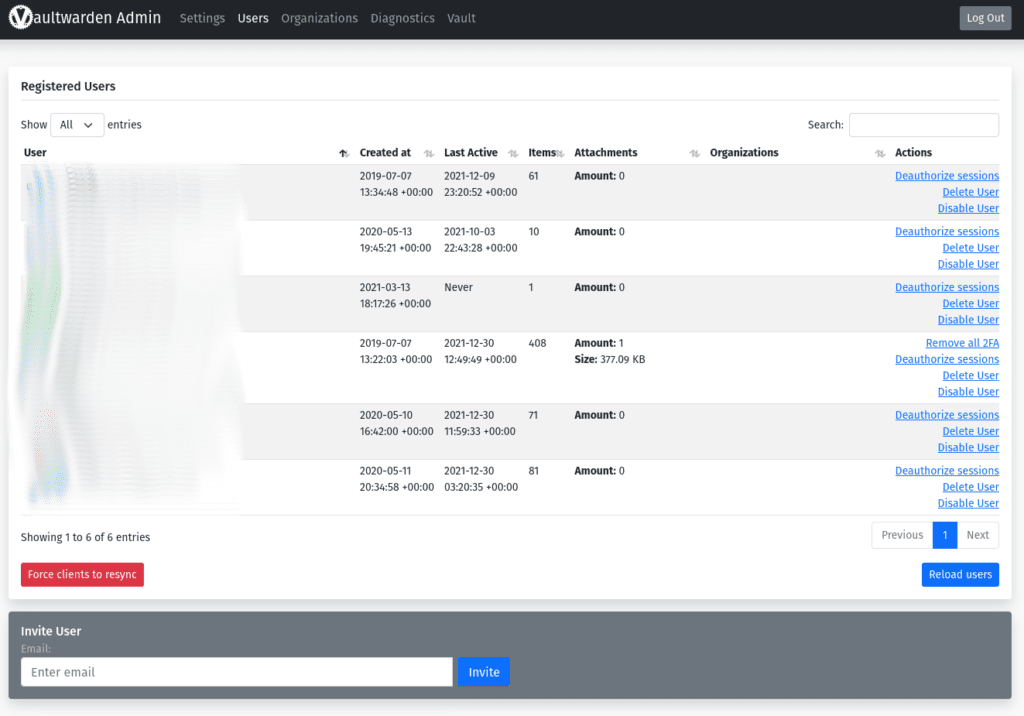
The final step will be to send yourself an invitation email via the Users’ panel at the top of the page. This allows you to create an account by clicking the link in the email.
You have now successfully set up Vaultwarden.
Part 3 — Setting Up the Bitwarden Clients.
Now you have set up Vaultwarden you can use the various Mobile, Desktop or Browser Add-ons.
It’s very easy to point these to your personal self-hosted version. In the main login screen click the ‘Logging in on:’ and select ‘Self-hosted’
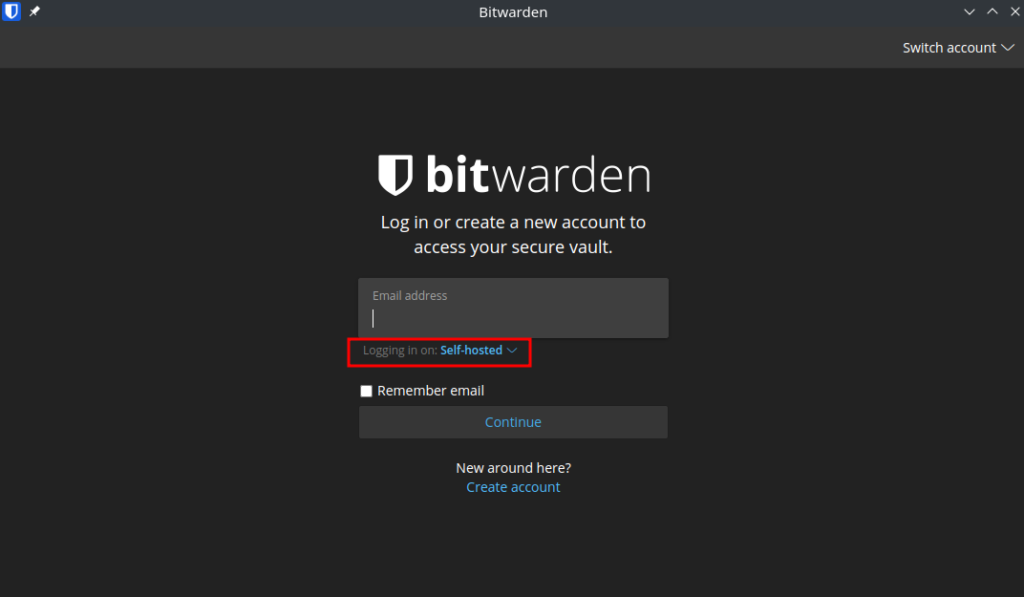
In the pop-up screen enter your full address for the server e.g. https://vaultwarden.xyz.synology.me

You have now completed the guide.
FAQ
Q) I am receiving the notice “You are using a plain text ADMIN_TOKEN which is insecure.”
A) A recent update changed the Admin Token used to access the admin panel to make it more secure. You can follow the next steps to migrate over.
- Follow the section of the guide to create the Argon2 token, you can use the existing ‘password’ aka admin token for this as it will still be used for the actual admin login screen, Important: when you get to the part that asks you to add the additional $ into the token skip that and come back here.
- Stop the Project and then edit the yaml and completely remove the existing
ADMIN_TOKENvariable. - Start the container again and login to the admin panel with your usual admin password. Scroll down to the bottom of the General Settings section and paste your Argon2 hash into the
Admin token/Argon2 PHCoption and save the settings. - Restart the project again, and you will now be using the new hash and can log in with your usual password
Looking for some help, join our Discord community
If you are struggling with any steps in the guides or looking to branch out into other containers join our Discord community!

Buy me a beverage!
If you have found my site useful please consider pinging me a tip as it helps cover the cost of running things or just lets me stay hydrated. Plus 10% goes to the devs of the apps I do guides for every year.


| Historic Updates | Date |
|---|---|
| New guide Published | 29/12/2021 |
| Updated with Admin Panel Options | 30/12/2021 |
| Changed the port number from 8112 to 8122 so it doesn’t conflict with Deluge | 01/01/2021 |
| Updated screenshots and steps for DSM7.1 | 17/06/2022 |
| Added new port settings and Docker Bridge Network | 23/07/2022 |
| Note added about not using gmail/google/ email for setup and a note about a app specific password for yahoo | 05/12/2022 |
| Compose version number removed and small wording amendments | 09/04/2023 |
| Amended the path to save the compose file – this is for security, so the container has no access to the file contents. | 14/04/2023 |
| Update to Admin_Token to use Argon2 Hash | 24/04/2023 |
Hi, I hope you will read this but I followed your guide and the container runs but when I visit the page I see a vaultwarden loading screen (link to the image: https://ibb.co/YBxgq2Fy) I have a synology ds224+ running DiskStation Manager 7.2.2-72806
Thanks in advance.
Hey – had a couple of people on Discord with the same issue as well as here in the comments as I can’t seem to replicate it! Check you are accessing the URL via https://
Also in your Admin panel make sure you have correctly set the full proxy address.
Great post! I was looking for a way to self-host my password manager, and your detailed guide on setting up Vaultwarden in Docker on my Synology NAS is exactly what I needed. The step-by-step instructions were super easy to follow. Thank you for sharing!
Hey, thanks for the feedback and glad it was useful!