
Last updated on 19 August 2025
Important or Recent Updates
| Update | Date |
|---|---|
| New guide released | 06/06/2024 |
| Swapped the WireGuard container from LinuxServer to WG-Easy as it has a nice web UI! Also swapped the example Android Client to WG Tunnel. | 30/08/2024 |
| Amendments made to the bcrypt password element to ensure the hash is formatted correctly and amended the wording relating to the password being optional but recommended. | 04/11/2024 |
| Updated for the latest version apologies for the delay | 07/06/2025 |
| Swapped INIT_HOST to WG_HOST not sure why the other is not working as it was in the documentation for the latest version. | 23/06/2025 |
| My site is haunted – My changes from the November 2024 update seem to have decided to vanish! Restored them back! Also note IPv6 is disabled as it does not work on Synology (This was already in the compose but just adding the note) https://github.com/wg-easy/wg-easy/issues/2016 | 19/08/2025 |
What are we doing?
I already have a guide on how to set up Tailscale on your NAS for remote access. In the interest of choice and as I am currently using this method this is an alternative using WireGuard (WG-Easy).
This guide has a number of key steps. I will take you through each one, if you already followed some of my other VPN related guides you may be able to skip sections!
- Folder Setup
- DDNS Address
- TUN Script
- WireGuard Kernel Module
- Container Setup
- Client Setup
A note on Double NAT or CGNAT
Unfortunately more ISPs are moving to these methods of address allocation as the IPv4 address space is getting low on available addresses.
You can test if this is the case by checking the WAN IP on your Router/Modem settings and then comparing it to the one shown on portchecker.co. If they are different you are likely Double NAT and will either need to see if you can pay your ISP for a standard IPv4 address or use Tailscale (see my other guide) or Cloudflare Tunnels for access.
Let’s Begin
In this guide I will take you through the steps to things up and running in Container Manager. We will be using the new Projects (Docker Compose) feature as it will save you time vs manual setup using the normal UI.
Folder Setup
Let’s start by getting some folders set up for the containers to use. Open up File Station create the following.
/docker/projects/wg-easy-compose
/docker/wg-easy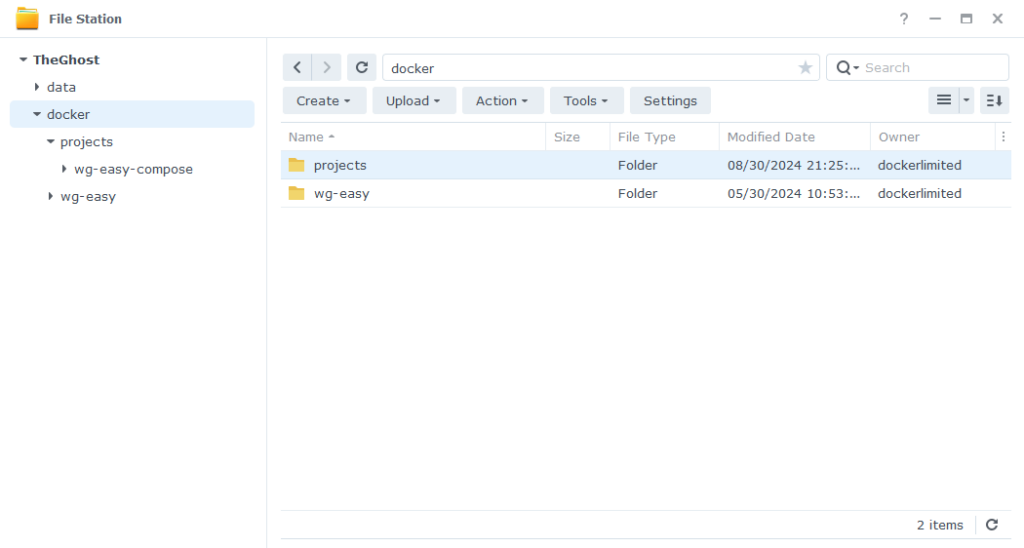
Next we need to set up a DDNS address in order to get connected.
DDNS and SSL
Before we start, make sure you have registered for a Synology Account as we are going to be using their DDNS service. https://account.synology.com/en-uk/register/ If you already have this set up move to the next step.
DDNS (Dynamic Domain Name System)
A DDNS address allows you to get external access to WireGuard via a domain provided by Synology, this is useful on home internet connections where your ISP will change your IP address on a regular basis. This will not put the NAS login screen on the internet by default as we won’t be opening the addition DSM ports on the router.
For some great hints and tips in relation to securing your NAS set Wundertechs recent guide.
In the DSM Control panel go to ‘External Access’ and then to the ‘DDNS’ tab
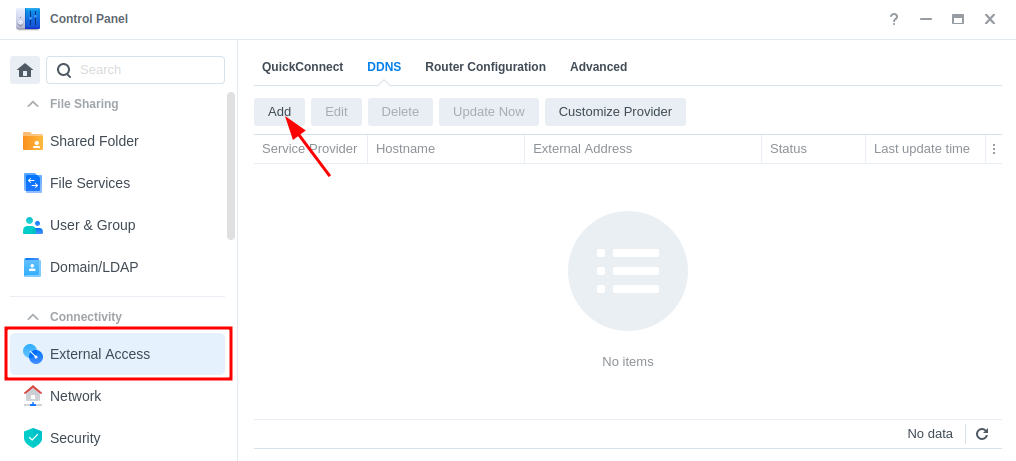
Click on ‘Add’, then fill out the following sections.
| Section | Value |
|---|---|
| Service Provider | Synology |
| Hostname | This will be the address used to identify your NAS so make it personal to you not specific to this guide. jellyseerr.synology.me = BAD myawesomenas.synology,me =GOOD |
| Email: | Log into your Synology account |
| External Address (IPv4) | This should be filled in automatically |
| External Address (IPv6) | This should be filled in automatically if your ISP is using IPv6 |
| Get a Cert from Let’s Encrypt | Tick this box |
| Enable Heartbeat | Tick this box |
Now press OK, DSM will apply your settings. It can take a few moments to set up and the DSM interface will refresh. You will likely receive a certificate error which you will need to accept to get back into DSM.
Setting up the TUN start up script
In order for the VPN connection to work we need to make sure the TUN Interface is available. In order to ensure it is available even after a reboot we will set up a small ‘script’.
Please note if you already have GlueTUN running you have already done this 🙂 so jump ahead
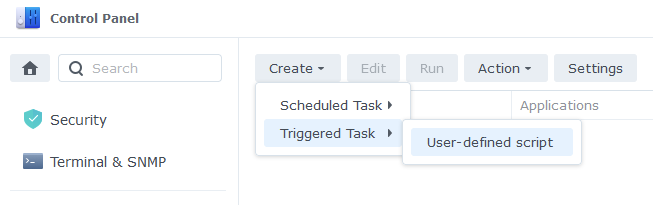
Open up Control Panel and then click on Task Scheduler
Next click on Create, Triggered Task then User Defined Script.
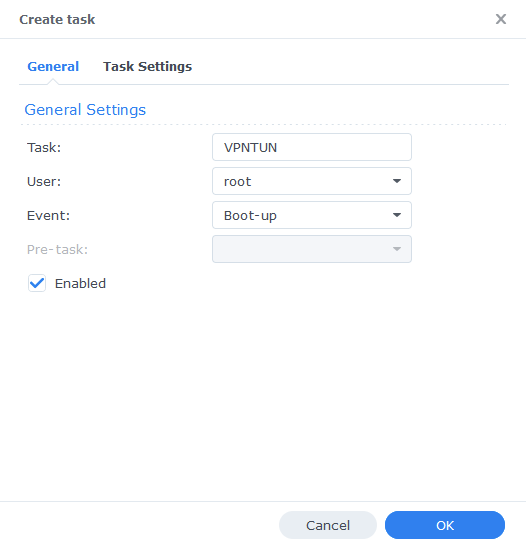
Enter the following:
| Section | Setting |
|---|---|
| Task: | VPNTUN |
| User: | root |
| Event: | Boot-up |
| Enabled | Tick |
On the Task Settings tab copy and paste the code below in the ‘User-Defined script’ section. It will look like screenshot.
#!/bin/sh -e

insmod /lib/modules/tun.ko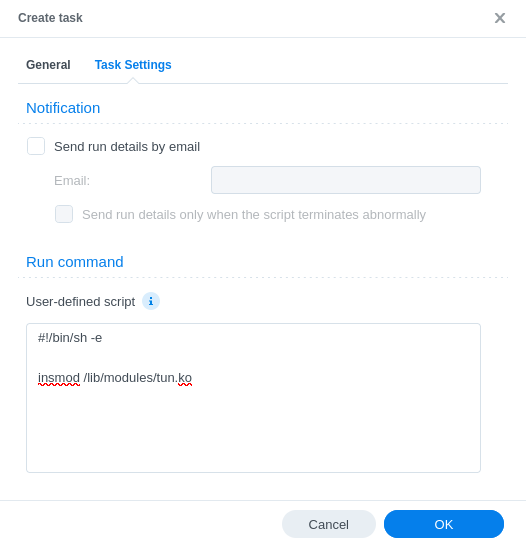
You can now press OK and agree to the warning message. Next run the script which will enable the TUN device.
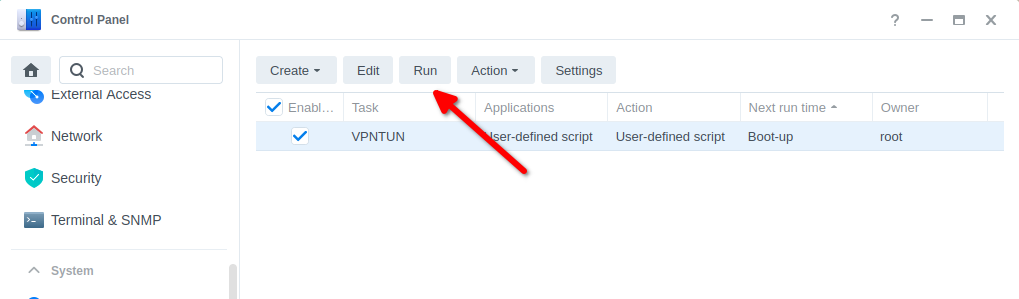
You can now move on to the next step.
WireGuard Kernel Module (Required)
As DSM uses an older Kernel that does not have the required WireGuard modules we need to load them separately.
BlackVoid.club have put together a Kernel Module for Synology which allows the lower level Kernel to perform WireGuard duties, make sure you drop them a thanks as this would not be possible without them!

While on first glances it looks like a long installation process the page details a number of methods. I recommend having a read taking note of warnings and also if you want to build your own module it tells you how.
The TLDR is below.
- Find your model of NAS under the correct DSM version section (If you are following this guide it will be 7.2) and download the pre compiled .spk file
- Head into Package Center and click ‘Manual Install’ on the top right and install the .spk file and untick the box to run after install
- Reboot
- SSH Into your NAS (Just like in the User Setup guide) and elevate yourself to root by typing
sudo -iand entering your password - Enter this command and press enter to start up the module
/var/packages/WireGuard/scripts/start
You should now be able to see the WireGuard package running in Package Center. Please note while I will try my best to support in relation to this module I may have to refer you on to BlackVoid if it is a specific technical issue.
On to the next part.
Container Manager
Next we are going to set up a ‘Project’ in Container Manager. Open up Container Manager and click on Project then on the right-hand side click ‘Create’.
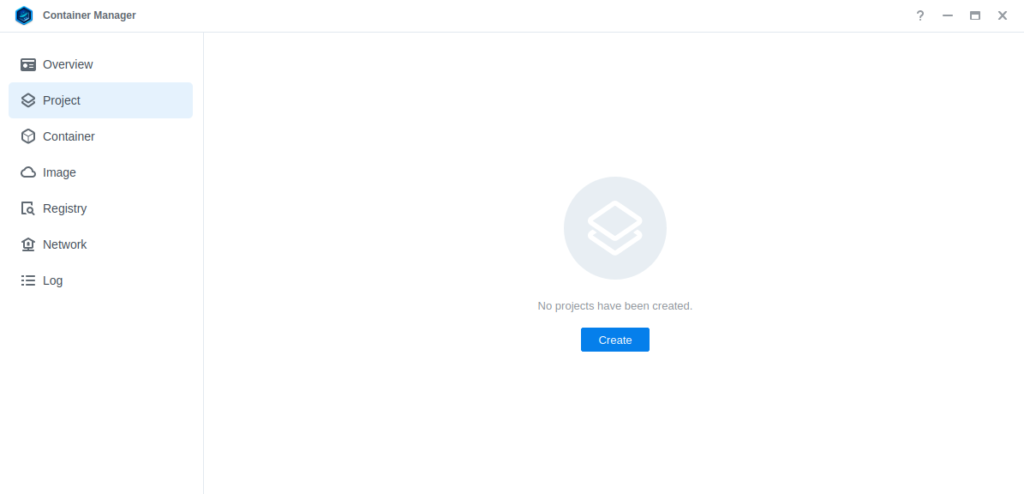
In the next screen we will set up our General Settings, enter the following:
| Section | Setting |
|---|---|
| Project Name: | wg-easy |
| Path: | /docker/projects/wg-easy-compose |
| Source: | Create docker-compose.yml |
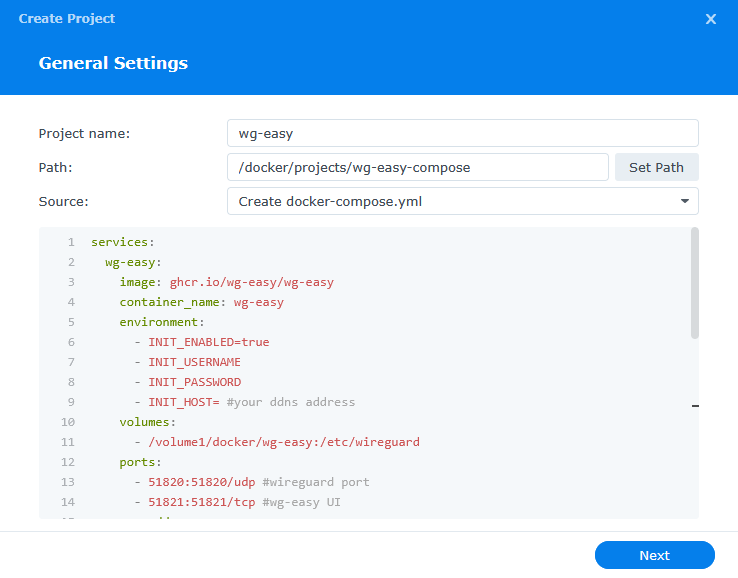
Next we are going to drop in our docker compose configuration, copy all the code in the box below and paste it into line ‘1’ just like the screenshot.
services:
  wg-easy:
    image: ghcr.io/wg-easy/wg-easy
    container_name: wg-easy
    environment:
      - INIT_ENABLED=true
      - INIT_USERNAME=
	    - PASSWORD_HASH= #your bcrypt hash
      - WG_HOST= #your ddns address
    volumes:
      - /volume1/docker/wg-easy:/etc/wireguard
    ports:
      - 51820:51820/udp #wireguard port
      - 51821:51821/tcp #wg-easy UI
    cap_add:
      - NET_ADMIN
      - SYS_MODULE
    sysctls:
      - net.ipv4.ip_forward=1
      - net.ipv4.conf.all.src_valid_mark=1
      - net.ipv6.conf.all.disable_ipv6=0
      - net.ipv6.conf.all.forwarding=1
      - net.ipv6.conf.default.forwarding=1
restart: unless-stoppedEnvironment Variables
We are now going to amend some key variables which define how the WireGuard connection will be set up and behave, I have covered the key settings here to get you up and running. You can find a full list of variables on the WG-Easy GitHub.
| Variable | Value |
|---|---|
| INIT_USERNAME | Set a username for the web UI |
| PASSWORD_HASH | This is optional but recommended to enable a password login for the web UI – see the extra info below on how to do it. If you don’t want to enable this remove the line. |
| INIT_HOST | Change this to the DDNS address you set up in the previous steps |
Generating the web password
In order to enable the password for the Web UI you need to add a Bcrypt hash of your chosen password into the compose. Go to https://bcrypt.online/ to create the hash.
Enter the password in the ‘Plain Text Input’ box and then press the ‘Generate Hash’ button. Copy the generated hash next to the PASSWORD_HASH= line.
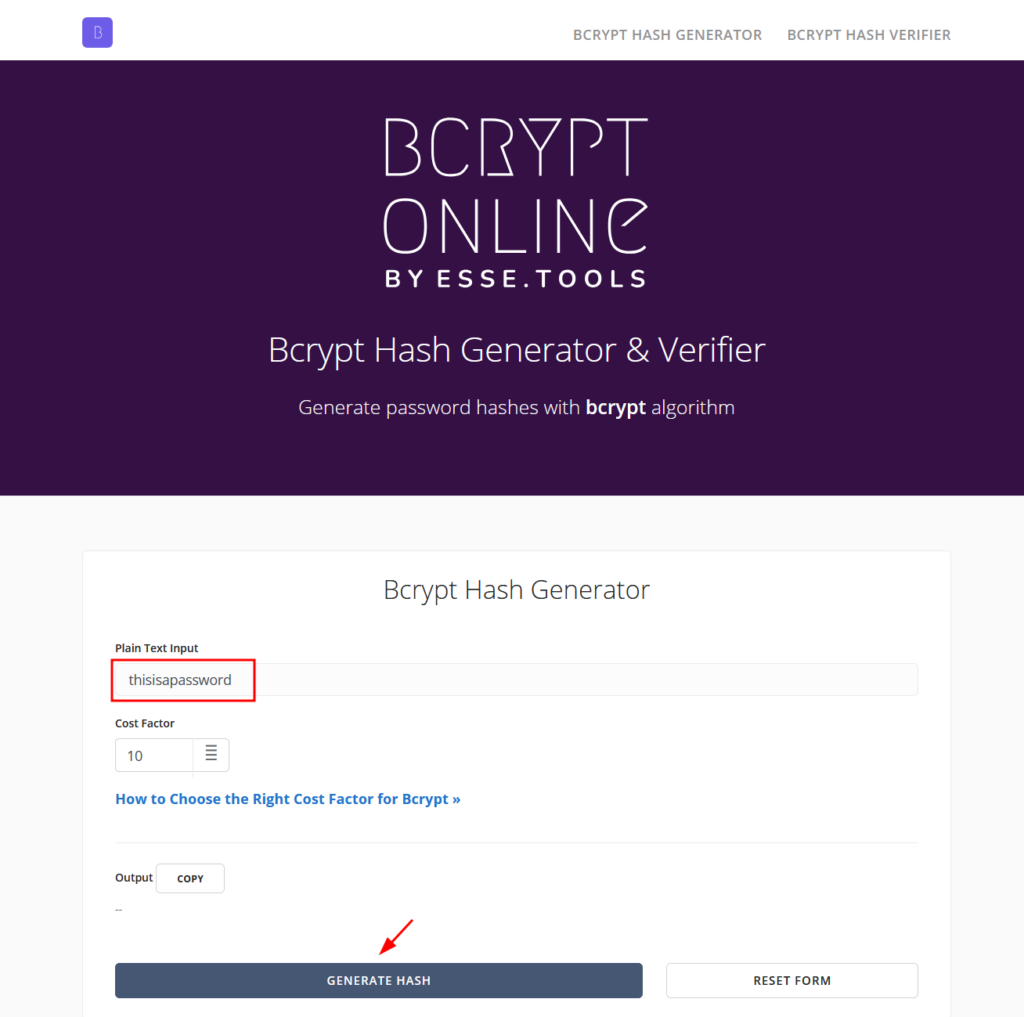
Finally you will need to slightly amend the $ signs in the hash to ensure it is read correctly from the compose by replacing any single $ to double $$ for example
$2y$10$Kpbc.6Ue5WClnHLxCxLOo.lNmJRg8inaNFu9tW03WaZpAGVLQRn76
becomes
$$2y$$10$$Kpbc.6Ue5WClnHLxCxLOo.lNmJRg8inaNFu9tW03WaZpAGVLQRn76
Once you have made the edits you can click ‘Next’
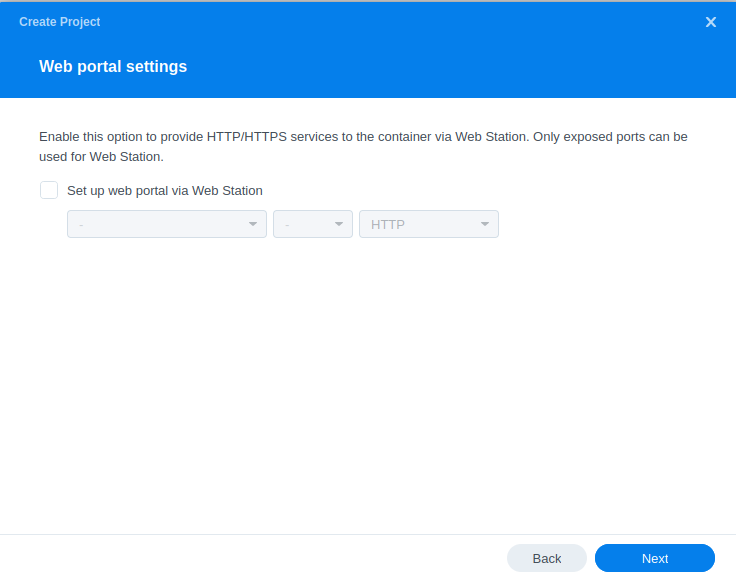
You do not need to enable anything on the ‘Web portal settings’ screen click ‘Next’ again.
On the final screen click ‘Done’ which will begin the download of the container image and once downloaded it will be launched!
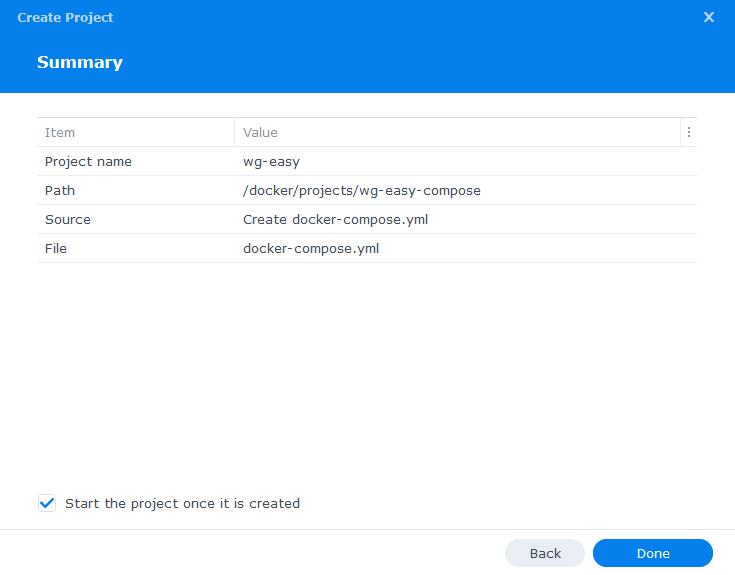
The image will now be downloaded and extracted. You should see ‘Code 0’ when it has finished.
Forward the WireGuard Port
Now the container is running it would be a good idea to head into your Routers settings and forward the port your set for the container (51820). Refer to the manual on how to do this, essentially the port will be forwarded to the NAS IP address.
Firewall Exceptions
(Skip if you don’t have the Firewall configured)
If you have the Synology Firewall enabled please see this additional guide for further info on exceptions and correct set up.
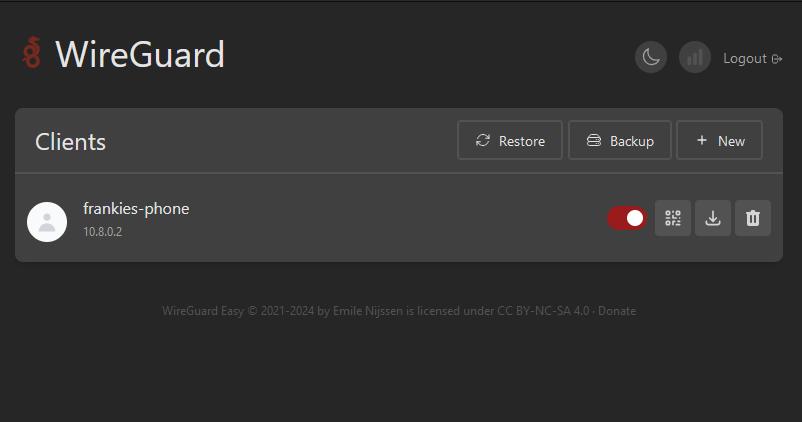
Client Set up
WireGuard Easy makes it super easy to set up each client. Go to the Web UI on your NAS IP port 51821

Simply click ‘New Client’ and the config details will be created automatically for you.
You have a couple of choices on how to add the config to your end device, for phones make use of a WireGuard app. For this guide I am using WG Tunnel on the Playstore, for iPhone users there is also a WireGuard app.
Open the App and Tap the + button in the bottom Right, then ‘WireGuard’ in the pop-up menu, then ‘Add from QR Code’. Scan the QR code from WG Easy.
You can now turn on the connection from within the app and when roaming away from home all your locally hosted services will just work like you are on Wi-Fi. Your internet traffic is also routed through the connection. I have found that battery impacts are negligible so leave the connection on 24/7.
Looking for some help, join our Discord community
If you are struggling with any steps in the guides or looking to branch out into other containers join our Discord community!

Buy me a beverage!
If you have found my site useful please consider pinging me a tip as it helps cover the cost of running things or just lets me stay hydrated. Plus 10% goes to the devs of the apps I do guides for every year.


Your earlier guides have you setting up a GlueTUN container. Is that necessary here, or do I need only setup the persistent TUN device? My only aim is to have a WG server on my NAS (DS923+), and I have already set up the other portions of this guide. However, while I can connect (handshake is valid, port forwarding through the router is done), I cannot access any local services on the NAS. Firewalls are open to the necessary ports and I even created a rule for the Docker subnet (bridge mode), but nothing is accessible.
Hey, Gluetun is completely independent this just requires the initial system level bits to get the VPN working.
Would be good to see your compose information please. just remove your password hash
https://paste.drfrankenstein.co.uk
Any way to make this work with AGH dns rewrite rules? I can access my services over IP but not with my rewrites like sab.lan. These are working on my local network.
Thanks!
Can you try changing the WG_DEFAULT_DNS to the IP of your AdGuard instance and see if that makes the difference
Just to also add – if you change the Server don’t forget to also update your clients as well
Hi Dr! Thank you for another great guide.
For a VPN server I’m using Synology’s VPN Server package with OpenVPN. Is Wireguard better than Synology’s VPN server? Should I switch?
Thank you!
The difference at low speeds is going to be negligible – however it’s nicer to just move to a more modern VPN solution.
Very new to the NAS world. I followed your excellent Gluetun guide to get my 923+ set up with all of my desired docker containers, behind the VPN container. Everything works flawlessly on my WiFi network. The problem I’m having is connecting to my Emby server (or accessing any of my NAS data) outside of my network.
The Emby container is the most important, trying to get access to it remotely, but given the GlueTUN VPN container, normal remote connection setup won’t work. So I followed this guide to set up WireGuard, but now have no idea how to test or make sure I did everything properly. I have set WireGuard up only on my cell phone and have used the QR code to get everything connected per the guide above. When outside my network, there is no change to the behavior of my apps, it still can’t connect. Just wondering the best way to troubleshoot this, thanks in advance.
Hey – So to ask the obvious first – Is Wireguard connecting successfully on your phone? If so, are you able to access the NAS itself as this all works independently to GlueTUN (I am running the same setup here)
Yes, I believe so. When I enter the app, it has the WireGuard tunnel name I created with the trigger to turn on or off. Whether that means it’s working properly I’m not sure. I did find that when I left the trigger in the on position while away from my home WiFi network, things like my maps and some apps on my phone like YouTube weren’t loading properly (like I didn’t have internet access, even on data only) but when I flipped off the WireGuard trigger I got regular access to those apps again.
OK that must be a DNS issue in that case, double-check the config options you added to the compose are all correct. Try changing this line and then re-add the config to the phone again as it will generate a new QR code.
PEERDNS=9.9.9.9
So I double checked the config options, and don’t exactly know what each of the environment variables do, but will say I changed the PUID, PGID, TZ, SERVERURL and SERVERPORT and have confirmed they match the prior setup through the Gluetun guide. Also port forwarded the IP address of my NAS to match the server port number I created.
Lastly, I tried updating the PEERDNS to 9.9.9.9 but doesn’t seem like it’s having an impact. After the WireGuard app setup, the guide above just ends, is there some suggestions on how we should best test the connection to see if it’s working? For Emby, do I need to create a new server connection? I’m just wondering which IP address I should use at this point…
Let’s see how we get going on Discord – reviewing WG-Easy as an alternative based on Fei’s recommendation.
I set ALLOWEDIPS to my NAS’ IP address though found I couldn’t connect to it from the VPN on my phone (trying to access Synology Photos) in spite of having a firewall rule on the NAS to allow all ports/protocols from the VPN subnet. Did you need to add any routing rules?
Leave it at its default setting which gives you access to the NAS – note when you change the settings the configs will be regenerated so will need to be imported to your mobile again.
Out of curiosity, do (or would) you need a NAS firewall rule allowing traffic from the Docker container subnet (or a manually-mapped IP address for the container)?
Initially I thought that only the internal subnet (10.13.13.0/24) would require a rule, though doing some testing I found that VPN traffic was using Docker’s internal network (172.19.0.0/16), and only after adding a rule allowing traffic from it could I connect to anything from a device connected to the VPN.
Essentially the firewall will block anything that does not have an exception added for it. So if the container say was on a different internal subnet (docker network subnet) it will also have another exception added, the only exception is for MACVlan which completely bypasses the Firewall.. Essentially the firewall starts looking like Swiss cheese with more and more holes punched in it for everything to function.