Last updated on 1 January 2025
Important or Recent Updates
| Historic Updates | Date |
|---|---|
| New DSM7.2 Container Manager Update (Beta/RC) | 30/04/2023 |
| Fixed a typo in the ports section for 7359 | 04/07/2023 |
| Guide rewritten moving to a Project rather than the slower method via the UI giving you more flexibility. Also includes updates to improve security which is only possible via projects. | 25/10/2023 |
In this guide I am going to take you through the setup of Jellyfin in Container Manager. Please note this guide is for anyone that does not have Hardware Transcode abilities on their NAS. You can see the other guide for those that do.
Let’s Begin
As usual, it’s important you complete the three preceding guides which will get your folder structure, docker user and bridge network setup.
- Docker Package, SSD and Memory Recommendations
- Step 1: Directory Setup Guide
- Step 2: Setting up a restricted Docker user
- Step 3: Setting up a Docker Bridge Network (synobridge)
Folder Setup
Let’s start by getting some folders set up for the container to use. Open up File Station create the following.
/docker/projects/jellyfin-compose
/docker/jellyfin
Container Manager
Next we are going to set up a ‘Project’ in Container Manager. Open up Container Manager and click on Project then on the right-hand side click ‘Create’.

In the next screen we will set up our General Settings, enter the following:
| Section | Setting |
|---|---|
| Project Name: | jellyfin |
| Path: | /docker/projects/jellyfin-compose |
| Source: | Create docker-compose.yml |
Next we are going to drop in our docker compose configuration copy all the code in the box below and paste it into line ‘1’ just like the screenshot.
What on earth is a Docker Compose?
Docker Compose allows us to define how Docker should set up one or more containers within a single configuration file. This file is yaml formatted and Container Manager uses the Projects feature to manage them.

services:
  jellyfin:
    image: linuxserver/jellyfin:latest
    container_name: jellyfin
    environment:
      - PUID=1234 #CHANGE_TO_YOUR_UID
      - PGID=65432 #CHANGE_TO_YOUR_GID
      - TZ=Europe/London #CHANGE_TO_YOUR_TZ
      - JELLYFIN_PublishedServerUrl=SEE_TABLE_BELOW
      - UMASK=022
    volumes:
      - /volume1/docker/jellyfin:/config
      - /volume1/data/media:/data/media
    ports:
      - 8096:8096/tcp #web port
      - 8920:8920/tcp #optional
      - 7359:7359/udp #optional
    network_mode: synobridge
    security_opt:
      - no-new-privileges:true
    restart: always
The two optional ports in the above can be removed if you will not use them. 7359 is for automated discovery of Jellyfin by the apps, and 8920 is the HTTPS port which is useful if not using the reverse proxy later in the guide.
Environment Variables
We need to make some changes in order for the container to have the correct permissions to save its configuration files and to have access to your media.
| Variable | Value |
|---|---|
| PUID | (required) The UID you obtained in the user setup guide |
| PGID | (required) The GID you obtained in the user setup guide |
| TZ | (required) Your timezone wikipedia.org/wiki/List_of_tz_database_time_zones |
| JELLYFIN_PublishedServerUrl | This will be your NAS IP or if you are going to be accessing via your DDNS address use this. (You can change this later if you wish) |
Volumes
We can now pass through our file paths into the container they are mounted using the volume’s section of the compose file.
I have pre-filled this section to pass the correct paths, the only thing that you may need to change is the /volume1/ if your file paths are on a different volume.
Click ‘Next’
You do not need to enable anything on the ‘Web portal settings’ screen click ‘Next’ again.

On the final screen click ‘Done’ which will begin the download of the container images and once downloaded they will be launched!

The image will now be downloaded and extracted. You should see ‘Code 0’ when it has finished.

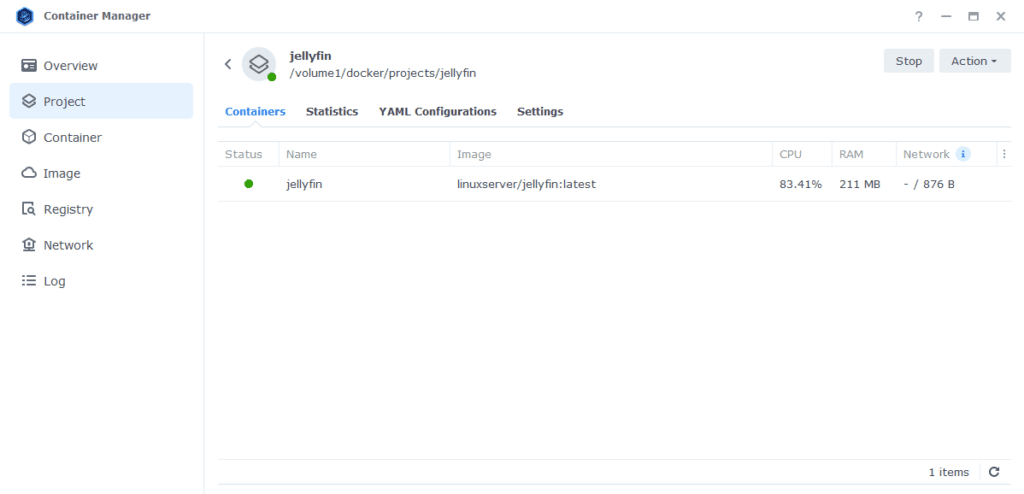
You will now see your Jellyfin running and should have a green status on the left-hand side.
Firewall Exceptions
(Skip if you don’t have the Firewall configured)
If you have the Synology Firewall enabled please see this additional guide for further info on exceptions and correct set up.
Jellyfin Initial Setup
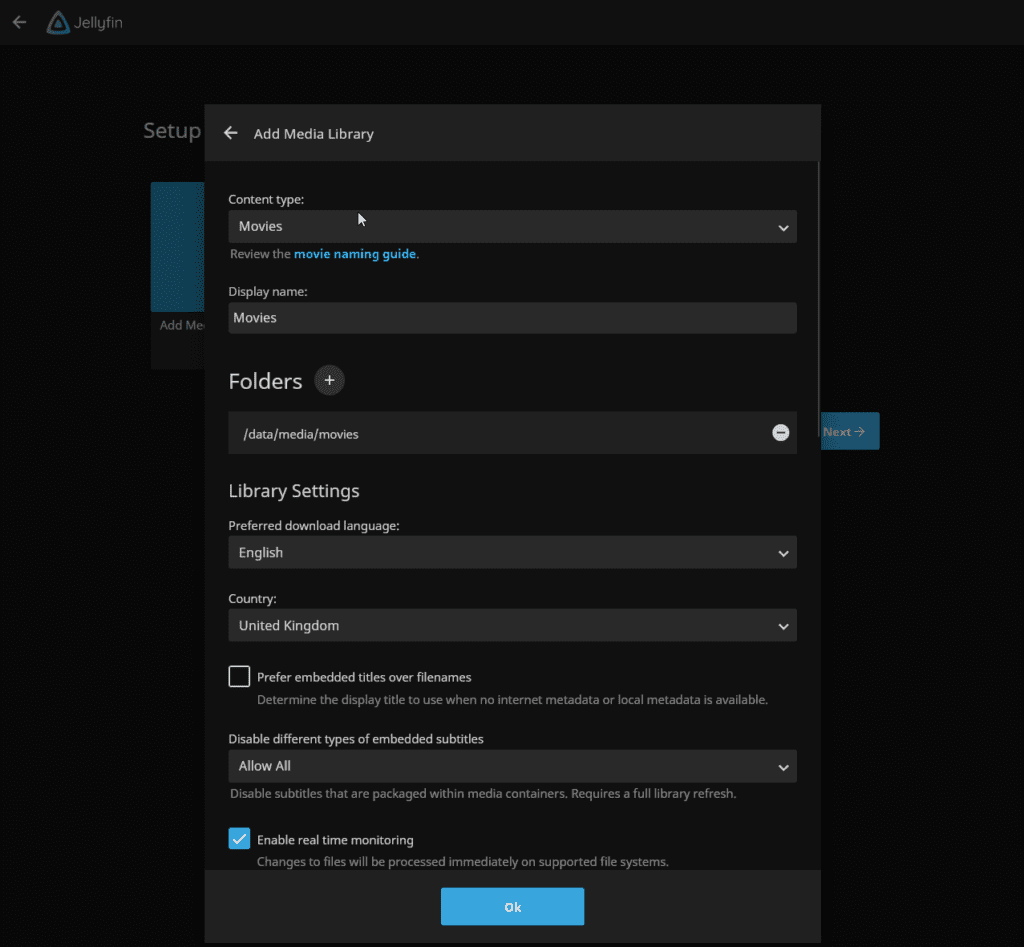
After a few minutes you should be able to access the server and go through the initial Jellyfin setup by going to the IP of your NAS in your browser followed by port 8096.
e.g. 192.168.0.30:8096
When adding movies or shows they will be located in the /data/media folder.
Remote Access
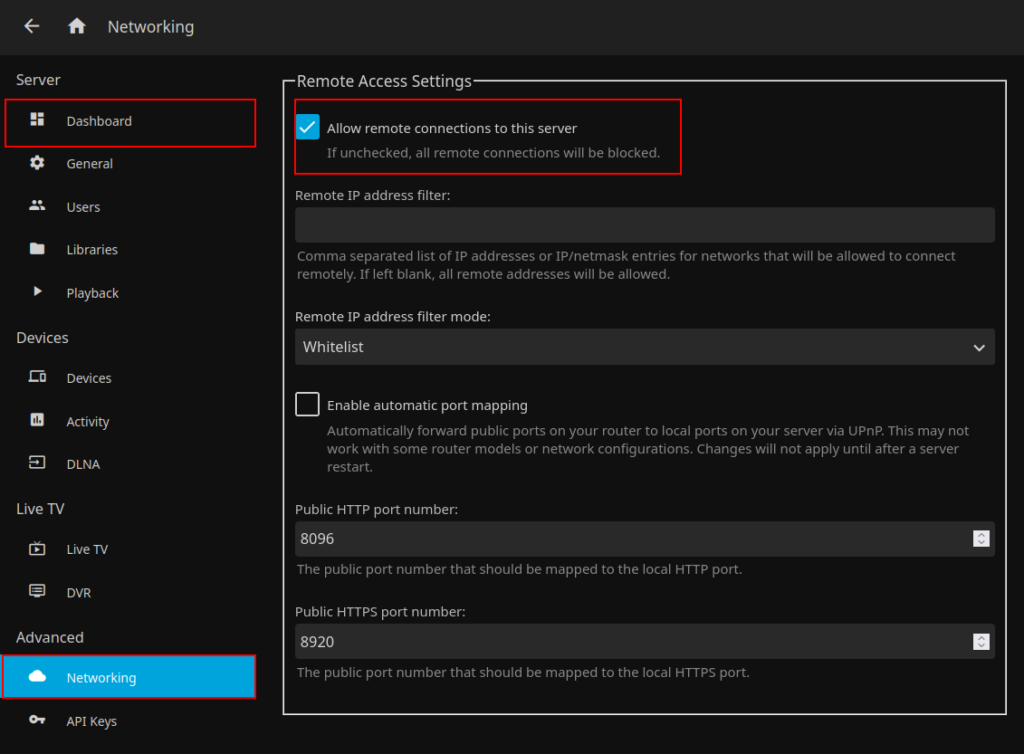
If you are going to be using your set-up outside your LAN you will also need to enable the following options to allow access and also to restrict bandwidth
- Allow remote connections to this server
- Streaming
In order to limit upload bandwidth you can also set an overall limit for streams, this is useful if you or other users will be trying to play back files larger than your upload bandwidth can handle

External Access
You have some choices when it comes to making your new container accessible from outside your home network, these come with different levels of security and convenience. This mini section is generic but covers the basics of getting this guide up and running and is entirely optional.
- Synology’s DDNS (Dynamic Domain Name System) with a TLS Certificate and Reverse Proxy
This is useful if you have some family members or friends that need access to something like Overseerr or Jellyseer and is covered below. - Tailscale or Wireguard VPN
If just you or close family in your household are accessing these services, and you don’t want to expose them to the internet this would be the more secure choice. See my other separate guides. - Cloudflare Tunnels
I don’t currently use these, so I would recommend watching the Wundertech guide on how they work.
A note on Double NAT or CGNAT
Unfortunately more ISPs are moving to these methods of address allocation as the IPv4 address space is getting low on available addresses. If your ISP is doing this your choices are more limited.
You can test if this is the case by checking the WAN IP on your Router/Modem settings and then comparing it to the one shown on portchecker.co. If they are different you are likely Double NAT and will either need to see if you can pay your ISP for a standard IPv4 address or use Tailscale or Cloudflare Tunnels for access.
Using the built-in tools on DSM
The first step of this process is to forward port 443 on your Router to your NAS IP Address, how you do this will depend on your router model, so please refer to its manual.
Router (External):443 > NASIP (Internal):443
Next make sure you have registered for a Synology Account as we are going to be using their DDNS service. https://account.synology.com/en-uk/register/ If you already have this set up move to the next step.
DDNS (Dynamic Domain Name System)
A DDNS address allows you to get external access to your container via an address provided by Synology, this is useful on home internet connections where your ISP will change your IP address on a semi-regular basis.
In the DSM Control panel go to ‘External Access’ and then to the ‘DDNS’ tab

Click on ‘Add’, then fill out the following sections.
| Section | Value |
|---|---|
| Service Provider | Synology |
| Hostname | This will be the unique address just for you so keep the name generic. minecraft.synology.me = BAD myawesomenas.synology,me =GOOD |
| Email: | Log into your Synology account |
| External Address (IPv4) | This should be filled in automatically |
| External Address (IPv6) | This should be filled in automatically if your ISP is using IPv6 |
| Get a Cert from Let’s Encrypt | Tick this box |
| Enable Heartbeat | Tick this box |
Now press OK, DSM will apply your settings. It can take a few moments to set up and the DSM interface will refresh. You will likely receive a certificate error which you will need to accept to get back into DSM.
Reverse Proxy
We are going to set up a reverse proxy subdomain for the address you just register. This means you and your users can access the container without using a port number as it will route all traffic through the secure 443 port.
Go back into the Control Panel and access the ‘Login Portal’ then in the ‘Advanced’ tab click ‘Reverse Proxy’ and then click on ‘Create’.

We are now going to enter some rules, so when you or your users access the URL specified the request will automatically be sent to the containers web UI.
Use the settings below, you will need to amend the Hostname sections in line with the hostname you registered earlier, and the IP of your NAS.
| Setting | Value |
|---|---|
| Reverse Proxy Name: | Give it a meaningful name in line with the container you are setting up. |
| Protocol: | HTTPS |
| Hostname: | containername.xxx.synology.me ‘containername‘ will be the name you want to use to access this container ‘.xxx.synology.me‘ will be the exact name you registered earlier |
| Port: | 443 |
| Protocol: | HTTP |
| Hostname: | ‘localhost’ or your NAS IP address |
| Port: | The UI Port Number from the yaml in the guide you are following |
On the second tab ‘Custom Header’ click on Create then WebSocket, this will add two entries for WebSockets to function correctly, you can now press save.

You should now be able to access the web UI of the container by going to the address you just set up in the reverse proxy, it will be a secure connection, and you should have no certificate errors.
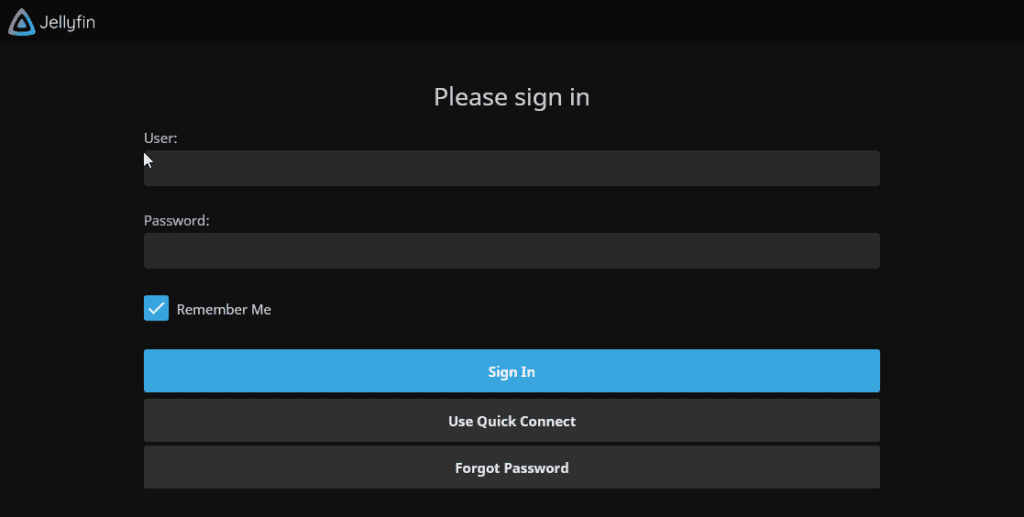
You can now log in with the username and password you created earlier, the same address is used in the Android and iPhone apps.
Looking for some help, join our Discord community
If you are struggling with any steps in the guides or looking to branch out into other containers join our Discord community!
Buy me a beverage!
If you have found my site useful please consider pinging me a tip as it helps cover the cost of running things or just lets me stay hydrated. Plus 10% goes to the devs of the apps I do guides for every year.



Hello, thank you so much for creating this guide!
I’m a new to all of this, and was following the steps in this guide (also followed the preceding guides to set up the folder structure, user, and bridge network) on a DS1522+ running the latest version of DSM.
I was able to complete all the steps up until trying to access the server, where when I type in :8096, it brings up a screen with my NAS. When I click it and click on “Connect”, I get an error saying
“We’re unable to connect to the selected server right now. Please ensure it is running and try again.”
In Container Manager, I can see the status of the jellyfin project is “running”, container status for jellyfin shows an uptime of 15 minutes (at time of writing), Images shows linuxserver/jellfin is running, and the synobridge bridge network shows 1 connected container (the jellyfin one that we just created)
Things I’ve checked/tried:
– I do not have the synology firewall enabled
– I’ve tried clearing cookies/cache
– when accessing using an incognito window (Chrome), I am brought to a login page/page to create an admin account, but this seems to be unrelated to what I’m trying to do.
Hey spotted your post on Discord and replies.
I believe I did everything corrected up through the section that should build jellyfin. I got the error:
Error response from daemon: https://registry-1.docker.io/v2/“: conte
I suspect that there’s more to it, but the edge of the window cut it off, and I don’t see a way to expand it. Any clues?
I’m having similar troubles on other things on the NAS (though at this point I’ve stripped away just about everything and am starting again following your instructions pretty strictly — the only major difference is that, thanks to previously set-up shares, I have /volums1/publicxl/data rather than just /volume1/data/
Is there a way to download the packages then install them from a local folder? Would that make a difference?
Hey, if it’s not connecting to the registry try as a starter a simple reboot of the NAS to see if it flushes out any potential DNS issues.
OK, I restarted the NAS, then tried to rebuild via the Container Manager. I got the same truncated error.
Then, as I described in the previous reply, I tried it from the command line, and got the same timeout:
josephzitt@ZittNAS-XL:~$ sudo docker pull jellyfin/jellyfin
Password:
Using default tag: latest
Error response from daemon: Get “https://registry-1.docker.io/v2/”: net/http: request canceled while waiting for connection (Client.Timeout exceeded while awaiting headers)
josephzitt@ZittNAS-XL:~$
Dos this suggest anything further?
Try to pull the linuxserver/jellyfin:latest image – however I suspect it will fail as something is blocking your internet access.
BTW, I’m trying to join your Discord community, but the link gives me “Unable to accept invite.”
It seems like you are having DNS issues, do you have the firewall in place at all. Try updating the NAS to some different DNS in Control Panel > Network (Manual DNS)
Try this link I just made it – the other one has an unlimited time limit so not sure why its not working for you.
https://discord.gg/tZ6XPtsF
I’m not running a firewall on the NAS. I have Google DNS set on it. But I’m seeing that just about any attempt to connect to anything outside of my LAN on it is either extremely slow or fails entirely. My Mac, with the same settings and on the same LAN, has no such problems.
My guess is that my ISP, who are basically evil, are doing some sort of weird block. Unfortunately, communicating with them is effectively impossible, as is switching away from them.
For the moment, I’m putting Plex on my MacBook, using SMB shares from the NAS. It’s not optimal, but it will get things running again. I’m moving in a month, where I’ll be stuck with the same ISP though through a business account. I’ll see if they keep screwing with things there.
This is more than likely your side of the network though on the NAS. Another thing to try is re-installing the Container Manager package as I have seen a lot of times when for some reason the package installation is not right and has no network access.
Verify the overall NAS has internet access by pinging a couple of DNS Servers (Google and Quad9) you should get 4 confirmations with 0% packet loss
sudo ping -c 4 8.8.8.8
sudo ping -c 4 9.9.9.9
If these work you know it’s the package and a reinstallation of it might help
What can I discern from this?
$ sudo ping – c 4 8.8.8.8
ping: -: Name or service not known
OK, I spotted my typo there. Ignore the previous reply.
Followup:
This may or may not tell us something:
I tried installing jellyfin from the command line and got this:
josephzitt@ZittNAS-XL:~$ docker pull jellyfin/jellyfin
Using default tag: latest
Got permission denied while trying to connect to the Docker daemon socket at unix:///var/run/docker.sock: Post “http://%2Fvar%2Frun%2Fdocker.sock/v1.24/images/create?fromImage=jellyfin%2Fjellyfin&tag=latest”: dial unix /var/run/docker.sock: connect: permission denied
josephzitt@ZittNAS-XL:~$
I then did the permissions fix for systems installed after 2023, but it didn’t appear to change anything.
I then tried it as sudo:
josephzitt@ZittNAS-XL:~$ sudo docker pull jellyfin/jellyfin
Using default tag: latest
Error response from daemon: Get “https://registry-1.docker.io/v2/”: net/http: request canceled while waiting for connection (Client.Timeout exceeded while awaiting headers)
josephzitt@ZittNAS-XL:~$
This suggests that the download is timing out on my crappy slow internet connection. Is that so? If so, is it possible to try to download the container another way then install from that? I tried Daocker save, but got:
josephzitt@ZittNAS-XL:~$ docker save jellyfin >image.tar
Got permission denied while trying to connect to the Docker daemon socket at unix:///var/run/docker.sock: Get “http://%2Fvar%2Frun%2Fdocker.sock/v1.24/images/get?names=jellyfin”: dial unix /var/run/docker.sock: connect: permission denied
josephzitt@ZittNAS-XL:~$
How do I update jellyfin?
Hey – See the left menu for a couple of ways to update your containers 🙂
Hi Dr. Frankenstein!
I did everything as you recommend and the Jellyfin is running but I am having this weird error that doesn’t make sense to me (because the folder does not even exist). This is happening in a loop.
—> System.IO.IOException: Permission denied
System.UnauthorizedAccessException: Access to the path ‘/config/data/data’ is denied.
Unhandled Exception
failed to load external entity “/config/network.xml”
That path references the files in /volume1/docker/jellyfin/data/data is there anything inside that folder as there should be files.. I would try running the permission fix from the User and Group guide but adjust the path it has on it to just the one I just mentioned
Thanks a lot for the reply!
The file does not exist at all. Should it?
I have installed the docker several times now and it never gets created and no issue during the setup of the Jellyfin project.
OK can you jump back to the User and Group guide and run the permission fix (should be the first one as per the dates) then re-run the setup and the files should be created
Unfortunately when I try to enter Jellyfin using the secured connection, it freezes. Any idea how to resolve that?
Hey I spotted you email – I will reply soon, just bare with me as its a holiday weekend here in the UK.