Last updated on 27 October 2023
Please note if you are using DSM7.2 or higher you should use the Container Manager version of this guide from the menu.
This guide has reached the end of its updates as most people are now on the latest DSM update - This guide is correct as of 08/12/2023 however no further updates will be added.
| Update | Date |
|---|---|
| Updated the environment variables from ‘FTLCONF_REPLY_ADDR4’ to ‘FTLCONF_LOCAL_IPV4’ | 10/10/2022 |
What is Pi-hole?
If you are looking to get advertising and tracking blocked across all the devices on your network a Pi-hole will have you covered. It’s a locally hosted Domain Name Server and uses block lists to stop adverts.
Let’s Begin
Couple of things to note and common questions:
- Pi-hole is not able to block YouTube ads
- You will need to change the DNS settings either on your Router or whatever device is managing your DHCP/DNS settings
- You will not be able to use this in conjunction with the DHCP server built into DSM if you have that enabled you will need to turn it off before continuing.
In order for you to successfully use this guide please complete these two steps first.
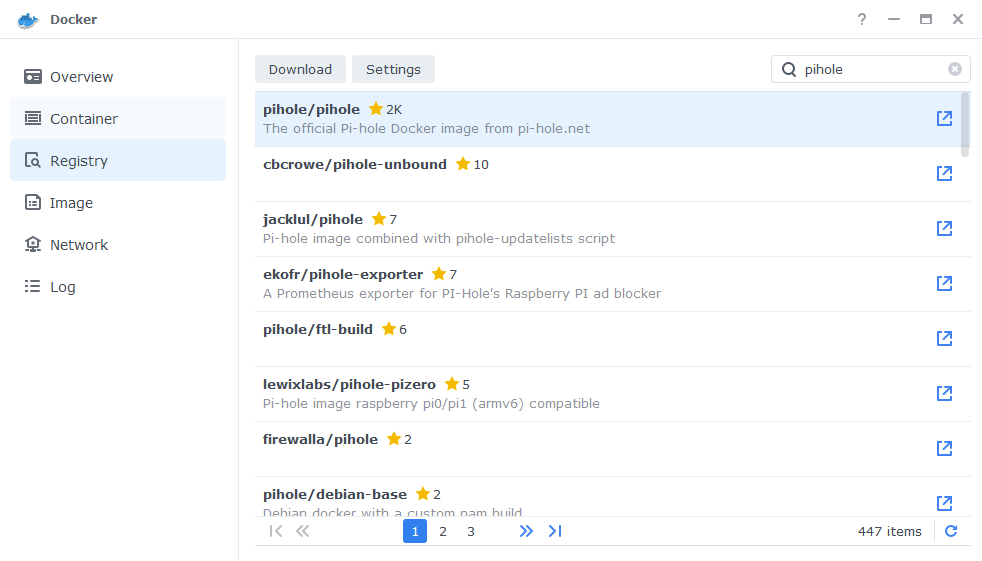
Downloading the Pi-hole Image
Open up Docker within DSM and navigate to the ‘Registry’ section and search for ‘pihole’ in the search box. Download the official version.
The pop-up box will ask which version you want to download, make sure you choose ‘Latest’ from the list of available versions.
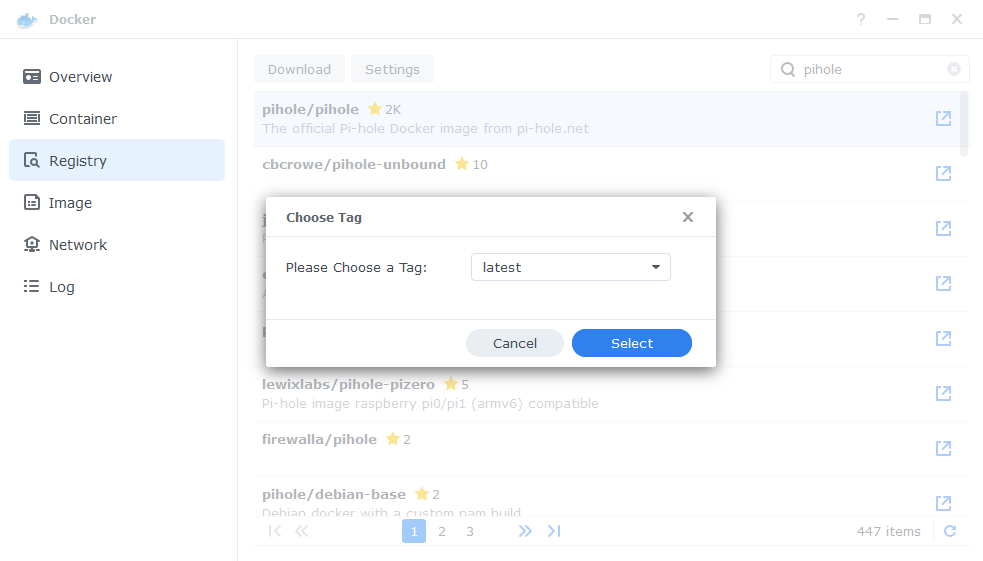
You can check the status of the download over on the ‘Image’ tab.
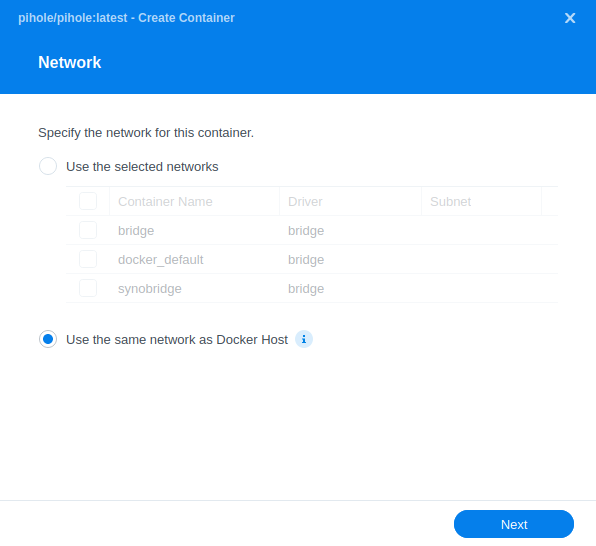
Setting up the container
In Docker click on the ‘Image’ tab, in the list of your containers select the ‘PiHole’ image and click on ‘Launch’
The first screen will ask how you want to set up the Docker network, to keep things simple we will be using the Docker Host option which means we will not need to set up any additional ports. Click Next once you have selected the option.
General Settings
Next you will be greeted with the General Settings screen, this is where you can start specifying some of your preferences.
You can change the name of the container to anything you like, and you may want to enable Auto Restart as this will ensure Pi-hole starts automatically if you reboot your NAS.
You will also notice a Configure capabilities button — don’t change anything in here!
Keep in mind if you turn off your Diskstation or stop the container you will lose internet access as there will be no way for devices to resolve DNS queries.
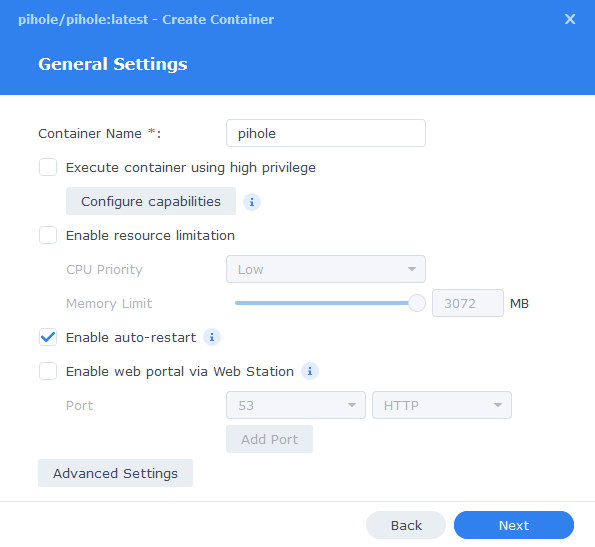
Next up we are going to click on the ‘Advanced Settings’ button, this will take you to a new window with a number of tabs which we are going to work through.
Environment
Next we are going to set up a some environment variables that docker will use to allow the container to access our local file system by telling it the IDs to use for file permissions
For each of the items in the table below you will need to click on ‘Add’ button then type each of the below in the ‘variable’ and ‘value’ sections.
| Variable | Value |
|---|---|
| PIHOLE_UID | The UID you obtained in the user setup guide |
| PIHOLE_GID | The GID you obtained in the user setup guide |
| WEB_UID | The UID you obtained in the user setup guide |
| WEB_GID | The GID you obtained in the user setup guide |
| TZ | Your timezone wikipedia.org/wiki/List_of_tz_database_time_zones |
| WEBPASSWORD | A password of your choice for the Pi-hole web interface |
| DNSMASQ_USER | pihole |
| DNSMASQ_LISTENING | local |
| WEB_PORT | 8000 |
Once you have entered the above scroll down the Environment Variables and you will be able to see one called FTLCONF_LOCAL_IPV4 you need to enter the IP address of your NAS.
| Variable | Value |
|---|---|
| FTLCONF_LOCAL_IPV4 | Enter the IP of you NAS |
Links / Execution Command
You do not need to set up anything on these tabs.
Press ‘Save’ to go back to the initial setup screen, then press ‘Next’
Volume Settings
We will now be specifying the directories where Pi-hole will store its configuration files.
We first click on ‘Add folder’ so we can create some folders for the config files to live, first create one called ‘pihole’ inside your /docker share.
Then within that folder create two new folders called ‘dnsmasq.d’ and ‘pihole’
You will now add each of these folders in line with the table / screenshot below
| File/Folder | Mount Path |
|---|---|
| /docker/pihole/dnsmasq.d | /etc/dnsmasq.d |
| /docker/pihole/pihole | /etc/pihole |
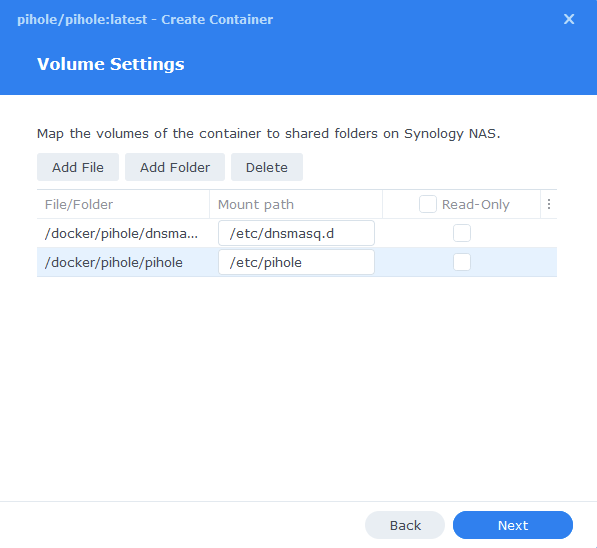
Click Next to move to the final screen.
Summary
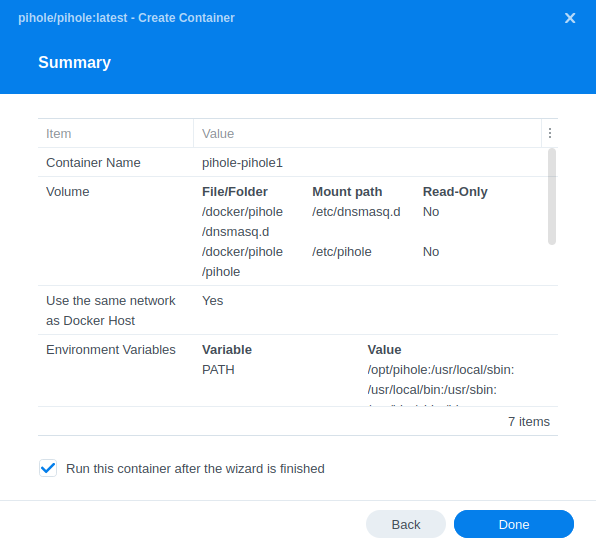
You have now completed the container setup.
You will be shown an overall summary of the settings we have specified, this is a good time to double-check everything is correct. Finally, click on Done and the container should start to boot.
After about 30 seconds or so you should then be able to access the Pi-hole web interface via you NAS IP followed by port 8000, and log in with the password you set earlier.
e.g. 192.168.0.46:8000

You will now need to add the IP address of your NAS as your DNS address in your router or other DHCP server. It can take some time for all of your devices to move over the new DNS settings so be patient, and you will gradually start to see your stats begin to start.
Also note as we are not using Pi-hole as the DHCP server you will not be able to see the names of the devices in the statistics just their IP addresses.
That’s it!
| Historic Updates | Date |
|---|---|
| New guide released | 20/09/2021 |
| Fixed a typo in the Environment Variables and added note around DHCP | 25/11/2021 |
| Additional environment variable added to fix a start-up error due to changes in the 2022.01 release and onward of PiHole. | 14/01/2022 |
| Environment Variables updated to the latest requirements – Now runs as your locally created docker user rather than root | 07/04/2022 |
| Updated screenshots and steps for DSM7.1 | 11/06/2022 |
| Restored the guide to 11/06 network setup due to an error on my part and updated environment variables | 22/08/2022 |
Buy Me a Coffee or a Beer
If you have found my site useful please consider pinging me a tip as it helps cover the cost of running things or just lets me get the odd beverage. Plus 10% goes to the devs of the apps I do guides for every year.


Followed to the letter, but does not work…
s6-rc: info: service _uid-gid-changer: starting
s6-rc: info: service _uid-gid-changer successfully started
s6-rc: info: service _startup: starting
[i] Starting docker specific checks & setup for docker pihole/pihole
[i] Setting capabilities on pihole-FTL where possible
[i] Applying the following caps to pihole-FTL:
* CAP_CHOWN
* CAP_NET_BIND_SERVICE
* CAP_NET_RAW
Failed to set capabilities on file `/usr/bin/pihole-FTL’ (Operation not supported)
The value of the capability argument is not permitted for a file. Or the file is not a regular (non-symlink) file
[!] ERROR: Unable to set capabilities for pihole-FTL. Cannot run as non-root.
If you are seeing this error, please set the environment variable ‘DNSMASQ_USER’ to the value ‘root’
s6-rc: info: service _startup successfully started
s6-rc: info: service pihole-FTL: starting
s6-rc: info: service pihole-FTL successfully started
s6-rc: info: service lighttpd: starting
s6-rc: info: service lighttpd successfully started
s6-rc: info: service _postFTL: starting
Checking if custom gravity.db is set in /etc/pihole/pihole-FTL.conf
s6-rc: info: service _postFTL successfully started
s6-rc: info: service legacy-services: starting
s6-rc: info: service legacy-services successfully started
Installation Failure: /etc/pihole/setupVars.conf does not exist!
Please run ‘pihole -r’, and choose the ‘reconfigure’ option to fix.
2023-01-26 23:10:52: network.c.369) can’t bind to socket: 0.0.0.0:80: Address already in use
Stopping lighttpd
Hey, any chance you could reach out via my contact page so I can see the settings you have used. Double check you IDs are correct as its suggesting it can’t run as the user specified so asking to run as root.
Usual culprits are the GID and UID being the incorrect way around GID is 3 digits the PUID 4.
Hi,
Application failed to start
I get this error in the log,
“Config data location ‘file:/config/’ does not exist”
Action:
Check that the value ‘file:/config/’ is correct, or prefix it with ‘optional:’
Any idea of where I have made a mistake?
I deleted the docker and tried again, this time it worked. I must have had some fat fingers somewhere and messed up. PiHole up and running.
Thanks
Hi, where could i find these variabeles? Searching for them quite some time.
– PIHOLE_UID=YOURUID
– PIHOLE_GID=YOURGID
– WEB_UID=YOURUID
– WEB_GID=YOURGID
Trying to get pihole running on my Synology running dsm 7.1.1, dsm is running web, internal dns, docker (homeassistant), own certificates > port 80 in use
Most of the explainations found on the internet fail also since the variabels like port seem not been remapped if you use them asif the docker dont support the port variabele. Any suggestions?
Hey, right at the top of the guide see the Let’s Begin section on how to get the IDs as you need to setup and specific docker user. These are then used in the variables you mentioned.
Thanks, next step i am running the synology dns internally and .. as expexted i get this one :dnsmasq: failed to create listening socket for port 53: Address already in use. Suggestions how to solve this one?
Almost up seems changing the docker to the original docker image it solves a part of the issue but the main issue stays 022-12-08 21:30:41: network.c.369) can’t bind to socket: 0.0.0.0:80: Address already in use
where should i configure the docker listen to another port i configured 8000 as in the example. with the different examples i run into this issue: i set ip to fixed local ip and the port to 8000 it looks asif the docker does not recognise the variabeles?
Hey, covering the two questions:
1) You will need to disable the existing DNS server in DSM as PiHole requires port 53 in order to act as the new DNS server. No way around that unless you start to play around with MACLVAN / IPVLAN however a bit out of the scope of this guide.
2) It sounds like you are trying to assign ports, so putting the container on a bridge network – The container is set up to listen on port 8000 internally for the web interface as defined by the Environment Variable. So you would map port 8000:8000 as port 80 is reserved by DSM.
3) FTLCONF_LOCAL_IPV4= must be the IP of your NAS
PLEASE help me!
I want to remove pihole, but I’m not sure how. In my Synology router I have the IP of my NAS as preferred DNS (secondary is the router itself). I have tried using the routers’s IP as DNS again, then stopping pihole, but no success, internet connection was then down. I don’t know what to do, please help…
Hey, You don’t use the router address for dns you should specify and main and a fallback. Such as quad9 9.9.9.9 and cloud flare 1.1.1.1 this will make sure you have Internet access.
So, how to proceed in uninstalling PiHole? I’m stuck here.
My router’s internal IP-address is 192.168.1.1
Before PiHole I always had the same address as preferred DNS. I tried reverting to that, but that did not work. How to uninstall and get rid of PiHole alltogether. I don’t want my network to be offline when my NAS is off.
Once you have changed your routers dns settings to either the ones I mentioned you can just stop the container and delete it.
Keep in mind that it can take up to 24 hours for all your devices to switch over to the new dns settings based on them getting a new DHCP lease every 24 hours on most set ups.
Just a thought, If I use my NAS as a DNS server in conjunction with PiHole and have my NAS’ IP address as the preferred DNS server, would adding 9.9.9.9 in my router as a secondary DNS server prevent loosing internet access in case my NAS is turned off? If so, that would be a great solution.
While that would work by having a secondary dns that is not the PiHole you will find some ad blocking will not happen your devices will go with whichever answers fastest.
Hi. Question about the note that you have
You will not be able to use this in conjunction with the DHCP server built into DSM if you have that enabled you will need to turn it off before continuing.
Why wouldn’t DHCP Server still work? I would assume built in DNS server will not work since its also on port 53 but not sure why DHCP server doesn’t work. So workaround to DHCP server would be to use pihole as dhcp server as well? I’m guessing built in DNS server will not work either?
Hey, so it’s because in this guide we are running the PiHole in host most which will grab port 67, if you run it in bridge mode and specify the ports you want then you can use the syno DHCP server
If you grab the compose details from here https://github.com/pi-hole/docker-Pi-hole and remove port 67 you should be set. Shout if you run into any problems.
Thank you. still trying to map this out.
I use syno’s DHCP server and DNS server for local name resolution.
Is it still possible to use syno DNS server as well with pihole running? or do I need to give up syno DNS and use pihole for local dns records?
any negatives of stopping both DHCP and DNS on syno and switching them to pihole docker ?
PiHole will take over DNS duties on your Network and DHCP if you allow it, so you would need to move you local name resolution over to it.
No downsides that I can see other than having to set up your settings again.
got the docker configured but keep getting 2 errors:
in pihole ui i keep seeing this:
DNSMASQ_CONFIG FTL failed to start due to process is missing required capability NET_ADMIN
and in the logs i see:
pihole-FTL: no process found
Stopping pihole-FTL
looping
OK I have had a further read and in order to use the DHCP functions from the April version onwards you either need to run as the network host mode or run the container with an additional capability NET_ADMIN you can add this by editing the container, click on configure capabilities then tick the NET_ADMIN box. Then run the container again.
Just spotted you will also need to add an additional environment variable of DNSMASQ_LISTENING with the variable set to ‘all’
This was already running with host networking checked. Do i need to do “run with higher privelage option” as well?
Will add DNSMASQ_LISTENING option and try again
Oh so on host it should just work if you have disabled the dsm DHCP and dns. The additional variables are not required. These are only needed in bridge mode.
Thats correct. Built in DNS server stopped and DHCP disabled. Errors that I pasted after both were not running and i tried to bring up pihole
Try a reboot to make sure the ports from disabling are freed up, as dsm won’t give any hint that they are in use when bringing up the container in host mode.
No don’t run with higher privs it give the container permissions it doesn’t need.
Hi Alex, we have seen that there has been another change to the setup for environment variables changing ‘FTLCONF_REPLY_ADDR4’ to ‘FTLCONF_LOCAL_IPV4’ as the latter has been depreciated.
Thank you. I ended up using virtual machine manager to deploy ubuntu and pihole on my synology. seems to work ok. This way I can keep my DHCP/DNS servers on synology and use pihole as well. Only slight issue is that all the clients go via synology dns so they appear as synology ip in the pihole logs