
Last updated on 28 February 2025
Important or Recent Updates
| Update | Date |
|---|---|
| New guide update for DSM7.2 and Container Manager | 06/05/2023 |
| Moved from UI setup to Project Setup which is more flexible and easier to maintain. | 21/10/2023 |
| Added an addition element to the compose to restrict the container from gaining additional privileges and also umask environment variable | 25/10/2023 |
What is SABnzbd?
SABnzbd is a binary newsreader, it is used to download files from Usenet, and where required will also repair and extract releases. It works on its own or in conjunction with other tools such as Lidarr and Radarr.
Useful external links for this guide
Linuxserver SABnzbd Container GitHub
SABnzbd Forums
SABnzbd Wiki
Let’s Begin
In this guide I will take you through the steps to get Sabnzbd up and running in Container Manager. We will be using the new Projects (Docker Compose) feature to get this running as it will save you time vs manual setup using the normal UI
In order for you to successfully use this guide please complete the three preceding guides
- Docker Package, SSD and Memory Recommendations
- Step 1: Directory Setup Guide
- Step 2: Setting up a restricted Docker user
- Step 3: Setting up a Docker Bridge Network (synobridge)
Folder Setup
Let’s start by getting some folders set up for the containers to use. Open up File Station create the following.
/docker/projects/sabnzbd-compose
/docker/sabnzbd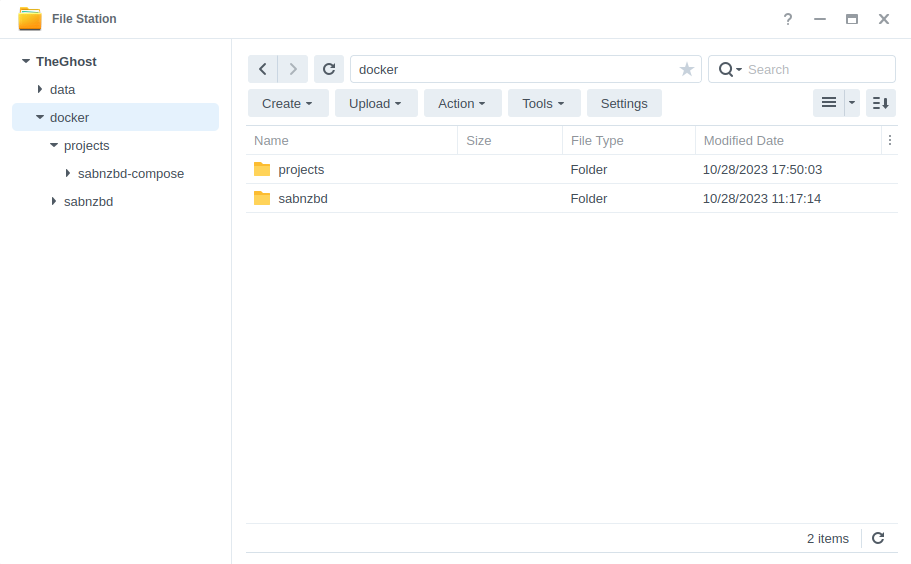
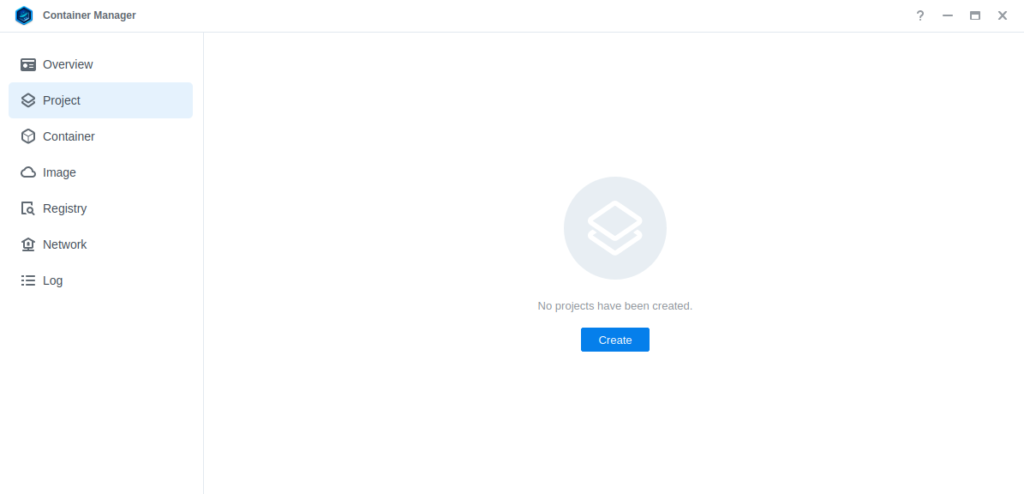
Container Manager
Next we are going to set up a ‘Project’ in Container Manager. Open up Container Manager and click on Project then on the right-hand side click ‘Create’.
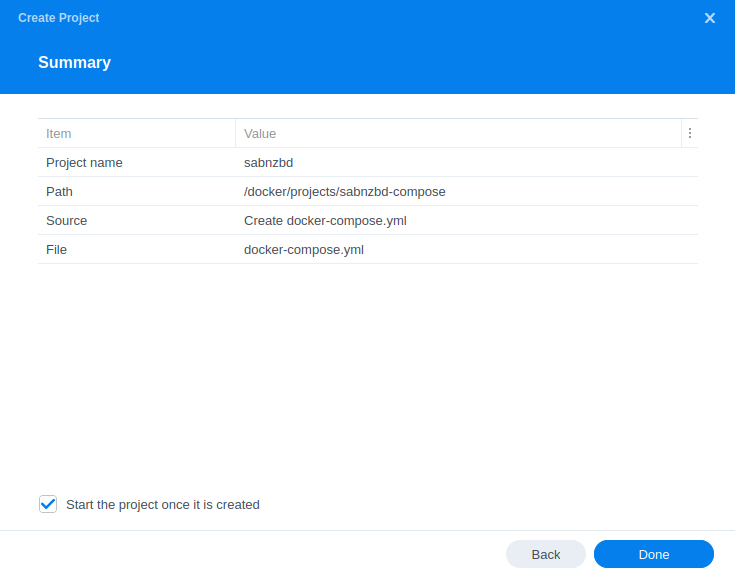
In the next screen we will set up our General Settings, enter the following:
| Section | Setting |
|---|---|
| Project Name: | sabnzbd |
| Path: | /docker/projects/sabnzbd-compose |
| Source: | Create docker-compose.yml |
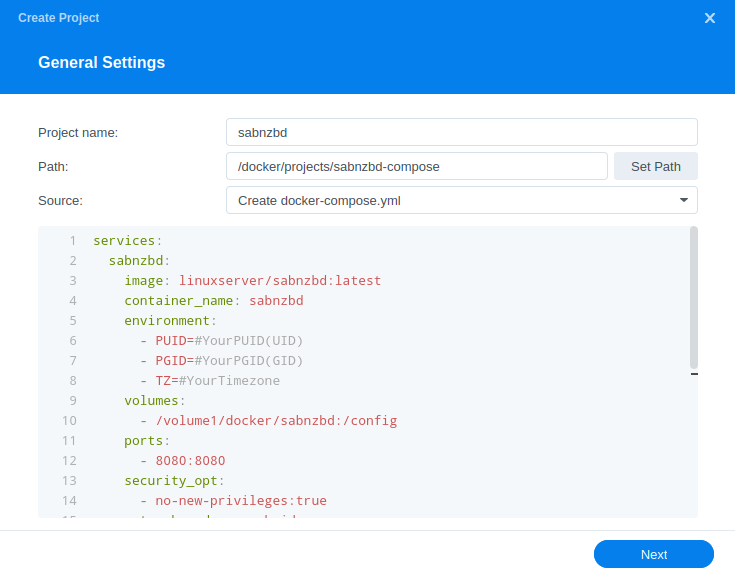
Next we are going to drop in our docker compose configuration, copy all the code in the box below and paste it into line ‘1’ just like the screenshot.
services:
  sabnzbd:
    image: linuxserver/sabnzbd:latest
    container_name: sabnzbd
    environment:
      - PUID=1234 #CHANGE_TO_YOUR_UID
      - PGID=65432 #CHANGE_TO_YOUR_GID
      - TZ=Europe/London #CHANGE_TO_YOUR_TZ
      - UMASK=022
    volumes:
      - /volume1/docker/sabnzbd:/config
      - /volume1/data/usenet:/data/usenet
    ports:
      - 8080:8080/tcp
    network_mode: synobridge
    security_opt:
      - no-new-privileges:true
    restart: always
Environment Variables
We are now going to amend some key variables to make sure the container has access to our folders and also knows where we are in the world. Don’t change any other settings other than those I mention.
| Variable | Value |
|---|---|
| PUID | (required) The UID you obtained in the user setup guide |
| PGID | (required) The GID you obtained in the user setup guide |
| TZ | (required) Your timezone wikipedia.org/wiki/List_of_tz_database_time_zones |
Once you have made the edits you can click ‘Next’
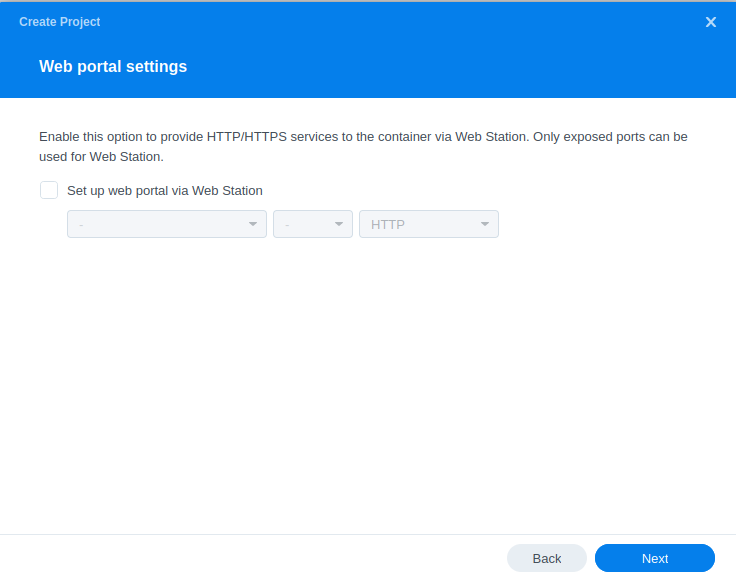
You do not need to enable anything on the ‘Web portal settings’ screen click ‘Next’ again.
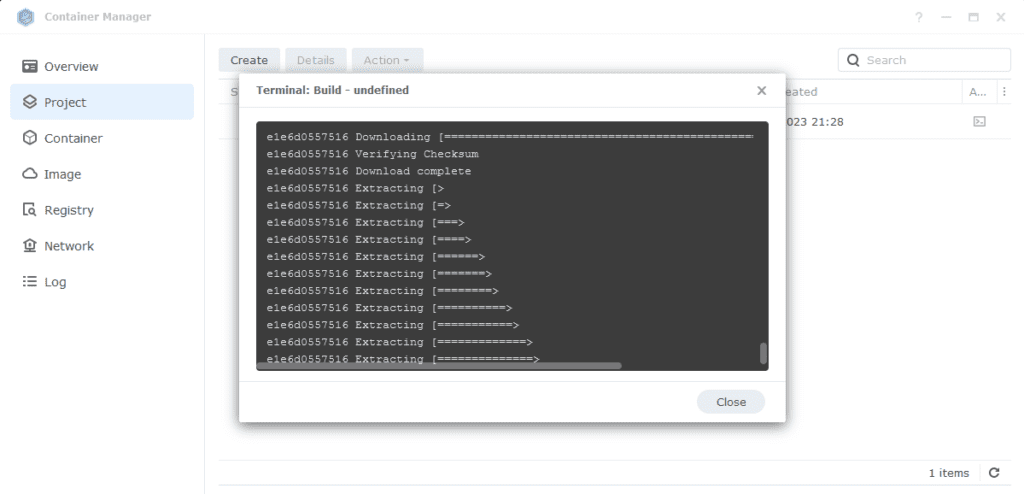
On the final screen click ‘Done’ which will begin the download of the container images and once downloaded they will be launched!
The image will now be downloaded and extracted. You should see ‘Code 0’ when it has finished.
Firewall Exceptions
(Skip if you don’t have the Firewall configured)
If you have the Synology Firewall enabled please see this additional guide for further info on exceptions and correct set up.
Some final steps
SABnzbd will now be running on port 8080 you can connect to it by going to the IP address of your NAS with that port
e.g. 192.168.0.40:8080
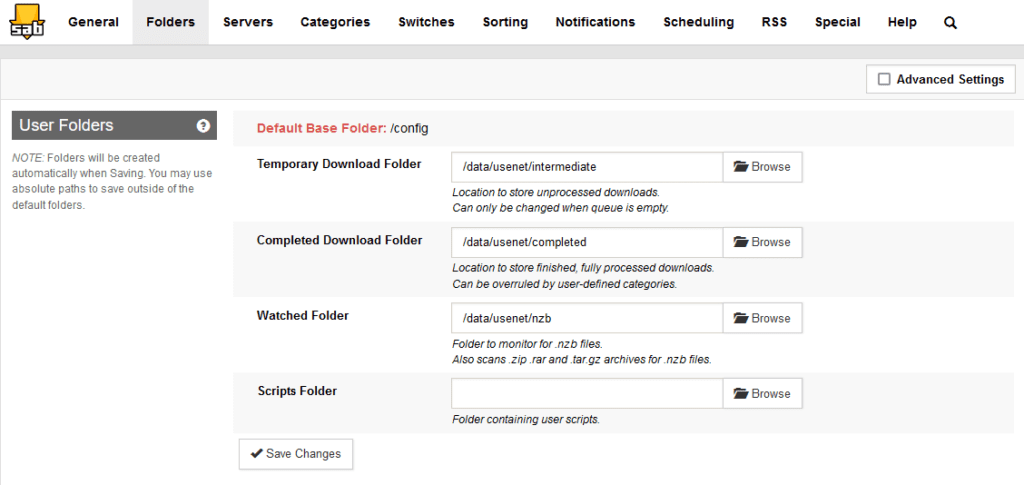
Once you have completed the setup wizard, go into the settings and amend your folders to the following
| Setting | Path |
|---|---|
| Temporary Download Folder | /data/usenet/intermediate |
| Completed Download Folder | /data/usenet/completed |
| Watched Folder | /data/usenet/nzb |
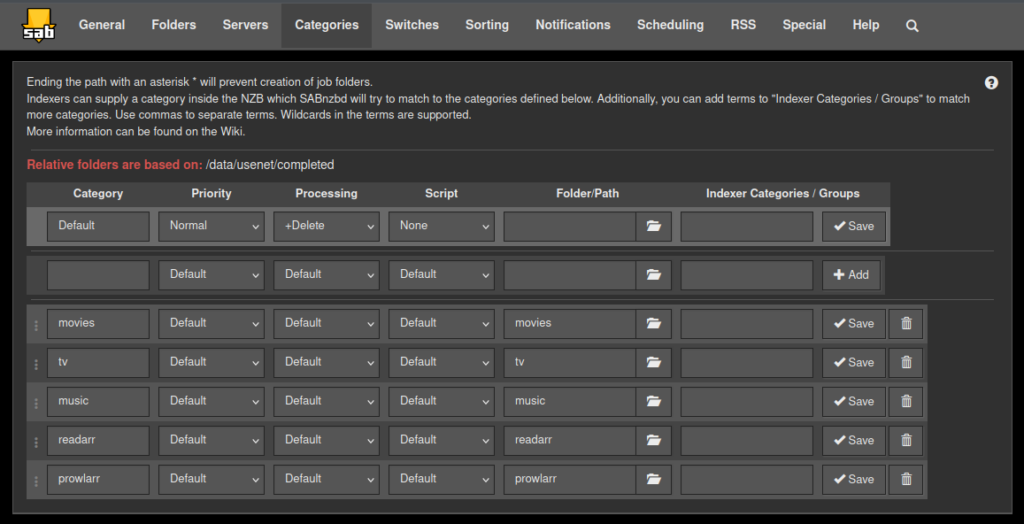
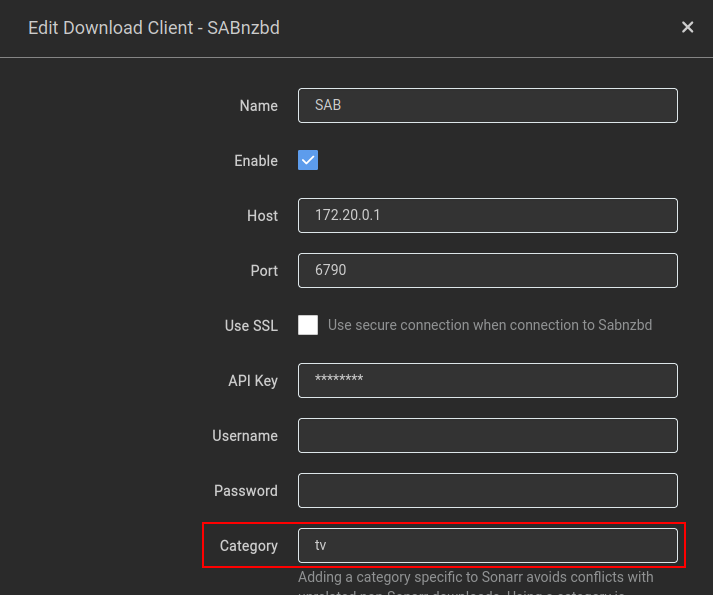
If you are using SABnzbd for your download client in the Arrs you will want to add some categories and paths as shown below. When adding SABnzbd to each of the Arrs match up the category in the download client settings, like the example below in Sonarr.
Categories will look like below, note that the path is purely the name of the folder with no other information, you will need to create each of the category folders in your usenet completed folder manually.
You are now configured to get downloads working, there are quite a few options in the configuration sections of the app that can both improve and hinder performance. These really depend on the capability of your NAS so keep this in mind.
Looking for some help, join our Discord community
If you are struggling with any steps in the guides or looking to branch out into other containers join our Discord community!

Buy me a beverage!
If you have found my site useful please consider pinging me a tip as it helps cover the cost of running things or just lets me stay hydrated. Plus 10% goes to the devs of the apps I do guides for every year.


TVM for all your excellent work @DR_Frankenstein!
I made the switch from native Synology packages to Docker some time ago using your guides and whereas everything is working very well, I have recently noticed that two of the containers are using a surprisingly high amount of CPU resource.
Both SABnzbd+ (linuxserver/sabnzbd:latest) & Sonarr (linuxserver/sonarr:latest) are each showing about 25% CPU utilisation, even when the apps are idle.
These were the first two containers that I added to Docker, there’s now 10 in total but it’s only these two that appear to be misbehaving.
Please could you suggest why this might be and what I could do to reduce their appetite for CPU cycles?
Hey these are like buses, just had someone on Discord with exactly the same question!. Can you see if its these two same services causing the spike..
https://cdn.discordapp.com/attachments/861680221530095619/1193242782547054682/Schermafbeelding_2024-01-06_om_18.20.08.png?ex=65ac00f0&is=65998bf0&hm=70d59a01ccd6d92ee34e7931ba2ca4db7fadb518ee8a8019f4bee7330d3d9863&
https://cdn.discordapp.com/attachments/861680221530095619/1193242782907768842/Schermafbeelding_2024-01-06_om_18.20.35.png?ex=65ac00f0&is=65998bf0&hm=194377e4495d6e26548cfb10e60c222590ea00959d129af0b245adc3405a015c&
Hi. Thank you so much for the guide.
I have set up my file structure exactly as you said – so I can see the following in File Station:
/data/usenet/completed
/data/usenet/intermediate
/data/usenet/nzb
However, when I try to set the Folders in User Folders in SABnzbd I cannot access anything that is under /data/usenet. There’s just nothing there with the file browser and if I type it manually it just strips it out (e.g. strips out ‘intermediate’).
I followed everything exactly and used your YML file with only the PUID, PGID and TZ to match my own.
What’s going wrong?
Hey, sounds like a permission issue, jump back to the user and group guide there is a command you can run to fix the folder(s)
Hi there. Thanks for your guides. I was wondering if you could help me with a basic question: I’ve got the arr apps root folders set to the media subfolders and sabnzbd / qbittorrent set up to send the downloads to the incompleted/completed/etc folders in their respective /data folders. In your folder structure guide, you didn’t show torrents/usenet subfolders for different media types. I was about to setup categories in sabnzbd for my media types – do I need subfolders there? Also, I’m about to move on to set up plex and I’m wondering how the completed torrent and usenet files get moved to the media folder? Is that done in the background through the arrs integration with the download client? Please help me understand
Hey
So when you set up Sonarr Radarr etc they will tell the torrent clients which categories/subfolders to put the file in. However this is not mandatory as they are clever enough to detect the correct files to import, so I don’t have that in the initial guide.
From a Plex perspective… Radarr and Sonarr once a download has completed will Move/Hardlink (depending on Usenet/Torrents) the files to the appropriate media folder automatically and perform renaming etc. So in Plex you would set you Media folder to be /data/media/movies etc..
I already have Heimdall running on port 8080. I tried changing the port to 8090 in the compose file, but I can not get it to work. Do you have any pointers for this noobie?
Make sure you just change the left hand external port and you should be good.
Thanks for the guides! I followed lots of them to set up my synology and they’ve been working great! The only issue I’ve had has been getting download speeds over 11MB/s on Sabnzbd. I’ve to gigabit speed and the synology is connected to ethernet. Any suggestions?
Hey,what NAS do you have and drives downloading to? Under the Wrench icon do a performance test to see if it highlights an issue as you should easily hit much higher.
I’ve got a DS220+ with 2 Seagate Iron Wolf drives. Under performance tests I get the following:
Used cache 0 B (0 articles)
System load 3.56 | 7.16 | 7.07 | V=150M R=85M
System performance (Pystone) 182945 Intel(R) Celeron(R) J4025 CPU @ 2.00GHz SSSE3
Download folder speed 36.5 MB/s /data/usenet/intermediate
Complete folder speed 25 MB/s /data/usenet/completed
Internet Bandwidth 87.2 MB/s 697.6 Mbps
Thanks!
OK, you should be getting a lot more, noticed your overall system load is high, how much RAM do you have? You need to keep in mind if your disks are busy it’s going to bottleneck throughput.
Was there a line that said something like Download speed limited by – Disk speed (29x)
That test gives a rough idea, but it can be all over the place as I receive Disk speed warnings when it’s going direct to a SSD connected to esata.
https://sabnzbd.org/wiki/advanced/highspeed-downloading
I’m at 18gb of RAM, and I didn’t get a “Download speed limited by” message. I was able to increase my speed up to ~70MB/s by changing my server priority order and changing the number of connections. There’s still room to increase speed, but it looks like the issue may be more on the server side than the Synology itself.
Thanks for helping me figure that out!
Looks like I spoke too soon in my previous reply. Now that I’ve got some faster download speeds, I am getting the “Download speed limited by” message:
Used cache 145.8 MB (199 articles)
System load 9.05 | 7.62 | 5.95 | V=449M R=377M
Download speed limited by Disk speed (11x)
System performance (Pystone) 178649 Intel(R) Celeron(R) J4025 CPU @ 2.00GHz SSSE3
Download folder speed 12.2 MB/s /data/usenet/intermediate
Complete folder speed 4.7 MB/s /data/usenet/completed
Internet Bandwidth 74.9 MB/s 599.2 Mbps
I suspect that if you get any other activities taking place on your drives in SHR you will get a drop in performance.
Have you thought about trying out NZBGet I am reviewing getting a new guide back up after I archived the old one. NZBGet has been getting a ton of fresh development under its new ownership.
https://nzbget.com/
https://hub.docker.com/r/nzbgetcom/nzbget
I am very productive today if you want to try out NZBGet instead
https://drfrankenstein.co.uk/2023/12/18/nzbget-in-container-manager-on-a-synology-nas/
Thanks! I just installed NZBGet and the download speeds hover at around 30MB/s compared to about 70MB/s in SABnzbd. I’m going to play with the settings in NZBGet to see if I can get the speed any higher.
Thanks!
OK a good start, still odd on the low speeds in SAB but use what works 🙂
I followed the performance tips provided here:
https://nzbget.net/performance-tips
I got my download speeds into mid-70MB/s.
This is a huge improvement compared to the 11MB/s I started at. Thanks!