Important or Recent Updates
| Historic Updates | Date |
|---|---|
| Updated to use Container Manager and Projects | 29/05/2023 |
| Added additional security option to the compose to restrict the container from gaining new privileges | 25/10/2023 |
What is Scrutiny?
Scrutiny is a Hard Drive Health Dashboard & Monitoring solution, merging manufacturer provided S.M.A.R.T metrics with real-world failure rates.
Let’s Begin
In this guide I will take you through the steps to get Scrutiny up and running in Docker.
In order for you to successfully use this guide please set up your Docker Bridge Network first.
Getting our drive details
We need to get some details about our drives in order for Scrutiny to read their SMART data.
It’s time to get logged into your Diskstation via SSH, in this guide I am using Windows Terminal however the steps will be similar on Mac and Linux,
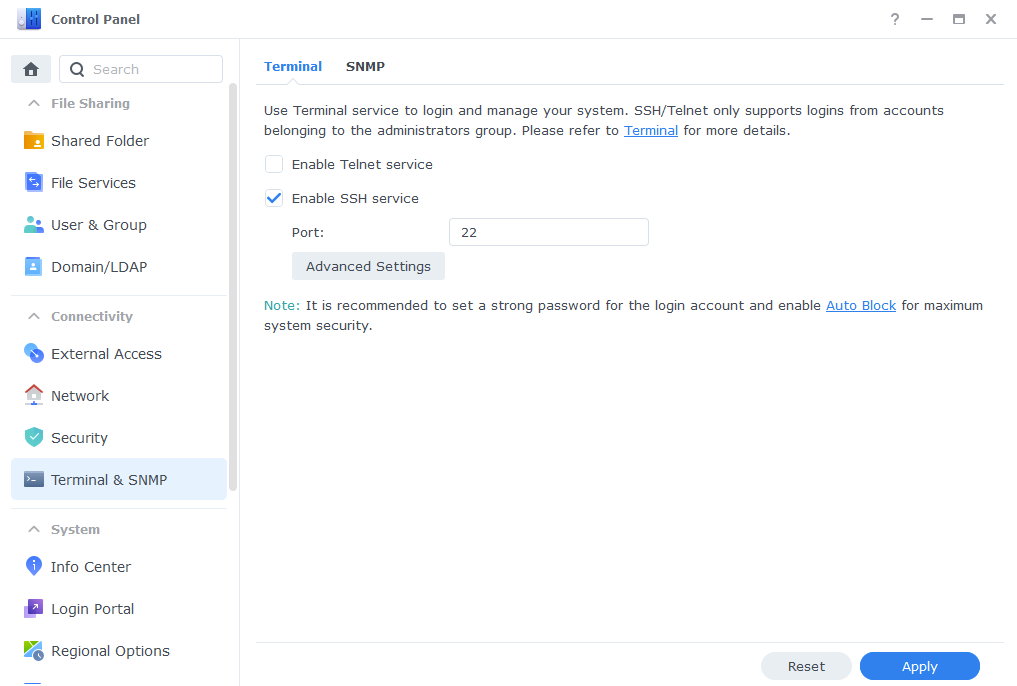
Head into the DSM Control Panel > Terminal & SNMP and then enable SSH service.
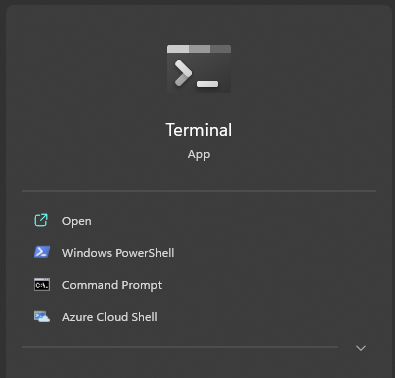
Open up ‘‘Terminal’
Now type ‘ssh’ then your main admin account username @ your NAS IP Address and hit Enter
ssh drfrankenstein@192.168.0.101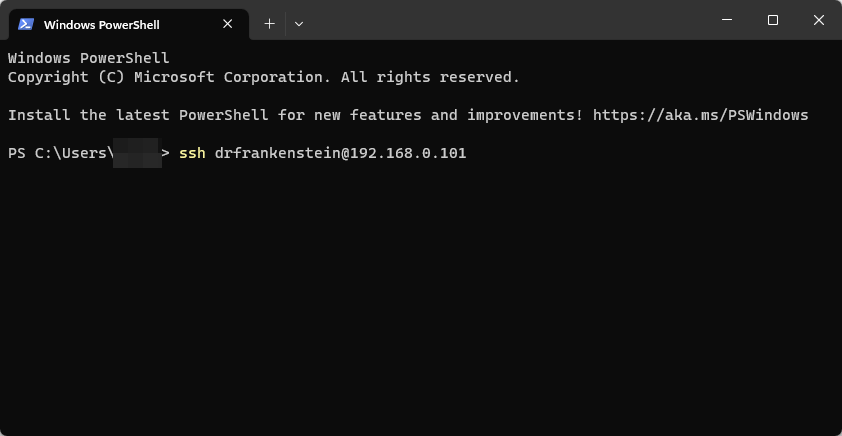
You will then be asked to enter the password for the user you used you can either type this or right click in the window to paste (you won’t see it paste the info) then press enter.
Enter the login information for your main Synology user account, you will not be able to see the password as you type it. (If you are using a password manager right-clicking in the window will paste – you won’t be able to see it)
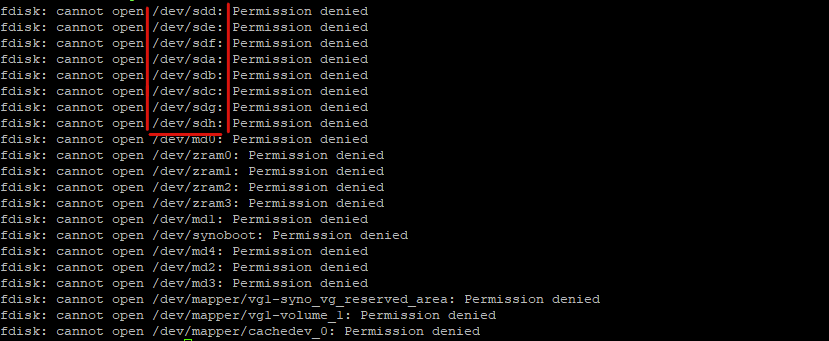
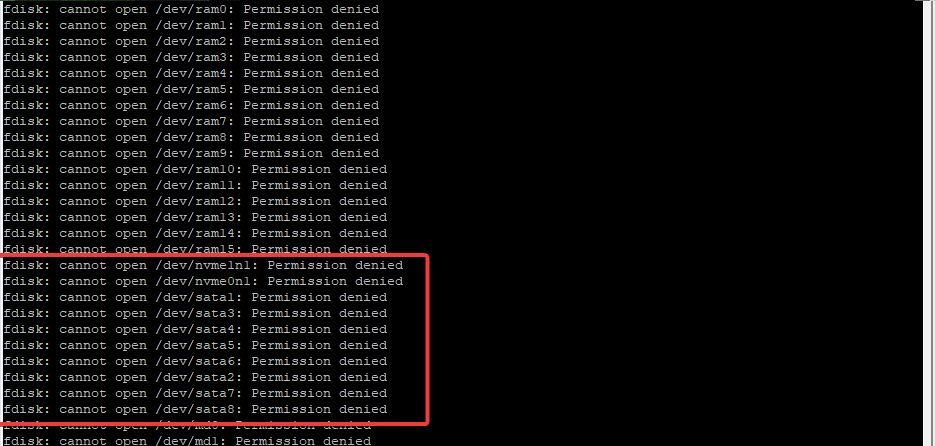
Now we are logged in we just need to do a single command to see our drives, note I am not prefacing this command with sudo as we don’t need the low level detail. You will see permission denied errors, but these can be ignored.
fdisk -lThe output you will see depends on the model NAS you own, the two examples below are from an 1821+ and an 1815+ which have 8 bays and the 1821+ has up to 2 NVMEs.
The 1815+ has 8 drives broken down from sda to sdh
The 1821+ has 8 drives broken down into SATA and NVME devices, sata1 to sata8 with the nvme0n1 and nvme1n1. (Note if you have any eSATA devices connected these will also show)
Make note of the devices you see in your output as we will need them for the config file and compose.
Config Files and Folders
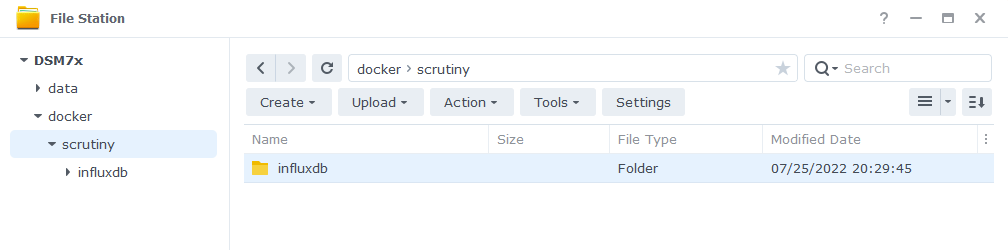
Next let’s create the folders the container will need. Head into FileStation and create a subfolder in the ‘docker’ share called ‘scrutiny’ and then within that another called ‘influxdb’ it should look like the below.
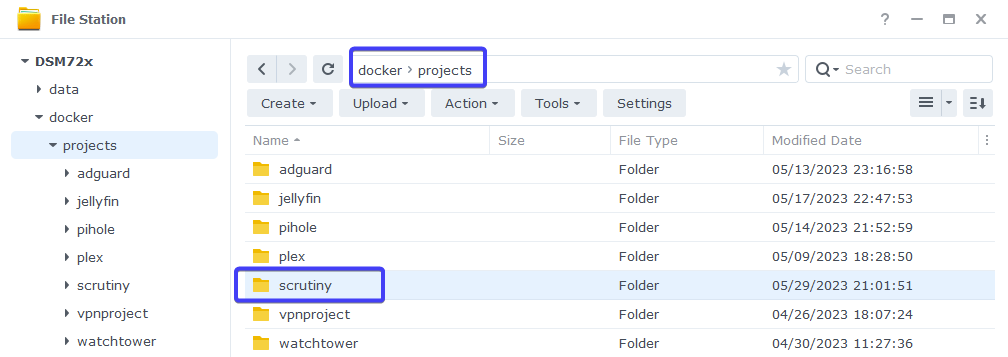
Then if you don’t have one already from my other guides create another folder in the ‘docker’ share called ‘projects’ and within that another one called ‘scrutiny’
Next comes the config files, You can edit this file in a number of ways, but to keep the guide OS-agnostic we will be using the Synology Text Editor package which can be installed via Package Center.
Open up a new text document and paste one of the two code snippets below into it. Use the one that matches up with the way your drives are shown in the previous step (if you come across anything different let me know in the comments!)
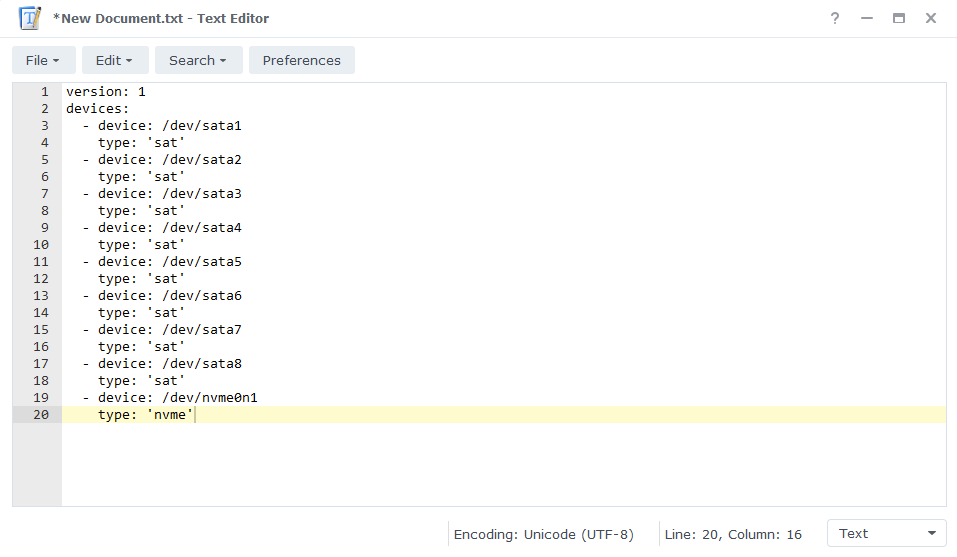
Type 1
version: 1
host:
  id: ""
devices:
  - device: /dev/sata1
    type: 'sat'
  - device: /dev/sata2
    type: 'sat'
  - device: /dev/sata3
    type: 'sat'
  - device: /dev/sata4
    type: 'sat'
  - device: /dev/sata5
    type: 'sat'
  - device: /dev/sata6
    type: 'sat'
  - device: /dev/sata7
    type: 'sat'
  - device: /dev/sata8
    type: 'sat'
  - device: /dev/nvme0n1
    type: 'nvme'
  - device: /dev/nvme1n1
    type: 'nvme'
Type 2
version: 1
host:
  id: ""
devices:
  - device: /dev/sda
    type: 'sat'
  - device: /dev/sdb
    type: 'sat'
  - device: /dev/sdc
    type: 'sat'
  - device: /dev/sdd
    type: 'sat'
  - device: /dev/sde
    type: 'sat'
  - device: /dev/sdf
    type: 'sat'
  - device: /dev/sdg
    type: 'sat'
  - device: /dev/sdh
    type: 'sat'
  - device: /dev/nvme0n1
    type: 'nvme'
  - device: /dev/nvme1n1
    type: 'nvme'
You will need to edit the config file in line with the number of drives you had in the output earlier either adding or removing lines accordingly, including adding or removing the NVME drives.
Next you can save this file as ‘collector.yaml’ in the ‘/docker/scrutiny’ folder.
Notifications Config (optional)
This step is optional and depends on if you want to set up some notifications in case one of your drive has issues.
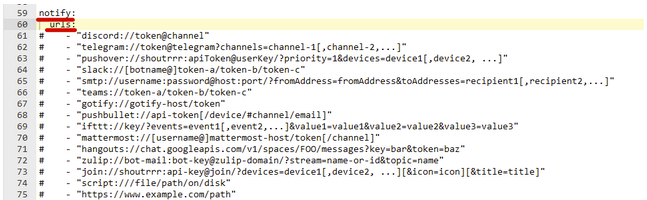
As of writing there are 14 different notification method, as you can imagine I cannot cover every single type in this guide, but this will get the config file in place for you to amend based on your preferences
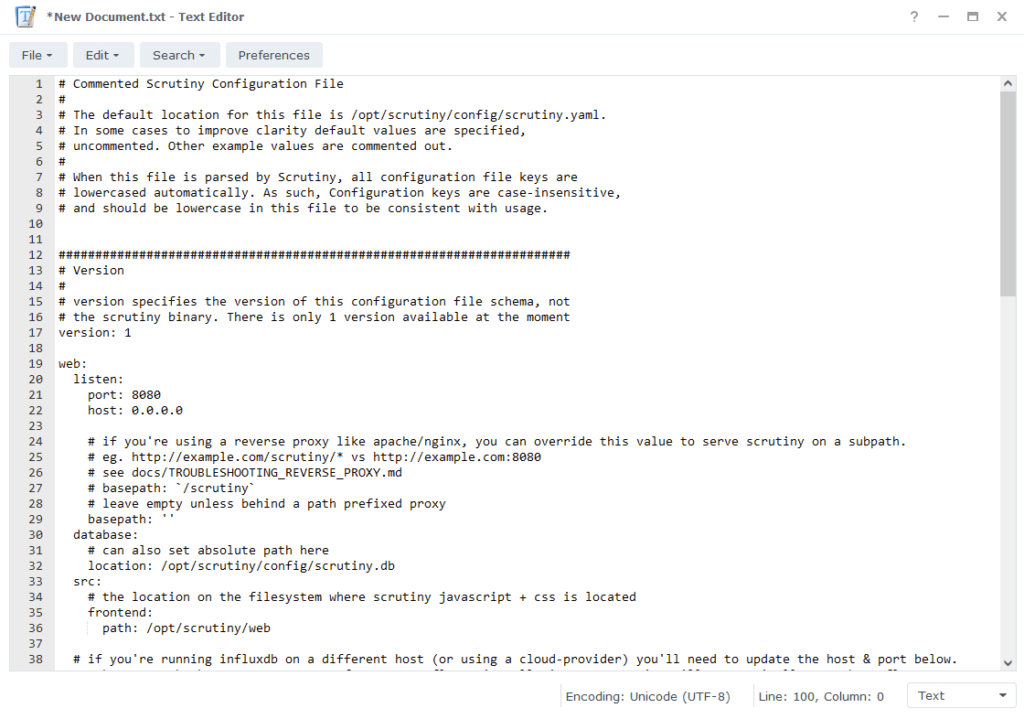
Open up a new file Text Editor again, this time you need to copy and paste the full contents of the example config file located here
Scroll to the bottom of the file where you will see a number of config options for notifications. You will need to the remove the # from the ‘notify’ and ‘urls’ lines and then depending on which type of notification you decide to set up the # will need to be removed from the corresponding line.
The level of notification you receive (Critical or All Issues) can be set up in the WebUI once Scrutiny is up and running.
Finally, save this file as ‘scrutiny.yaml’ into the /docker/scrutiny folder.
Docker Compose
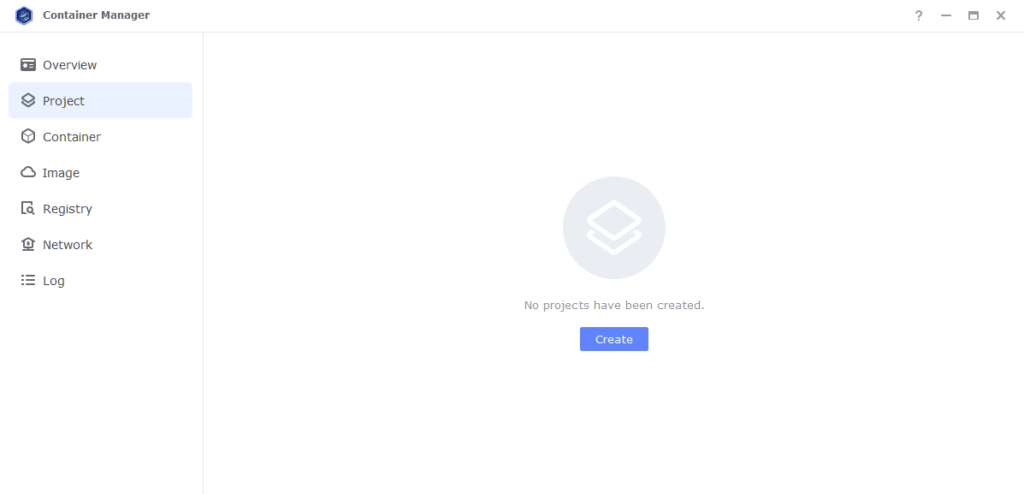
We will be using Docker Compose in the Projects section of Container Manager to set up the container.
Open up Container Manager and click on Project then on the right-hand side click ‘Create’.
In the next screen we will set up our General Settings ‘Project Name’ will be ‘scrutiny’ the ‘Path’ click the button and select the folder we created earlier in ‘/docker/projects/scrutiny’. ‘Source:’ change the drop-down to ‘Create docker-compose.yml’.
Next we are going to drop in our docker compose configuration copy all the code in the box below and paste it into line ‘1’ just like the screenshot.
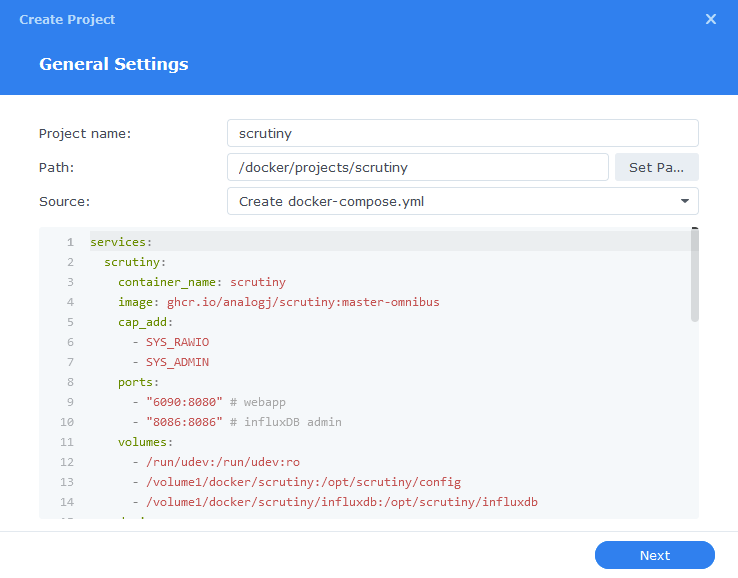
services:
  scrutiny:
    container_name: scrutiny
    image: ghcr.io/analogj/scrutiny:master-omnibus
    cap_add:
      - SYS_RAWIO
      - SYS_ADMIN
    ports:
      - 6090:8080/tcp # webapp
      - 8086:8086/tcp # influxDB admin
    volumes:
      - /run/udev:/run/udev:ro
      - /volume1/docker/scrutiny:/opt/scrutiny/config
      - /volume1/docker/scrutiny/influxdb:/opt/scrutiny/influxdb
    devices:
      - /dev/nvme0n1:/dev/nvme0n1
      - /dev/nvme1n1:/dev/nvme1n1
      - /dev/sata1:/dev/sata1
      - /dev/sata2:/dev/sata2
      - /dev/sata3:/dev/sata3
      - /dev/sata4:/dev/sata4
      - /dev/sata5:/dev/sata5
      - /dev/sata6:/dev/sata6
      - /dev/sata7:/dev/sata7
      - /dev/sata8:/dev/sata8
    environment:
      - SCRUTINY_WEB_INFLUXDB_TOKEN=ANYLONGSTRING
      - SCRUTINY_WEB_INFLUXDB_INIT_USERNAME=A-USERNAME
      - SCRUTINY_WEB_INFLUXDB_INIT_PASSWORD=A-PASSWORD
    network_mode: synobridge
    security_opt:
      - no-new-privileges:true
    restart: unless-stopped
As you can see the devices section contains all our drives, you will need to amend this again in line with the config file you created earlier. You will need to amend the paths each side of the : so they match, adding or removing drives accordingly including the NVMEs.
e.g., /dev/sata1:/dev/sata1 or /dev/sda:/dev/sda and so on.
In addition to this you will see in the ‘environment’ section three variables that will need to be updated as outlined below, these secure the database used by scrutiny.
| Variable | Value |
|---|---|
| SCRUTINY_WEB_INFLUXDB_TOKEN | enter a sting of characters you can use almost anything treat it like a password so a nice long string |
| SCRUTINY_WEB_INFLUXDB_INIT_USERNAME | This can be anything you like |
| SCRUTINY_WEB_INFLUXDB_INIT_PASSWORD | a secure password |
These 3 values are only required for the first ever setup – you can remove them once Scrutiny is up and running but keep them safe in case you ever need them. Maybe in Vaultwarden!
Once you have made the edits press ‘Next’
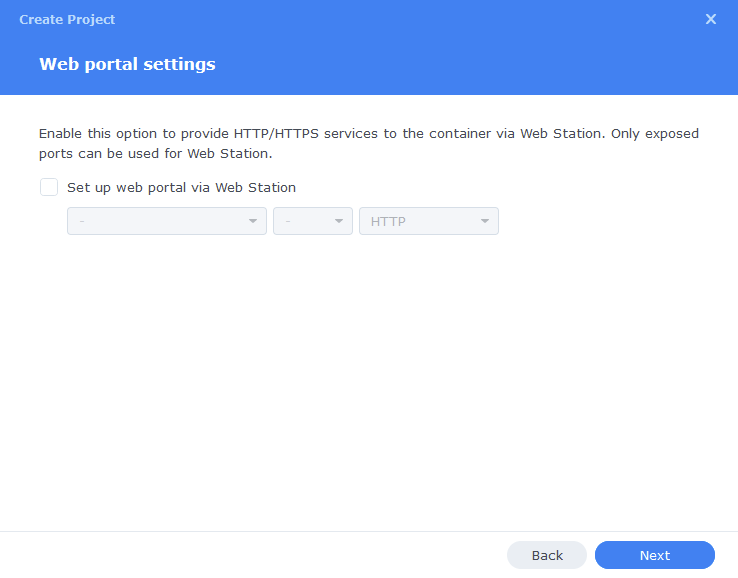
You do not need to enable anything on the ‘Web portal settings’ screen click ‘Next’ again.
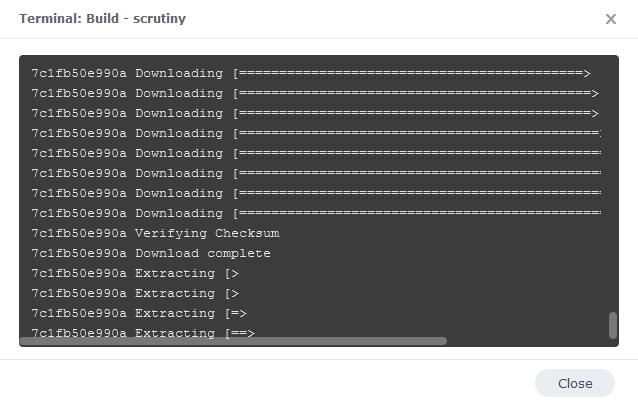
On the final screen click ‘Done’ which will begin the download of the container image and once downloaded they will be launched!

You will now see Scrutiny running and should have a green status on the left-hand side.
You should now be able to access the Scrutiny WebUI by going to your NAS IP followed by port 6090
e.g., 192.168.0.30:6090
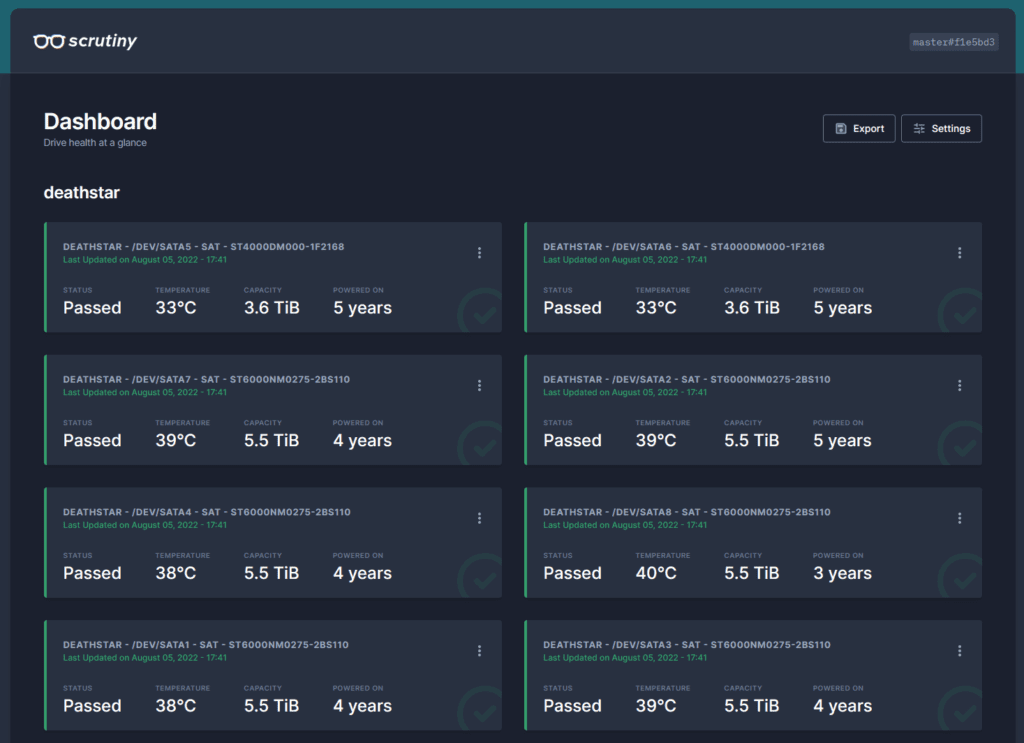
Sometimes it can take a few minutes before all your drives appear, as Scrutiny needs to obtain their information so don’t panic if it’s initially empty. You can now adjust settings for the UI and Notifications in the WebUI.
FAQ (Frequently Asked Questions)
I added extra drives to my config, and they don’t appear in the UI even after waiting
You can overcome this by stopping the overall Project and then rebuilding it via Action > Build in the Container Manager UI
Buy Me a Coffee or a Beer
If you have found my site useful please consider pinging me a tip as it helps cover the cost of running things or just lets me get the odd beverage. Plus 10% goes to the devs of the apps I do guides for every year.


Hi Doc,
Thanks for the helpful guide, I believe I followed it to the T and to be sure I deleted everything and tried again. On my scrutiny dashboard the “Last Updated” time does not update and neither do the temperatures and the temperature graph. It is not my browser as I tried edge, chrome and firefox. Restarting the container (right click on the container in DSM Container Manager and select Restart) does not help too. The only way to get the values to update is to stop the container and start it again. Am I missing some other setting?
Hmm it should update automatically, now its funny I just checked my own personal version and the data stopped on March 10th! I hadn’t even noticed it stopped updating!!
Let me do some investigating and come back!
OK this is a bug in the current version
https://github.com/AnalogJ/scrutiny/issues/602
You can pull the working image while we wait on a fix
image: ghcr.io/analogj/scrutiny:v0.7.3-omnibus
https://github.com/AnalogJ/scrutiny/pkgs/container/scrutiny/versions?filters%5Bversion_type%5D=tagged
Thanks! Yeah it took me a while to realise something was up.
If the instructions above were followed, will the image update automatically when a new version is released?
You will be locked into the version specified while the fix is found, so you will need to move back to the one in the guide which will receive the latest updates. See the sidebar for how to perform the updates post build.
Just released a fix. Cron will work correctly in v0.8.1+
For anyone following this guide in the future. If you capitalize the S in the scrutiny folder like I did, you will have get an error message when building. “Failed to bind to mount point”
Just rename the folder to all lowercase letters.
Good tip, keep everything lowercase it always saves a headache 🙂
Hello! Based on your instructions, I created a docker container Scrutiny.
Not one one attribute is not read from disks connected to the motherboard. Everything is OK from the disks connected to the LSI controller. I found differences in the container logs. For drives on the motherboard device_protocol`=”SCSI”,device_type`=”scsi”, for drives on LSI device_protocol`=”ATA”,device_type`=”scsi”. It looks like the protocol is not defined correctly.
https://bafista.ru/wp-content/uploads/2024/02/image.thumb_.png.137f3a00b451213c9c45a6c032733267-1707819165.2884.png
When you run the command what is DSM (xpenology) seeing for the drive info on the output? As your experience will likely be different depending on what if any information Scrutiny is going to be receiving via the drives connected via the LSI controller.
Hi Dr. Frankenstein
I have migrated all my Docker-Container to Container Manger on my SynoNAS (DS918+ DSM 7.2) by using your guides. Everythin went well so far. Every Container/Project is up and running. Also can I reach all ARR’s with my Browser. Only 4 Projects/Container makes problems. Scrutiny, spotweb and nzbhydra2 can not be reached over web, and minecraftjava crashes? after some time and the green point went to orange.
Could you tell me what I’ve done wrong?
Hey, xIExodusIx
I will need a bit more detail of the problematic containers. Can you reach out to me via my Help Me! page or via Discord and can certainly have a look at logs for you,
Hello Doc 🙂
The Project scrutiny I got to run, it works now after I deleted all in the “influxdb” Folder and building the Project new.
But spotweb won’t. I got some trouble with the Database Password, but this I could solve, but now, if I type my NASIP:9096 in my browser (Edge) I got an empty Webpage with the comment: “This page is not reachable”. Maybe I have to wait until tomorrow, and then try again and further. Under Docker all was fine.
For NZBHydra2 I modified the NZBGet script, under DFokker it works, but now I can’t reach it with NASIP:5075.
Minecraftjava I should start from scratch I think. I will try this first.
Thanks for helping. I will write if I have mor trouble.
xIExodusIx
Hi Doc,
it’s me again, the nzbhydra2 project is up and running, but still not reachable by NASIP:5075. But I don’t really need this tool, it’s not important for me! The spotweb projekt is also up and running and also not reachable by NASIP:9096.
I don’t have any clue anymore. What do you need from me for help solving this problem?
Thanks for helping 🙂
xIExodusIx
Hey spotted your other comments, ping me a message via my Help Me page so we keep the comments he related to the guide above.
Hello Dr. Frankenstein,
thank you for that tutorial. I followed step by step. Unfortunately, when opening up the Scrutiny-Dashboard, I don’t see any drives listed there – its just empty. fdisk -l command returned this:
fdisk: cannot open /dev/ram0: Permission denied
fdisk: cannot open /dev/ram1: Permission denied
fdisk: cannot open /dev/ram2: Permission denied
fdisk: cannot open /dev/ram3: Permission denied
fdisk: cannot open /dev/ram4: Permission denied
fdisk: cannot open /dev/ram5: Permission denied
fdisk: cannot open /dev/ram6: Permission denied
fdisk: cannot open /dev/ram7: Permission denied
fdisk: cannot open /dev/ram8: Permission denied
fdisk: cannot open /dev/ram9: Permission denied
fdisk: cannot open /dev/ram10: Permission denied
fdisk: cannot open /dev/ram11: Permission denied
fdisk: cannot open /dev/ram12: Permission denied
fdisk: cannot open /dev/ram13: Permission denied
fdisk: cannot open /dev/ram14: Permission denied
fdisk: cannot open /dev/ram15: Permission denied
fdisk: cannot open /dev/sata2: Permission denied
fdisk: cannot open /dev/sata1: Permission denied
fdisk: cannot open /dev/md0: Permission denied
fdisk: cannot open /dev/zram0: Permission denied
fdisk: cannot open /dev/zram1: Permission denied
fdisk: cannot open /dev/zram2: Permission denied
fdisk: cannot open /dev/zram3: Permission denied
fdisk: cannot open /dev/md1: Permission denied
fdisk: cannot open /dev/synoboot: Permission denied
fdisk: cannot open /dev/usb1: Permission denied
fdisk: cannot open /dev/md2: Permission denied
fdisk: cannot open /dev/mapper/vg1-syno_vg_reserved_area: Permission denied
fdisk: cannot open /dev/mapper/vg1-volume_1: Permission denied
and I used this for my collector.yaml file:
version: 1
host:
id: “”
devices:
– device: /dev/sata1
type: ‘sat’
– device: /dev/sata2
type: ‘sat’
– device: /dev/md0
type: ‘md’
– device: /dev/md1
type: ‘md’
– device: /dev/md2
type: ‘md’
Any help is appreciated. Thank you in advance!
Hey remove the mdX lines they are the raid array you just need the sata ones