Please note if you are using DSM7.2 or higher you should use the Container Manager version of this guide from the menu.
This guide has reached the end of its updates as most people are now on the latest DSM update - This guide is correct as of 08/12/2023 however no further updates will be added.
| Update | Date |
|---|---|
| You can now amend the cron schedule to pull on your own schedule rather than the 5-minute default | 17/09/2023 |
What is Spotweb?
To quote the GitHub page.
“Spotweb is a decentralized Usenet community based on the Spotnet protocol.”
It is essentially a self-hosted Usenet indexer that integrates with your favourite media managers such as Radarr, and I am going to walk you through setting this up in Docker on your Synology NAS
Let’s Begin
The guide has 2 pages:
- Page 1 – Folder setup and Container Manager
- Page 2 – Spotweb Changes and FAQ
Before we start with the main guide head over and follow these two guides to get a docker user and dedicated bridge network set up.
Downloading the Spotweb and MariaDB images
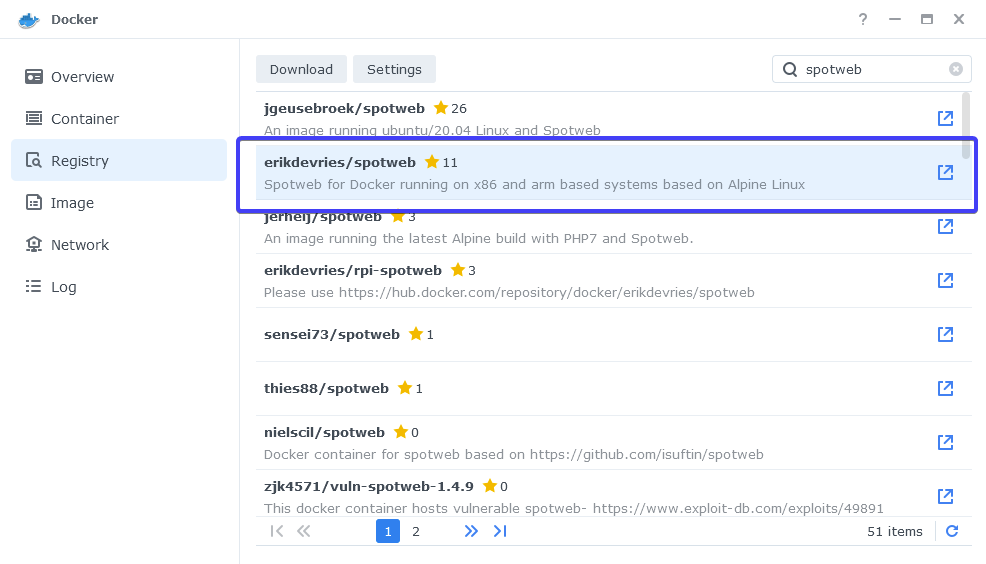
Open up Docker within DSM and navigate to the ‘Registry’ tab, then search for ‘Spotweb’.
In the list of available containers download the one made by erikdevries as shown below.
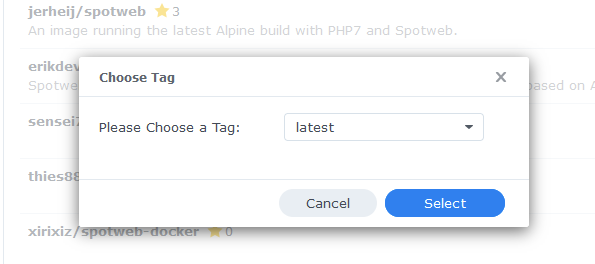
When the dialogue pops up asking you to choose a version, make sure you choose ‘latest’ from the list.
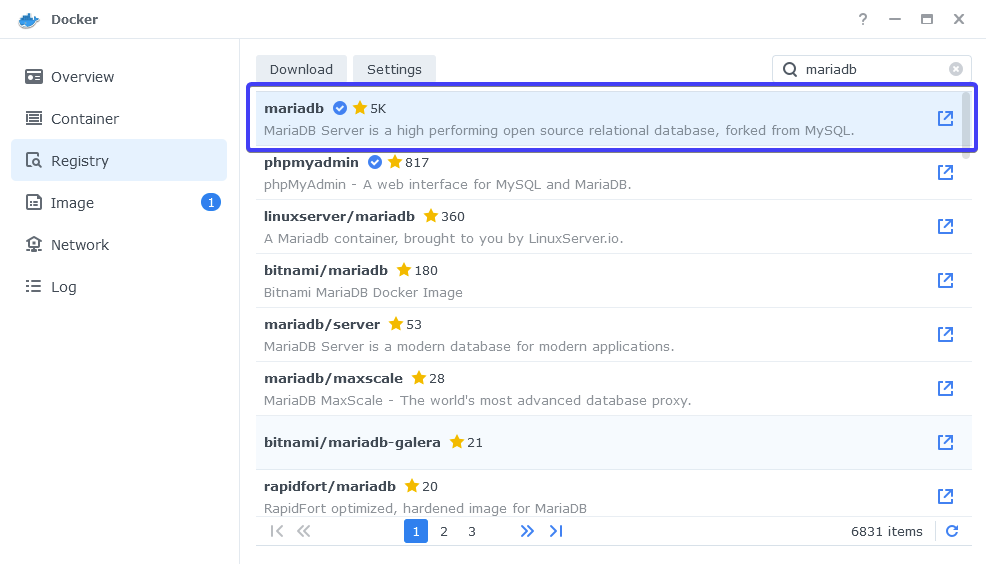
While the Spotweb image is downloading do another search for MariaDB as this is the database will we be using.
Download the official version as shown below using the ‘Latest’ tag when asked.
Setting up the MariaDB Container
In Docker click on the ‘Image’ tab, in the list of your containers select the ‘MariaDB’ image and click on ‘Launch’
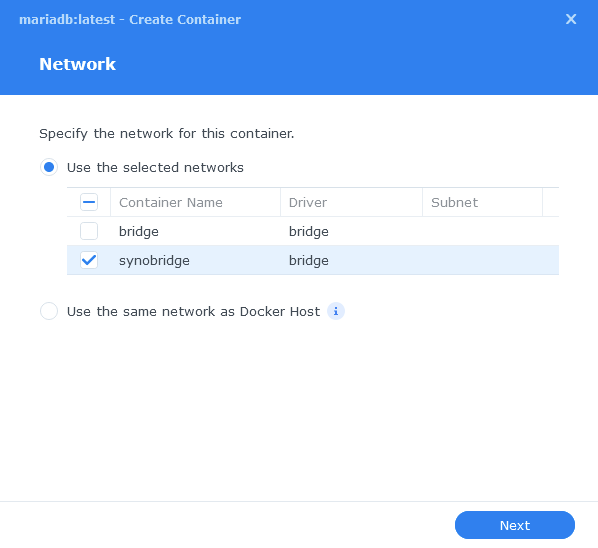
The first screen will ask how you want to set up the Docker network, we will be using the synobridge network we set up earlier.
General Settings
Next you will be greeted with the General Settings screen, this is where you can start specifying some of your preferences.
You can change the name of the container to anything you like, and you will want to enable Auto Restart as this will ensure the database starts automatically if you reboot your NAS.
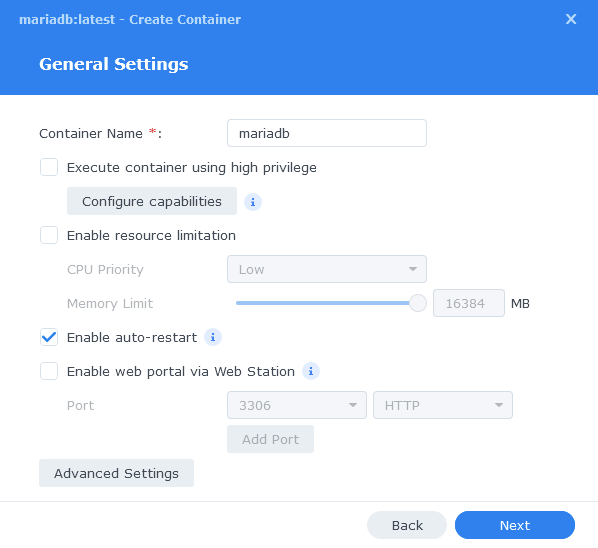
Next up we are going to click on the ‘Advanced Settings’ button, this will take you to a new window with a number of tabs which we are going to work through.
Environment
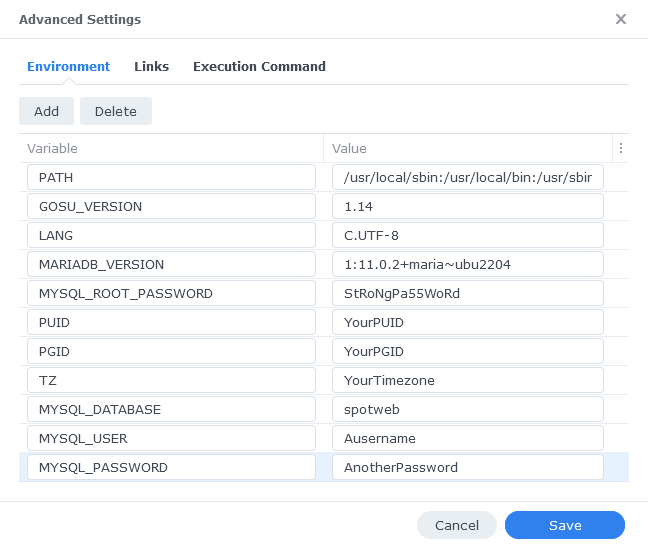
Next we are going to specify some variables that will tell MariaDB what to use for our credentials so Spotweb can access it.
Click the Add button, and fill in the following details as per the table/screenshot. Make note of these you will need them later!
| Variable | Value |
|---|---|
| MYSQL_ROOT_PASSWORD | enter a unique password do not use special characters and keep below 20 alphanumeric e.g. A-Z – 0-9 This is the master password for MariaDB in case you ever need it. |
| PUID | (required) The UID you obtained in the user setup guide |
| PGID | (required) The GID you obtained in the user setup guide |
| TZ | Your timezone wikipedia.org/wiki/List_of_tz_database_time_zones |
| MYSQL_DATABASE | spotweb |
| MYSQL_USER | enter a unique username for the spotweb database |
| MYSQL_PASSWORD | enter a unique password do not use special characters and keep below 20 alphanumeric e.g. A-Z – 0-9 as this is known to cause issues if overly complex |
Links / Execution Command
You do not need to set up anything on these tabs.
Press ‘Save’ to go back to the initial setup screen, then press ‘Next’
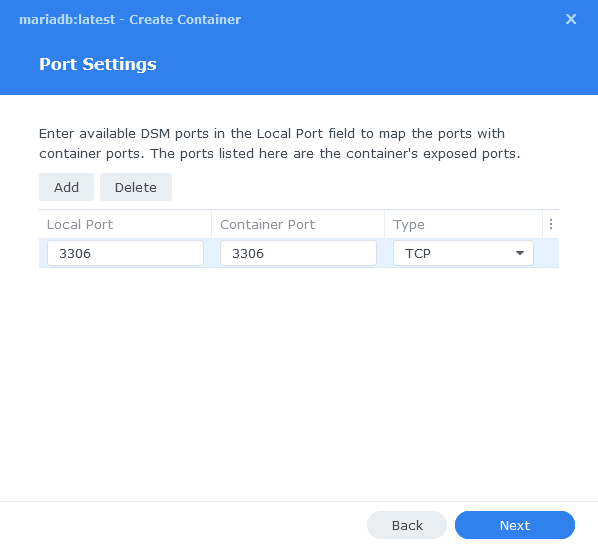
Port Settings
You will see that the Local Port has Auto in it by default, change this to 3306 then click Next.
Volume Settings
We will now be specifying the directories where the database will be stored along with its config files.
Click on ‘Add Folder’ then select the ‘docker’ folder and create a new sub-folder called ‘mariadb’ click on this folder and click ‘Select’
Now in the Mount Path box enter /var/lib/mysql
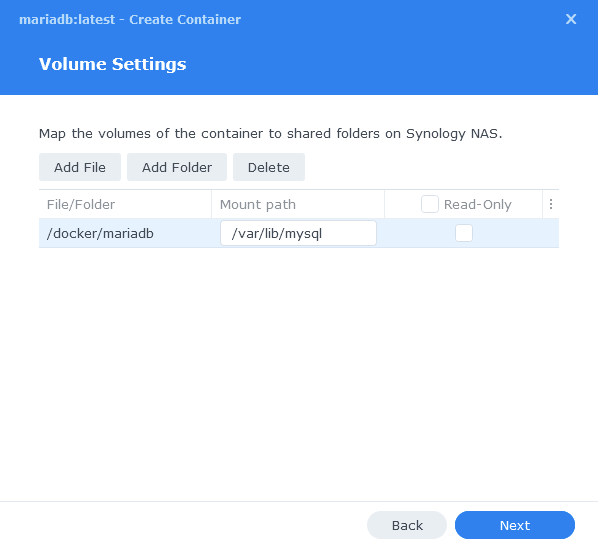
Click ‘Next’
Summary
You have now completed the setup of the database. Click on Next to move back to the final summary screen, this is a good time to double-check everything is correct.
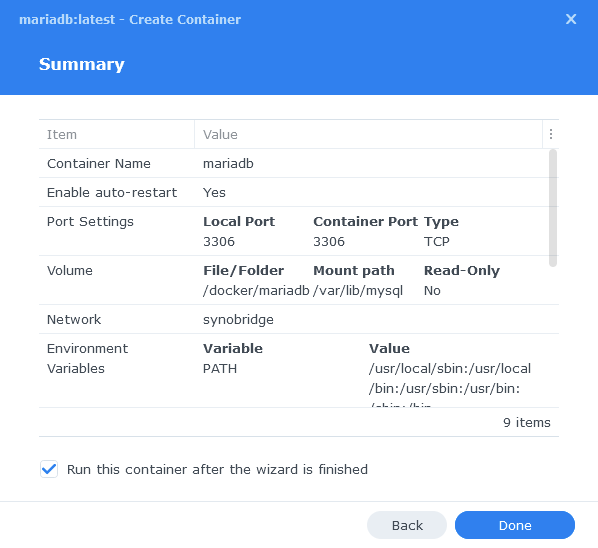
Finally, click on Done and the container should start to boot.
Setting up the Spotweb Container
We are now doing the initial setup and will be coming back to complete it later.
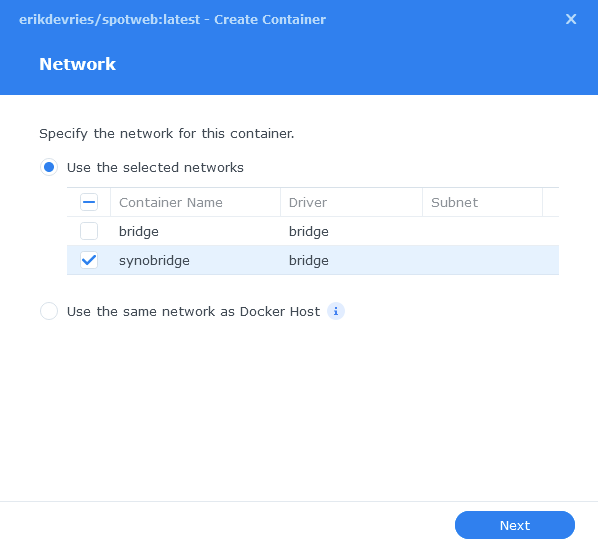
Head back into the Image tab and this time Launch the Spotweb image
You will be greeted with the Network screen, we will be using the ‘synobridge’ network we created earlier select it from the list and click Next.
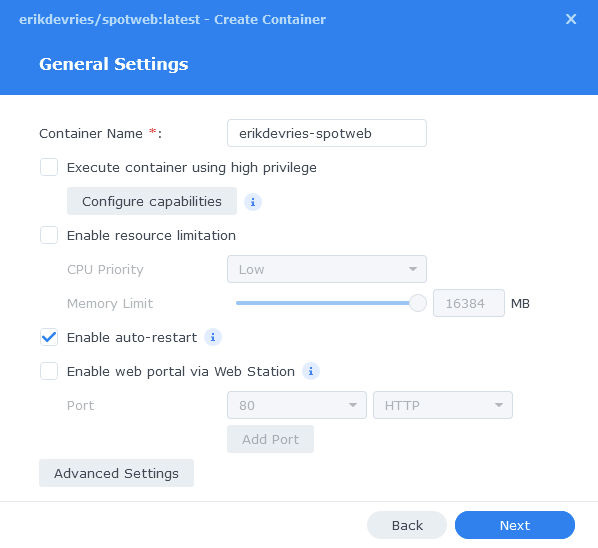
General Settings
Next you can rename the container and enable auto-restart to make sure Spotweb starts up with your NAS, then click Next.
Environment Variables
We are now going to specify some additional variables, click on ‘Advanced Settings’
Click the Add button, and fill in the following details as per the table/screenshot.
| Variable | Value |
|---|---|
| TZ | Your timezone wikipedia.org/wiki/List_of_tz_database_time_zones |
| DB_NAME | spotweb |
| DB_USER | Enter the same username from the MYSQL_USER setting you used for the MariaDB container |
| DB_PASS | Enter the same password from the MYSQL_PASSWORD setting you used for the MariaDB container (Not the Root Password) |
| DB_PORT | 3306 |
| DB_HOST | 172.20.0.1 |
| CRON_INTERVAL | ‘*/5 * * * *’ #by default this is 5 minutes you can work out a different interval by using https://cron.help to adjust the timing e.g. ‘*/60 * * * *’ is every hour on the hour. |
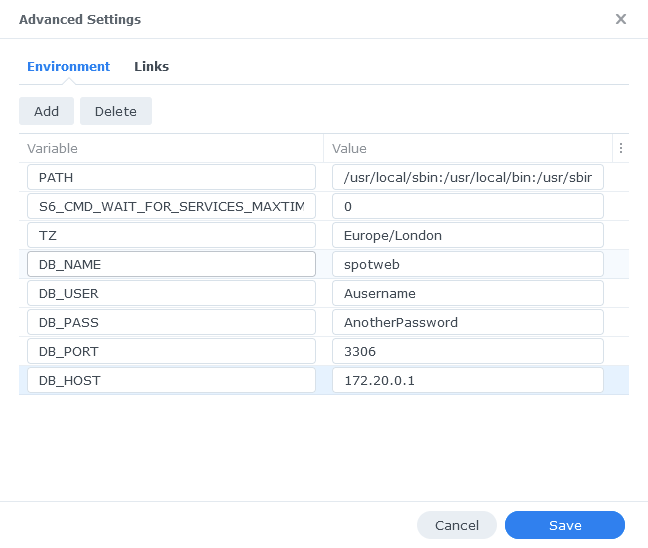
Click ‘Save’ then Click ‘Next’
Port Settings
Spotweb wants to use port 80, we need to move it to an alternative port, We will use 8085.
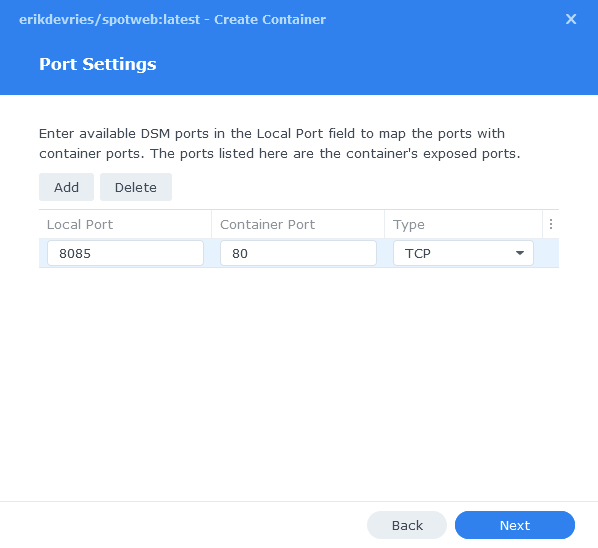
Click Next, you do not need to enter any information on the ‘Volume Settings’ page, click next again and then click ‘Done’ on the Summary to start the container.
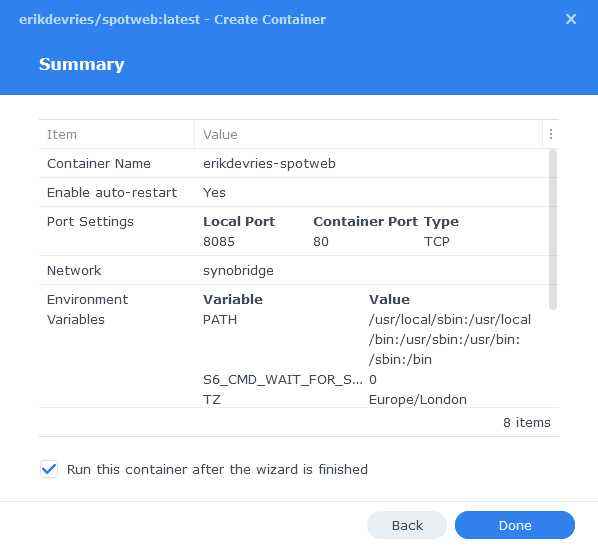
Once the container starts you need to give it about 5 to 10 minutes to create all the required database tables so be patient while it does this! You should then be able to access the Web UI via your NASIP:8085
You can now move on to Page 2.
Pages: 1 2
Yes it works now. Thank you
It works now. Deleted and then added the 2 CRON jobs. I have an account to download from 0:00 to 12:00. So I have t wait.
OK no problem good the error has gone away.
Hello, I get this error.
“/etc/crontab”:0: bad hour
errors in crontab file, can’t install.
Check that the cron schedule in the environment variables is formatted correctly and has not had any extra spaces added etc
SPOTWEB_CRON_RETRIEVE /15****
SPOTWEB_CRON_CACHE_CHECK 10/1***
Copy and paste them from the guide again as they don’t match up
*/15 * * * *
10 */1 * * *
Yes the setting are the same as the guide
Hmm can you try removing the cron variables and start the container to see if the error goes away. I recently spun up a fresh copy on the back of the new release 3 weeks ago and didn’t get this error.
We can then try and add them back in after the install is complete.
Then the error is gone
Finishing doing the setup, then once done add one back at a time to see which of the two is causing the error.
Almost everything is working fine. Only the automatic retrieval of new posts is not working. When I start en stop the container the posts are updated again. Where can I check the settings for automatic retrieval of new posts?
Hi, check the logs of the container, it will show the retrieve taking place every 15 minutes, the first will always be 15 mins after the first start of the container. Also once you are up to date there can be a few hours between releases.
I dont have a usenet provider. do i have to pay to get one?
Hey, yes in order to pull the various releases into Spotweb itself and then download them you will need a paid provider.. You can find various deals on Reddit https://www.reddit.com/r/usenet/wiki/providerdeals