Important or Recent Updates
| Historic Updates | Date |
|---|---|
| First version of the setup | 01/08/2021 |
| Updated the general formatting Gave the guide a once over with LanguageTool | 14/03/2022 |
| Added ‘books’ | 15/07/2022 |
| DSM7.2 Update for Container Manager | 22/04/2023 |
| Adjusted screenshot for DSM7.2.1 | 30/04/2024 |
| Amended the first section of this guide to accommodate those using NVMe volumes. | 31/10/2024 |
Container Manager Install
When installing Container Manager for the first time it will automatically create your docker shared folder, so there is no need to create this manually. If you have an NVMe or SATA SSD volume make sure you install the package to it for optimal performance.
Docker path adjustments for NVMe or SATA SSD volumes
If you are using a NVMe or SSD volume you will need to adjust the storage volume shown in each guide for any /docker share to the correct volume number for your fast storage. The /data share remains on your larger hard drive volume.
For example for Plex it would look like this assuming your volume numbers are volume 1 (hard drives) volume 2 (NVMe/SSD)
    volumes:
      - /volume2/docker/plex:/config
      - /volume1/data/media:/data/media
Media Folder Set up
When passing folders into a Docker container each mount point is treated as its own filesystem.
This means when moving files between two mount points Docker will do a Copy, then Delete operation. Meaning you are creating a full duplicate of a file while its being ‘moved’ creating unwanted disk IO and temporarily taking up double the space. (especially when seeding torrents after copying to the final folders)
In order to avoid this we need to set up a clean directory structure that allows us to just have one folder or share mounted to our containers.
If you are starting with these guides and have existing media you may need to move around your data in line with this setup, I recommend creating all the folders below using File station to avoid potential permission issues later.
Directory Structure
With this setup all of your media will sit within a single share, you can call this whatever you want but in all the guides it will be called ‘data’. If you change its name you will need to adjust any steps or compose files from my guides accordingly.
Please note: it is important that you make a decision around whether to use lowercase or Uppercase folder names, I recommend just stick with lowercase everywhere as it simplifies setup. If you decide to go against this ensure you change all the volume maps in the guides to match the case! Otherwise, containers and you will be very confused.
Open up the control panel then in ‘Shared Folder’ hit ‘Create’

Screen 1 – fill out the name as ‘data’ and use Volume 1 for its storage location (Your main hard drive volume)

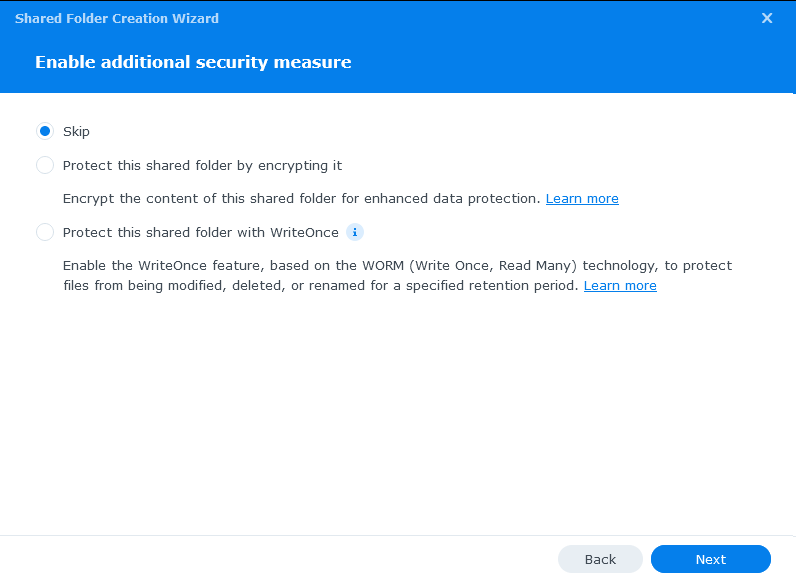
Screen 2 – we leave the folder unencrypted and don’t enable write once features
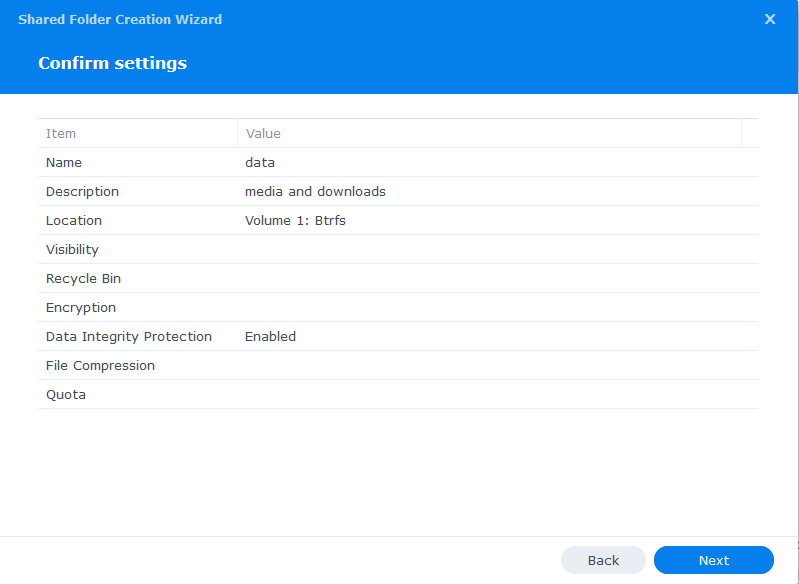
Screen 3 – Enable data checksums as this will help catch any issues with files during data scrubbing. (These options will not appear if you have ext4 file system – If you are starting this with a clean NAS go back change to BTRFS if possible)

Screen 4 – just click next past the summary
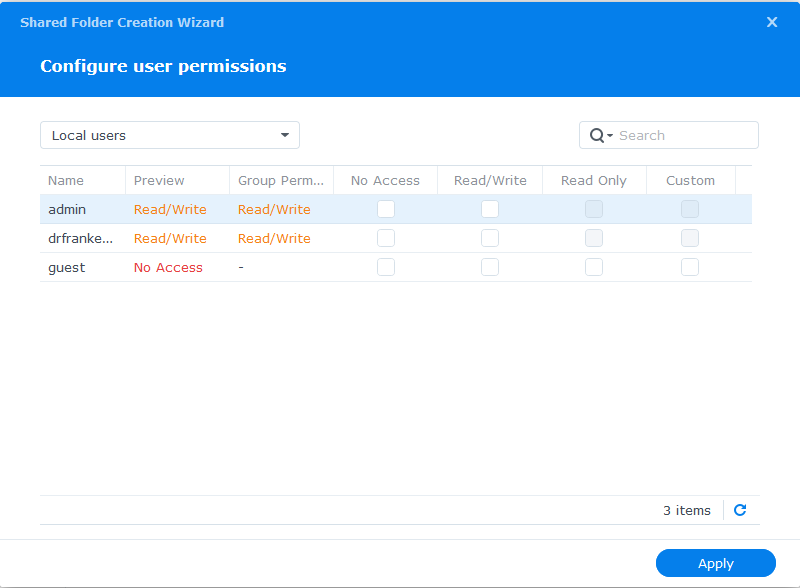
On the final screen we don’t need to change any user permissions yet, we will do that in the second guide.
The Sub-folders
Now we have our main ‘data’ directory we need to create a number of sub-folders to hold our media and downloaded files. You can amend this depending on whether you are using Torrents or Usenet (Newsgroups) or both.
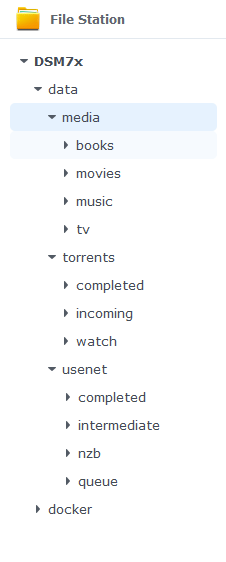
You will initially create 3 folders within /data
- media
- torrents
- usenet
Then under /data/media create
- movies
- music
- tv
- books
Then under /data/torrents create
- completed
- incoming
- watch
Then under /data/usenet create
- completed
- intermediate
- nzb
- queue
Your folder tree should now look like this.
Finally, within the /docker shared folder create a folder called ‘projects‘ which will be used for any containers using the Projects (Docker Compose) feature of Container Manager.
You can now go back to where you left off in the guides and do the next step.
Looking for some help, join our Discord community
If you are struggling with any steps in the guides or looking to branch out into other containers join our Discord community!

Buy me a beverage!
If you have found my site useful please consider pinging me a tip as it helps cover the cost of running things or just lets me stay hydrated. Plus 10% goes to the devs of the apps I do guides for every year.


Thanks for this guide, Dr.
In the early steps we create a “data” directory. Is that directory a child of the docker directory or at the same level?
Hey Kevin – they are two independent shares, the docker share will be created automatically when you install Container Manager
Just to say this guide has worked superbly and really easy to follow. Shall tip in a bit!
I do have one question, I am now looking at separating movies onto another hard drive so disk 1 will have TV while disk 2 will have movies and possibly music.
How would setting this up within the chain?
Would it be as simple as right click and move to disk 2 and the edit properties to point to disk 2 along with editing radarr to pint to the new address or something else?
You would need to have 2 root folders one on each disk, I assume you have a 2 bay unit – so for example /data and /data2 and mount this accordingly
/volume1/data:/data
and
/volume2/data2:/data2
Keep in mind that you won’t benefit from hardlinks as you will likely be downloading stuff to one drive and then copying the files to the second. Meaning seeding files take up double the space. (assuming you are torrenting)
I’m planning on running a centralized Syncthing server on Docker on my Synology DS716+ but I’m new with both Docker and Syncthing.
Can you elaborate more on “When passing folders into a Docker container each mount point is treated as its own filesystem” under Media Folder Set up? I get the gist of it, unwanted disk IO and temporarily taking up double the space. Are we just trying to consolidate everything under one data/media folder that both DSM and Docker containers can use efficiently?
I’m not using my NAS as a seedbox or media server (yet…)
Yes – so essentially when you pass in a volume or bind mount to a container docker has no idea if that is a folder in the same folder structure or it could be a folder on a remote host. So it will always copy files between these mount points. As described gives the high IO so we consolidate all the downloads and media under a single shared folder, then within the container we mount just the folders required for that container to function.
So a torrent client will generally only need to see inside /data/torrents and nothing above that folder so it receives that mount, but Radarr needs access to reach into /data/torrents in order to ‘move’ (hardlink) a file into /data/media so it gets the whole /data share.
From a Syncthing perspective you can mount as many folders as you like as generally you are not syncing between them, they are single entities.