Last updated on 6 April 2025
Please note this guide was written for DSM7/7.1 and will not be updated for 7.2
| Update | Date |
|---|---|
| Fixed a regression with the port numbers both screenshots and wording. | 15/09/2023 |
What is Deluge?
Deluge is a lightweight torrent downloader, it has a number of built-in plugins to help organise your downloads and a full web interface.
Let’s Begin
In this guide I will take you through the steps to get Deluge up and running in Docker if you want to also run a VPN see my alternative guides on the left-hand menu.
In order for you to successfully use this guide please complete the three preceding guides
- Step 1: Directory Setup Guide
- Step 2: Setting up a restricted Docker user
- Step 3: Setting up a Docker Bridge Network
Downloading the Container
Open up Docker within DSM and navigate to the ‘Registry’ section and search for ‘deluge’ in the search box and download the ‘linuxserver/deluge’ image.
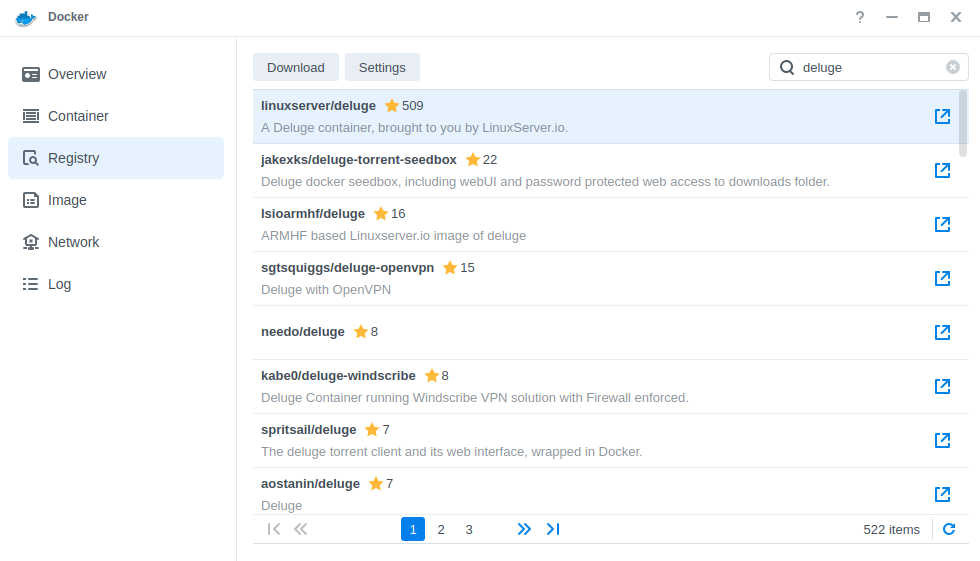
The pop-up box will ask which version you want to download, make sure you choose ‘Latest’ from the list of available versions.
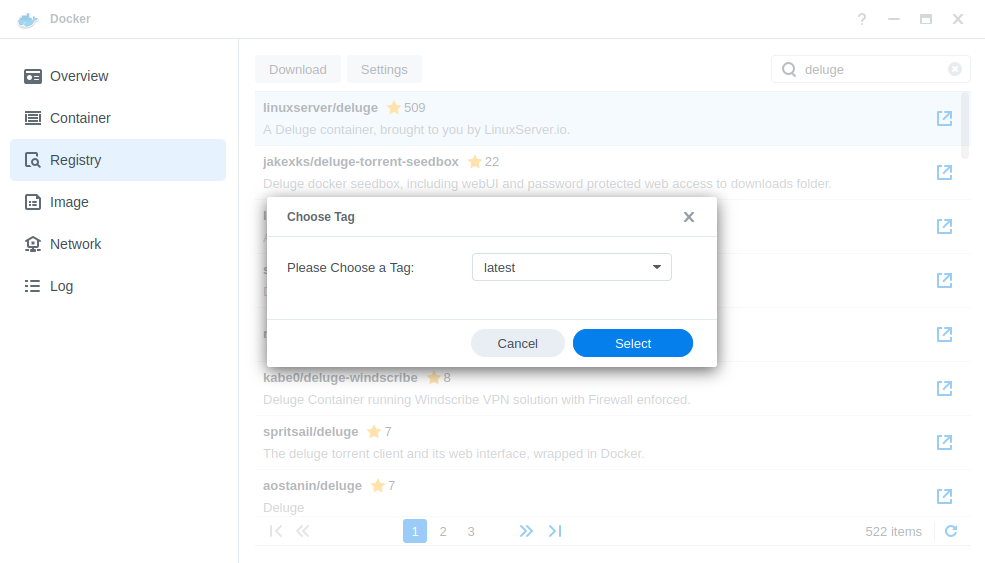
You can check the status of the download over on the ‘Image’ tab.
Setting up the Container
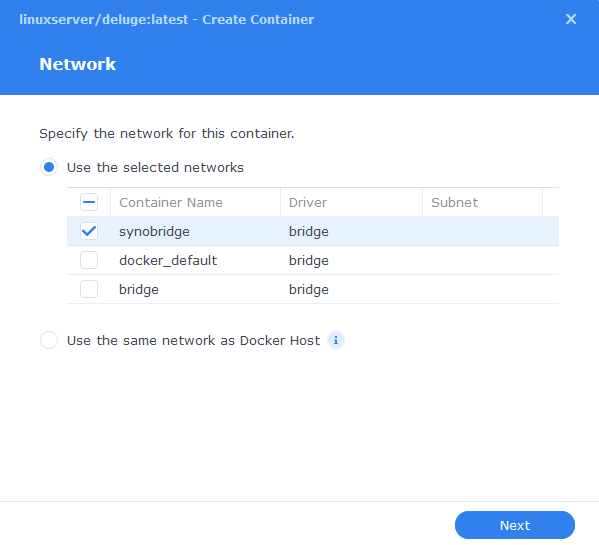
In Docker click on the ‘Image’ tab, in the list of your containers select the ‘Linuxserver Deluge’ image and click on ‘Launch’
You will be greeted with the Network screen, we will be using the ‘synobridge’ network we created earlier select it from the list and click Next.
General Settings
Next you will be greeted with the General Settings screen, this is where you can start specifying some of your preferences.
You can change the name of the container to anything you like, and you may want to enable Auto Restart as this will ensure Deluge starts automatically if you reboot your NAS.
You will also notice a Configure capabilities button — don’t change anything in here!
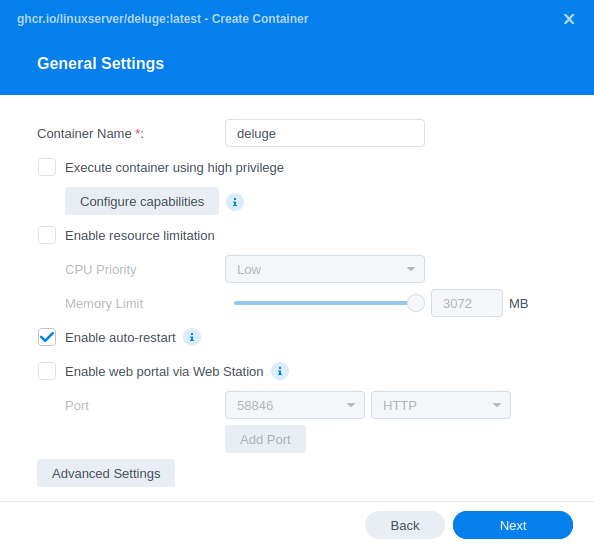
Next up we are going to click on the ‘Advanced Settings’ button, this will take you to a new window with a number of tabs which we are going to work through.
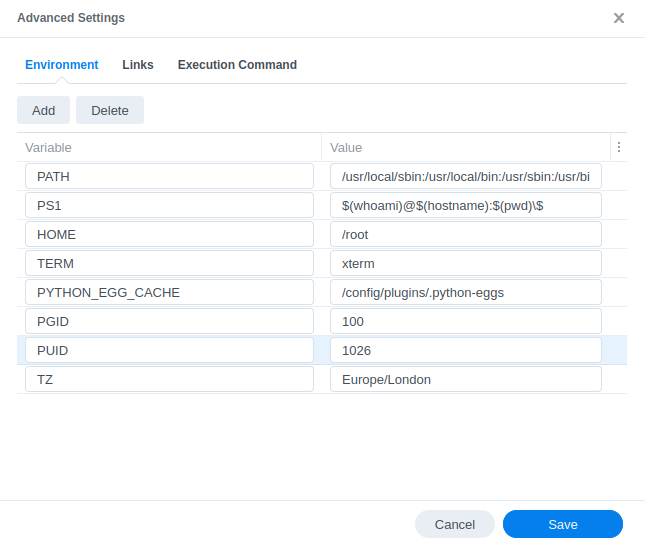
Environment
Next we are going to set up some environment variables that docker will use to allow the container access to our files.
Fill in the following details as per the table/screenshot, you will need to do them one at a time.
| Variable | Value |
|---|---|
| PUID | The UID you obtained in the user setup guide |
| PGID | The GID you obtained in the user setup guide |
| TZ | Your timezone wikipedia.org/wiki/List_of_tz_database_time_zones |
Links/Execution Commands
You do not need to set up anything on these tabs.
Press ‘Save’ to go back to the initial setup screen, then press ‘Next’
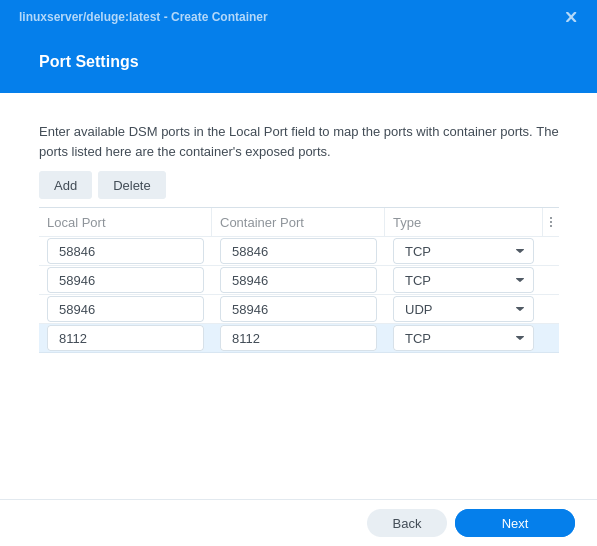
Port Settings
We are not going to amend the default ports Deluge requires which are the following:
| Port | What it’s for… |
|---|---|
| 58846 (TCP) | Remote connection from a PC Client |
| 58946 (TCP & UDP) | Ports to forward on your Router to ensure you are connectable |
| 8112 (TCP) | WebUI |
Copy the ports shown on the Right hand ‘Container Port’ section to the left hand ‘Local Port’ section.
Once amended press ‘Next’
You can now click Next
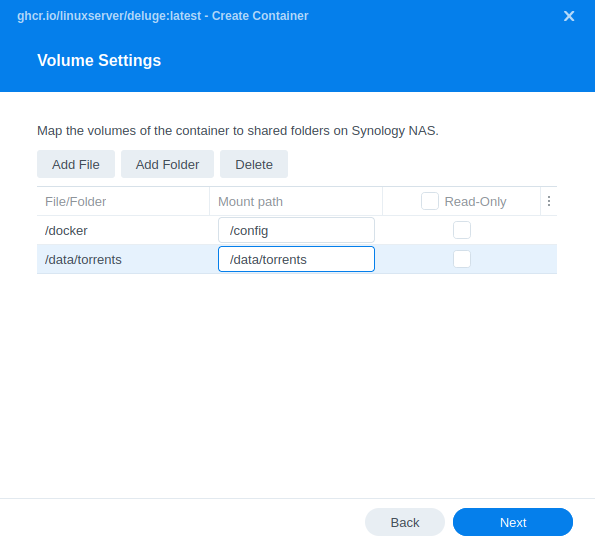
Volume Settings
We will now be specifying the directories where Deluge will store its configuration files and where to download files to.
Click on Add Folder, click on the docker share and create a new sub-folder called ‘deluge’ select this folder and click ‘select’
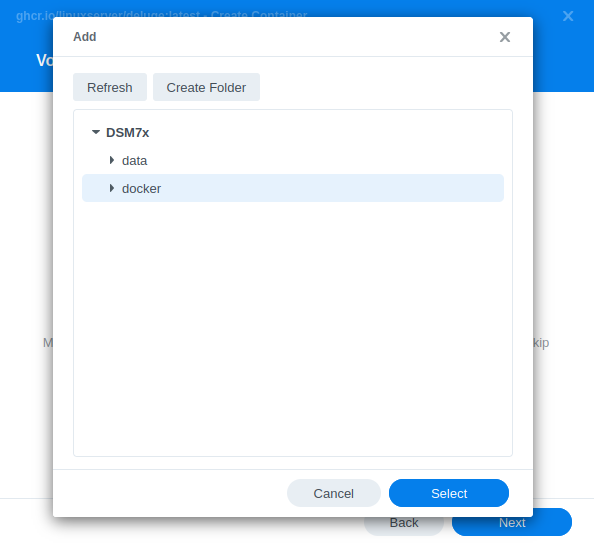
Now add ‘/config’ to the ‘Mount path’ box
Click Add Folder again and this time select the ‘/data/torrents’ share and click Select.
You will now enter ‘/data/torrents’ into the ‘Mount path’ box
Your path settings should now look like the table/screenshot below.
| File/Folder | Mount path |
|---|---|
| docker/deluge | /config |
| data/torrents | /data/torrents |
Click Next to move to the final screen.
Click Next to move to the final screen.
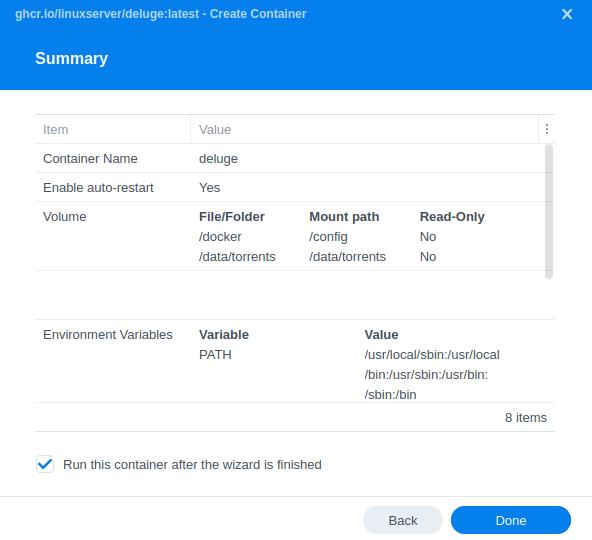
Summary
You have now completed the setup of the container.
You will be shown an overall summary of the settings we have specified, this is a good time to double-check everything is correct. Finally, click on Done and the container should start to boot.
Finally, click on Done and the container should start to boot.
Setting up Deluge
As we have used /data/torrents as the mount point for our downloads we need to make sure Deluge uses this same file path.
We are going to do this by just changing the directory settings within Deluge.
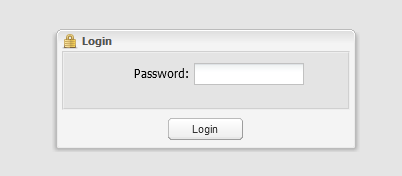
Open a new browser tab and go to your NAS IP address on port 8112 (e.g. 192.168.0.46:8112)
Deluge by default has the password of deluge to access the web UI, you can change or remove this later in the settings.
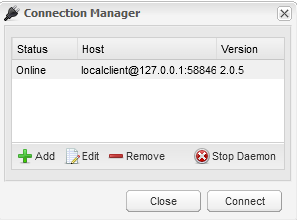
Next you will connect to the Deluge back end, just select the host and click connect, it will remember this going forward.
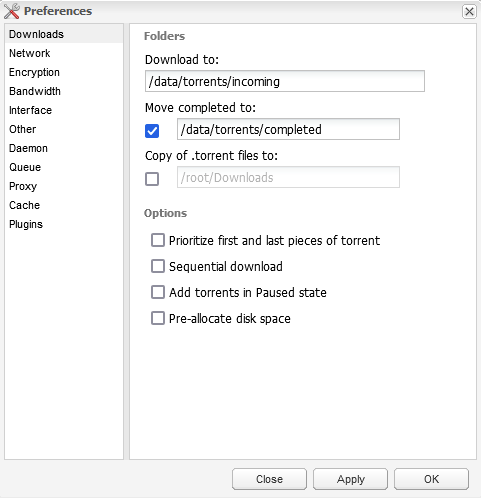
Download Paths
Now you are in the UI click on Preferences at the top of the screen, we are going to change the various folders to the settings shown in the screenshot/table below
| Option | From | To |
|---|---|---|
| Download to: | /root/Downloads | /data/torrents/incoming |
| Move complete to: | /root/Downloads | /data/torrents/completed |
Port Number
You will also need to set the port number in the Incoming and Outgoing port sections in line with the ones we set up for the Container of 58946
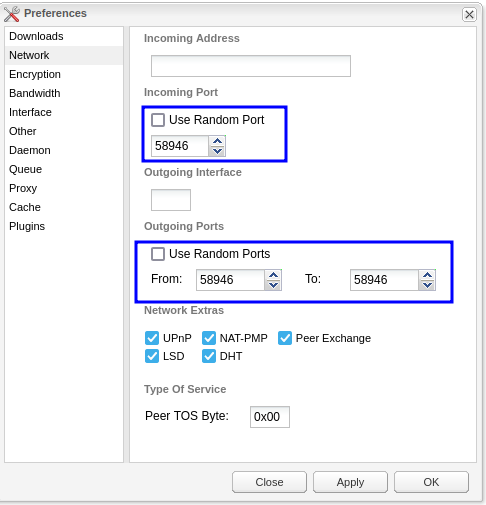
Press apply and hit OK, your last task will be to port forward your router to you NAS the TCP and UDP ports of 58946 to ensure you get connected to other peers.
Plugins
There are a couple of plugins you will want to enable in the Plugins’ section in Preferences, when enabled you will need to refresh the page to see them. (If you are looking for something to unpack torrents that are zipped then follow the Unpackerr guide)
- Autoadd – This allows you to pull in any torrents in the watch directory (screenshot below)
- Label – This allows Radarr/Sonarr to assigned labels and pull downloads into subdirectories
- Auto Remove Plus – Download the ‘AutoRemovePlus-2.0.0-py3.8.egg’ version from the Deluge forums and place it in the Plugins’ folder in /docker/deluge/plugins. It allows you to fine tune when to remove torrents and their associated data once downloaded. (You may need to stop and and start the container for this to appear)

| Historic Updates | Date |
|---|---|
| New guide for Deluge | 13/09/2021 |
| Fixed port settings section and added notes around plug-ins | 30/12/2021 |
| Added an extra plugin and note on how to enable them | 06/03/2022 |
| Updated with DSM7.1 Screenshots and Steps | 09/07/2022 |
| Added new port settings and Docker Bridge Network | 23/07/2022 |
| Compose version number removed, small wording amendments and removed an old image. | 08/04/2023 |
| Amended the path to save the compose file – this is for security, so the container has no access to the file contents. | 14/04/2023 |
Looking for some help, join our Discord community
If you are struggling with any steps in the guides or looking to branch out into other containers join our Discord community!

Buy me a beverage!
If you have found my site useful please consider pinging me a tip as it helps cover the cost of running things or just lets me stay hydrated. Plus 10% goes to the devs of the apps I do guides for every year.


Here is something wrong. In the “Summary” image it says: “Use the same network as Docker Host” but in the beginning, after all, you set the “bridge” mode to configure ports, as you can see in the “Port Settings” image.
Oh, that must have crept in ages back! Well spotted, I will just mask that bit of the image for now.
Thanks
Hello! I set up deluge inside a docker container, running through mullvad VPN. I accidentally updated DSM on my DS920+ and now I can’t connect to the webui (deluge-web) on my local server (192.168.1.12:8112). I am beyond annoyed at myself for updating DSM, and wondering if there is a way to restart deluge-web?
I completely forgot how I set all this up, and which guides I used so any help is appreciated to avoid a full reinstall, as I don’t really remember how.
Thanks!
Hey, are the deluge docker files within /docker/deluge? If so you could delete your existing container and use this guide which points at that folder for its config. Also before that check the Deluge logs as update DSM must have blocked the WebUI somehow? Maybe something using the port etc.
Hi Doc,
Thank you for your great guides, I’ve managed to set up my Syno with Plex and Deluge easily !
I’m just a bit confused about the port part of your guide especially this sentence “You will also need to set the port number in the Incoming Port section of the Network settings, this aligns with the ports we set earlier in the guide.”
By “this aligns with the ports we set earlier in the guide”, do you mean that we should use one of the ports from the container configuration ( 58846 or 58946 ) for the deluge incoming port ?
Or should we add to the container configuration the port 6881 you use for the deluge incoming port ?
I understand that 8112 is the port used for deluge web interface but what about 58946, 59946 and 6881 ?
Thanks in avance for your help
Hey it’s been a little while since this guide got some love it looks like a regression has crept in as I could have sworn I updated it all in line with port 6881… Correct that 8112 is the WebUI and won’t need to be forwarded.In order for deluge to be connectable by other peers you will need to open port 6881 TCP & UDP by forwarding the port to your NAS IP on your Router. Keep in mind by using Deluge without a VPN you are sharing your home IP with anyone you are Torrenting to and from.Let me get that fixed and adjust the wording!
Sorry I am being too hasty with my reply.
Can you hold off set up for 30 mins while I amend the guide ignore my previous comment!
Hi Doc,
Thanks for your updates on the guide, it’s much clearer for me now.
Regarding the confidentiality of my home IP address , I’ll set up a vpn on my router so it covers all my traffic and not only deluge’s.
Cool – Thanks for the update as well!
Thank you so much for this guide! I’ve managed to connect successfully and everything works fine. The only thing is, my NAS does a scheduled restart each night and though docker and deluge start up fine, deluge does not connect to the daemon until I log in and do it manually. It’s not the end of the world but just a bit of a pain. Have you seen this before? is there a way to automatically connect on restart? x
Hey not seen this however I rarely reboot unless an update requires it. Any reason you are doing a restart daily? Maybe move over to qbittorrent instead that doesn’t run in the same manner..
Awesome guides mate. Just stumbled on an issue where I was adding the watch folders in Deluge auto-add plugin. It throws an error saying ‘Incompatible Option / Unknow Method’ when I click on ‘add’. Has anyone seen this error occurring on your set up?
Hey, not seen this reported yet. Let me know if you get it fixed.