Last updated on 21 June 2025
Please note if you are using DSM7.2 or higher you should use the Container Manager version of this guide from the menu.
This guide has reached the end of its updates as most people are now on the latest DSM update - This guide is correct as of 08/12/2023 however no further updates will be added.
Container Manager guide can be found here!
| Update | Date |
|---|---|
| Config file updated with latest amendments | 08/07/2023 |
What is Unpackerr
Unpackerr monitors your torrent client’s completed download folders and when a compressed file requires ‘Unpacking’ from a Zip or RAR it will do it automatically for you. It will then notify Radarr and other arrs the download is ready.
Let’s Begin
In this guide I am going to take you through the steps to get Unpackerr up and running in Docker on your Synology NAS.
In order for you to successfully use this guide please complete the Setting up a restricted Docker user and the Docker Bridge guide you will also want to have Radarr, Sonarr or Lidarr set up.
Part 1 — Config File Set up
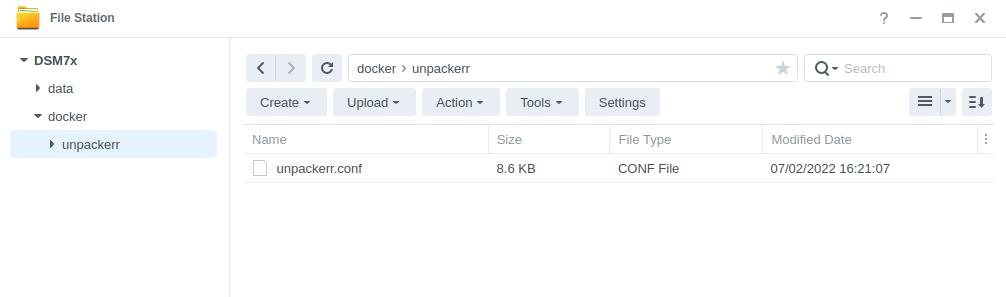
First up lets create a folder for unpackerr to keep the config files, head into Filestation and create a folder in the /docker share called unpackerr.
In order to use Unpackerr we need to set up a number of variables in the config file, I have built a version with some pre-configured basics in line with the folder structure across the guides.
Download the pre-made config file below and save it into the newly created unpackerr folder.
Right Click and Save As: unpackerr.conf
Next up we are going to edit the file, so it can send notifications to the Arrs when it has completed its work.
Making your amendments
You can edit this file in a number of ways, but to keep the guide OS-agnostic we will be using the Synology Text Editor package which can be installed via Package Center.
Open up the config file in Text Editor you will see its nicely broken down into sections.
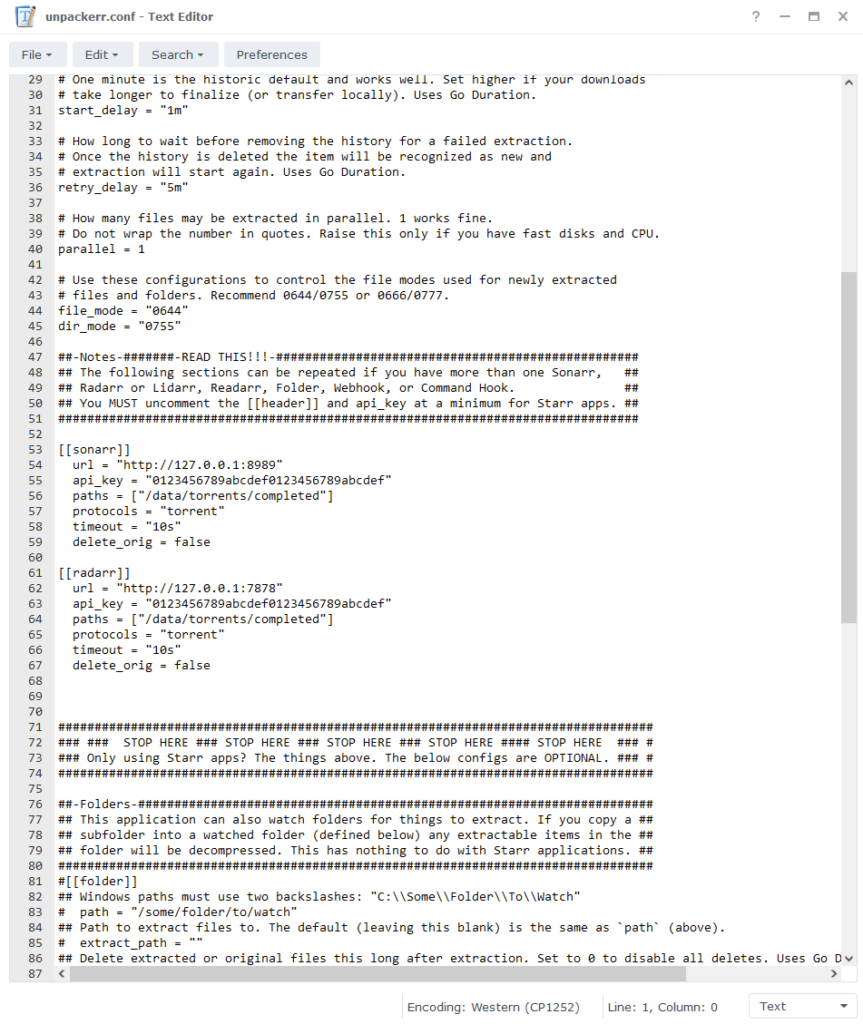
In the first section you can amend the preferences to your own liking I have set some sane defaults already.
In the second section you can start adding in your settings for the Arrs. Due to Radarr and Sonarr being the most commonly used applications I have left them in the file already. You will need to edit the following lines on each.
| Settings | Variable to Use |
|---|---|
| url = “http://172.20.0.1:8989” | This is the synobridge gateway IP you likely won’t need to change this, however you can also use your NAS IP. |
| api_key = “0123456789abcdef0123456789abcdef” | Your API key can be located in the Arrs settings pages (Settings > General) copy and paste it between the “” |
| delete_orig = false | If you want Unpackerr to delete the original compressed files when it has completed set this to ‘true’ |
If you are using other Arrs you can optionally copy the settings from below and add them into the config file and amend the same settings mentioned above accordingly
[[lidarr]]
  url = "http://172.20.0.1:8686"
  api_key = "0123456789abcdef0123456789abcdef"
  paths = ["/data/torrents/completed"]
  protocols = "torrent"
  timeout = "10s"
delete_orig = false[[readarr]]
url = "http://172.20.0.1:8787"
api_key = "0123456789abcdef0123456789abcdef"
paths = ["/data/torrents/completed"]
protocols = "torrent"
timeout = "10s"
delete_orig = falseWe won’t be changing any of the settings in the final two sections of the config file for this guide. You can now save and exit the config file.
Part 2 — Container Setup
Downloading the Unpackerr Image
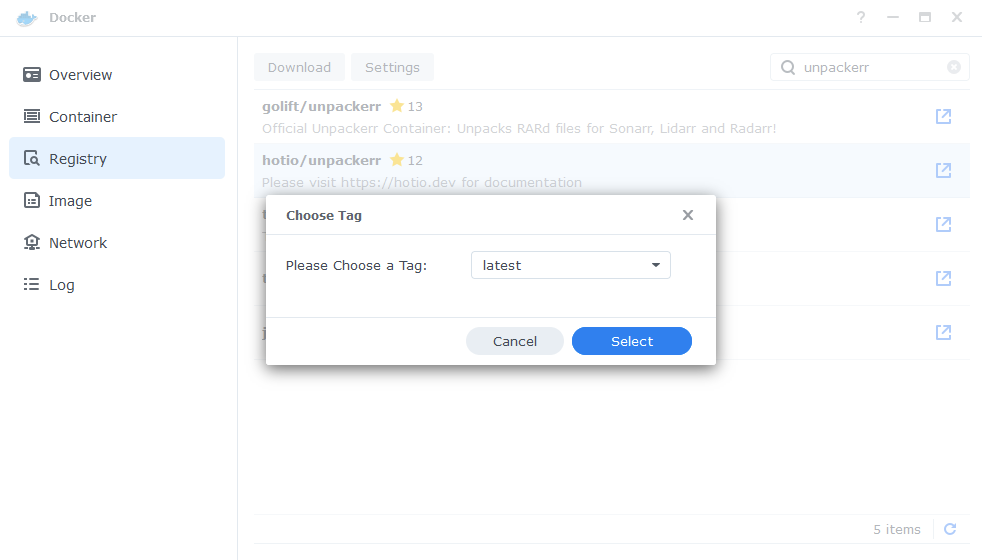
Open up Docker within DSM and navigate to the ‘Registry’ tab and search for ‘Unpackerr’.
In the list of available containers select the ‘hotio’ version, right click on it and select ‘Download’ or click the button at the top of the window.
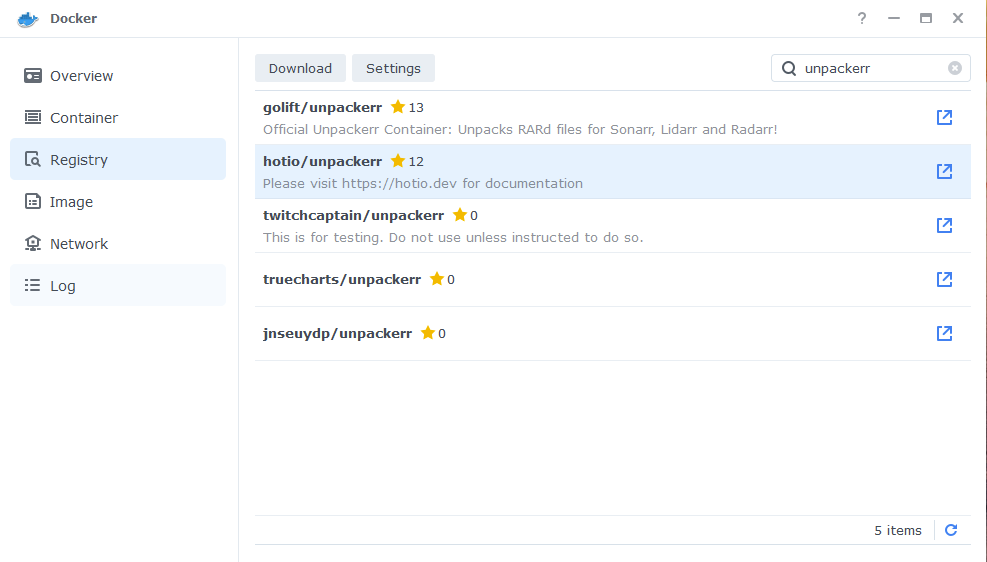
When the dialogue pops up asking you to choose a version, make sure you choose ‘Latest’ from the list.
You can check the status of the download over on the ‘Image’ tab.
Setting up the container
In Docker click on the ‘Image’ tab, in the list of your containers select the ‘Unpackerr’ image and click on ‘Launch’
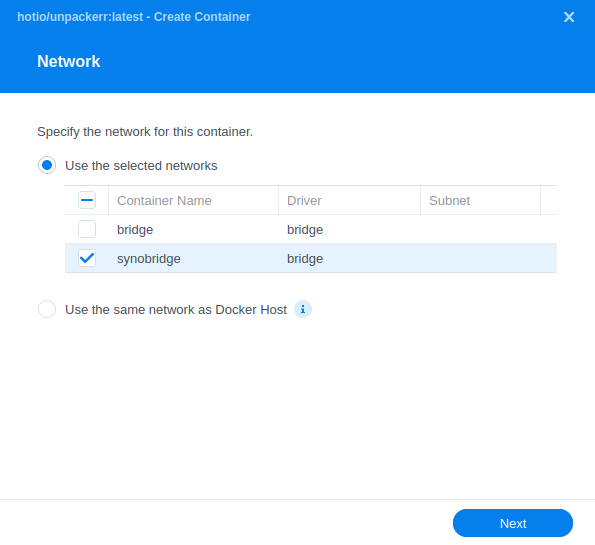
The first screen will ask how you want to set up the Docker network, we are going to select the ‘synobridge’ that we created earlier.
General Settings
Next you will be greeted with the General Settings screen, this is where you can start specifying some of your preferences.
You can change the name of the container to anything you like, and you may want to enable Auto Restart as this will ensure Unpackerr starts automatically if you reboot your NAS.
You will also notice a Configure capabilities button — don’t change anything in here!
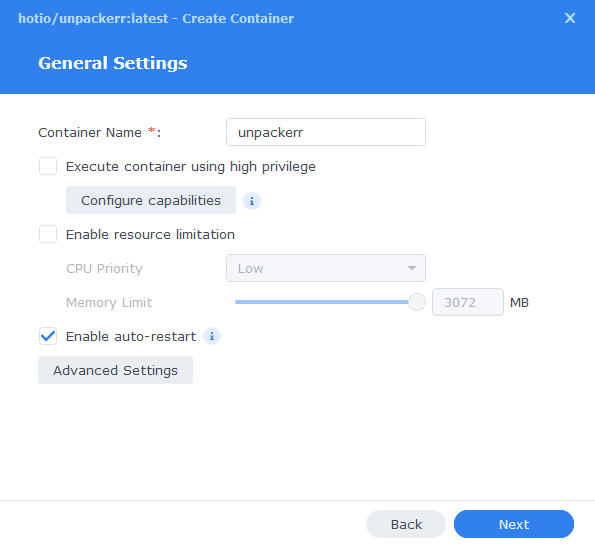
Next up we are going to click on the ‘Advanced Settings’ button, this will take you to a new window with a number of tabs which we are going to work through.
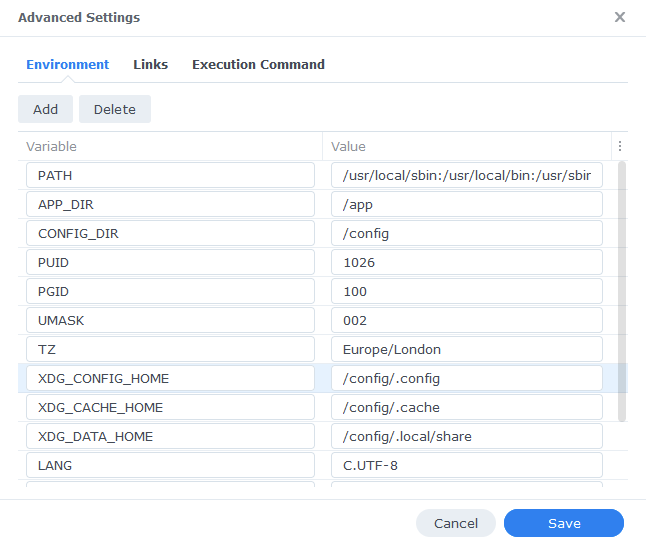
Environment (PGID, PUID and Timezone)
Next we are going to set up a couple of environment variables that docker will use to allow the container access to our files and folders and also to tell it where we live in the world.
You will notice these are already added into the list of available variables just update them accordingly.
| Variable | Value |
|---|---|
| PUID | The UID you obtained in the user setup guide |
| PGID | The GID you obtained in the user setup guide |
| TZ | Your timezone wikipedia.org/wiki/List_of_tz_database_time_zones |
| ARGS | Remove this option otherwise you will not be able to save. |
Links/Execution Commands
You do not need to set up anything on these tabs.
Press ‘Save’ to go back to the initial setup screen, then press ‘Next’
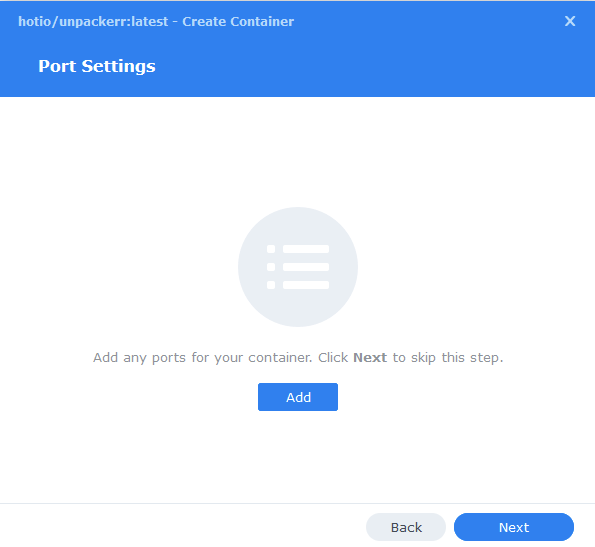
Port Settings
No ports required for Unpackerr just click ‘Next’.
Volume Settings
We will now be specifying the directories where Unpackerr will load the file and where to find our completed downloads
Click on Add Folder, and browse into the /docker share and select the unpackerr folder you created earlier, then add another folder this time selecting /data.
You will now add the Mount Paths as per the screenshot / table below.
| File/Folder | Mount path |
|---|---|
| docker/unpackerr | /config |
| data | /data |
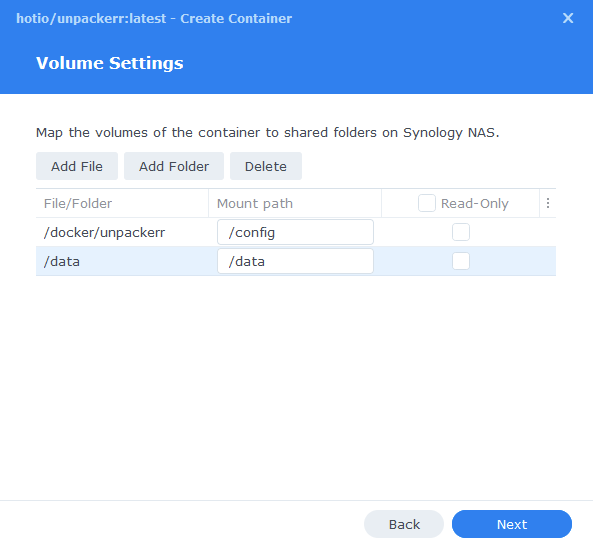
Click Next to move to the final screen.
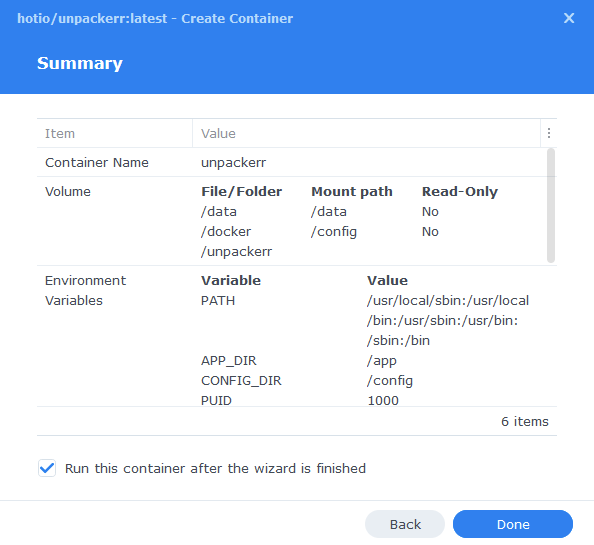
Summary
You have now completed the setup of the container.
You will be shown an overall summary of the settings we have specified, this is a good time to double-check everything is correct. Finally, click on Done and the container should start to boot.
You should now find that any compressed files are automatically unpacked ready for the media managers to pick the resulting file(s) up and move them.
| Historic Updates | Date |
|---|---|
| New Guide Released | 02/07/2022 |
| Amended Network Access | 23/07/2022 |
| Fixed a mistake with the last edit and not giving network access. | 29/07/2022 |
| Tweaked the example config to have the synobridge by default | 31/01/2023 |
| Compose version number removed and small wording amendments | 09/04/2023 |
| Amended the path to save the compose file – this is for security, so the container has no access to the file contents. | 14/04/2023 |
Looking for some help, join our Discord community
If you are struggling with any steps in the guides or looking to branch out into other containers join our Discord community!

Buy me a beverage!
If you have found my site useful please consider pinging me a tip as it helps cover the cost of running things or just lets me stay hydrated. Plus 10% goes to the devs of the apps I do guides for every year.


Thanks for all the great help, invaluable to us mortals.
Can I simply add another watch folder for Unpackerr ?
Hey – within the config file you can specify a path to monitor, just make sure they are mounted to the container.
Quick example below, there are other bits to edit in the config around deleting the original files etc.
[[folder]]
## Windows paths must use two backslashes: “C:\\Some\\Folder\\To\\Watch”
path = “/downloads/torrents/unrarme”
## Path to extract files to. The default (leaving this blank) is the same as `path` (above).
extract_path = “/data/torrents/unrarme/complete”
Thanks for these guides. However, small correction in the unpackerr.conf file:
If following the other guides (sonarr, radarr, etc) you should not use the local loopback of 127.0.0.1 (ex: http://127.0.0.1:8989). This will cause a “connection refused” error in the unpackerr log. It should be the “synobridge” network gateway because the container will run on that network.
To get past the “connection refused” error, 172.20.0.1 should be used. Example for radarr in the unpackerr config: “http://172.20.0.1:8989”
Now everything works fine!
Hey, I will bold the bit in the guide that says to change the IP, but also I will amend the IP in the example file 🙂 Thanks
Thanks for this guide mate – much appreciated 🙂
So I followed it to the T and I’m struggling with an error saying no matching folder found…
Would appreciate it if you can look at my settings and guide me?
https://i.postimg.cc/7YFSB4JF/screenie-2022-10-02-at-12-56-16-pm.png
https://i.postimg.cc/L8jLwWzn/screenie-2022-10-02-at-12-56-39-pm.png
https://i.postimg.cc/8CDMSbHw/screenie-2022-10-02-at-12-57-18-pm.png
Hey, sorry for the late reply. As you have mounted your /Media/PlexRolls to /Data you config file needs to be Path = “/Data” as this is what is sees within the container.
Thanks so much for all these fantastic guides! I noticed a few of the guides now recommend placing containers on the “synobridge” network in docker.
I have several of these – radarr, sonarr, unpackerr – running on the host network.
First off – do you recommend I move them to the “synobridge” network?
And secondly, how do I go about changing the network for containers already running on the host network? None of them appear to be available to add to the synobridge network.
Thanks!
Hey, I would not worry to much about moving them over if they are already functioning fine, if you ever set them back up you can gradually move them over.