Last updated on 6 April 2025
Please note if you are using DSM7.2 or higher you should use the Container Manager version of this guide from the menu.
This guide has reached the end of its updates as most people are now on the latest DSM update - This guide is correct as of 08/12/2023 however no further updates will be added.
| Update | Date |
|---|---|
| Fixed a typo in the ports section for 7359 | 04/07/2023 |
In this guide I am going to take you through the setup of Jellyfin in Docker using the Synology UI. Please note this guide is for anyone that does not have Hardware Transcode abilities on their NAS. You can see the other guide for those that do.
Let’s Begin
As usual, it’s important you complete the three preceding guides which will get your folder structure and docker, user and bridge network setup.
- Step 0.5 : Docker, Memory Recommendations and Limitations
- Step 1: Directory Setup Guide
- Step 2: Setting up a restricted Docker user
- Step 3: Setting up a Docker Bridge Network
Downloading the Jellyfin Image
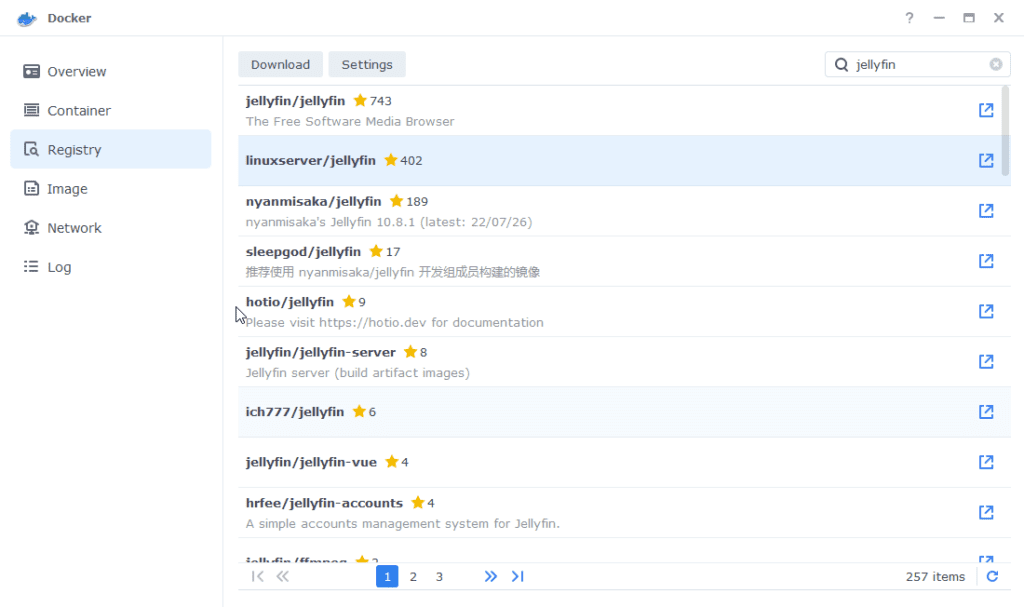
Open up Docker within DSM and navigate to the ‘Registry’ tab, then search for ‘Jellyfin’.
In the list of available containers select the one made by Linuxserver as shown below, right click on it and select ‘Download’ or click the button at the top of the window.
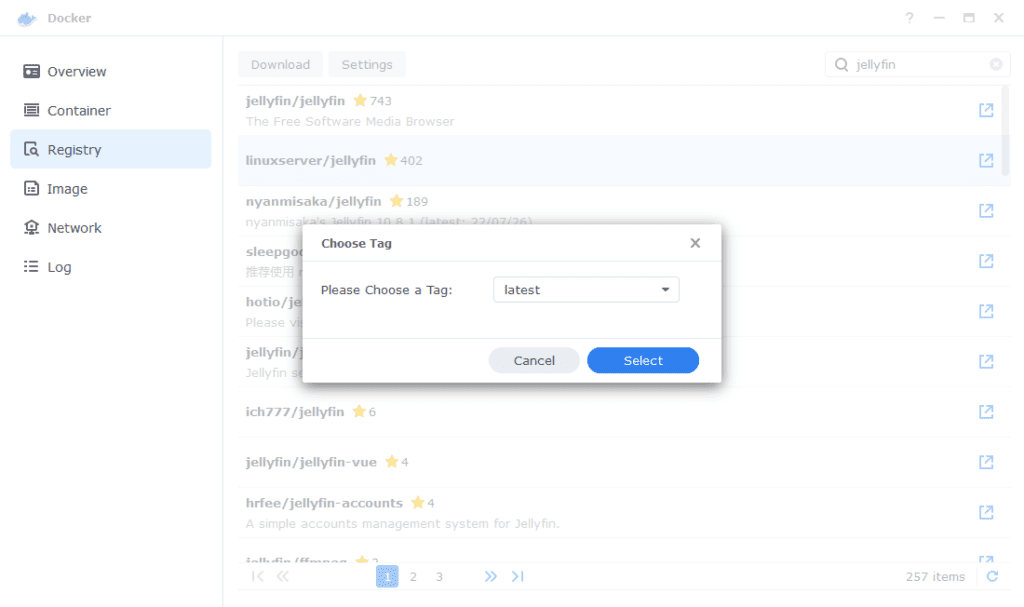
When the dialogue pops up asking you to choose a version, make sure you choose ‘Latest’ from the list.
You can check the status of the download over on the ‘Image’ tab, it will take a few minutes depending on the speed of your internet connection.
Setting up the container
In Docker click on the ‘Image’ tab, in the list of your containers select the ‘Linuxserver Jellyfin’ image and click on ‘Launch’
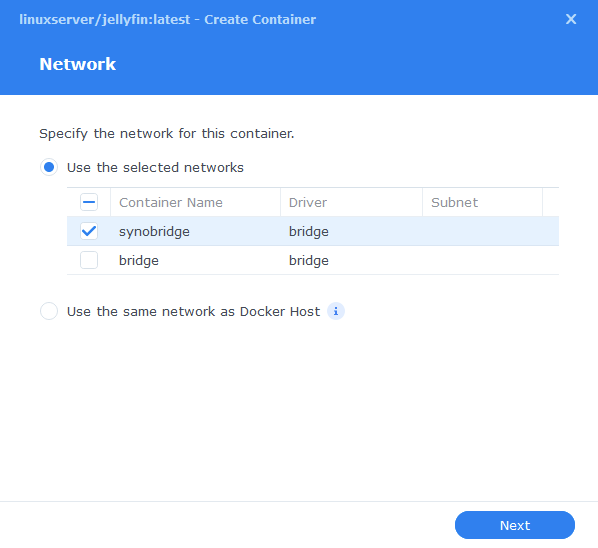
You will be greeted with the Network screen, we will be using the ‘synobridge’ network we created earlier select it from the list and click Next.
General Settings
Next you will be greeted with the General Settings screen, this is where you can start specifying some of your preferences.
You can change the name of the container to anything you like, and you may want to enable Auto Restart as this will ensure the server starts automatically if you reboot your NAS.
You will also notice a Configure capabilities button — don’t change anything in here!
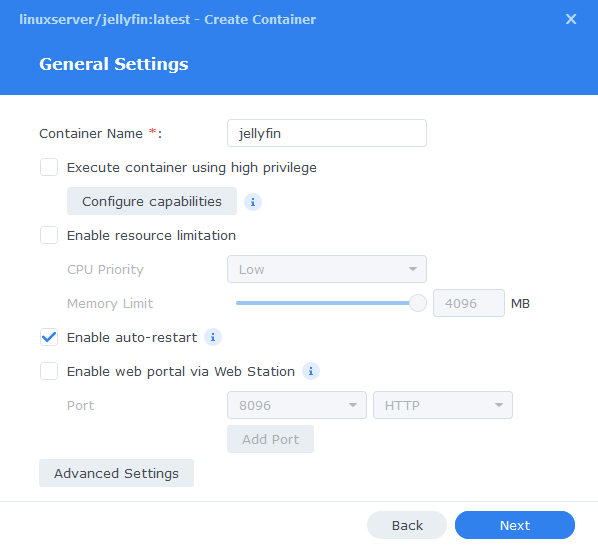
Next up we are going to click on the ‘Advanced Settings’ button, this will take you to a new window with a number of tabs which we are going to work through.
Environment
Next we are going to set up a couple of environment variables that docker will use to allow the container access to our files and folders and also to tell it where we live in the world.
Click the Add button, and fill in the following details as per the table/screenshot, you will need to do one at a time.
| Variable | Value |
|---|---|
| PUID | The UID you obtained in the user setup guide |
| PGID | The GID you obtained in the user setup guide |
| TZ | Your timezone wikipedia.org/wiki/List_of_tz_database_time_zones |
| JELLYFIN_PublishedServerUrl | The IP Address of your NAS |
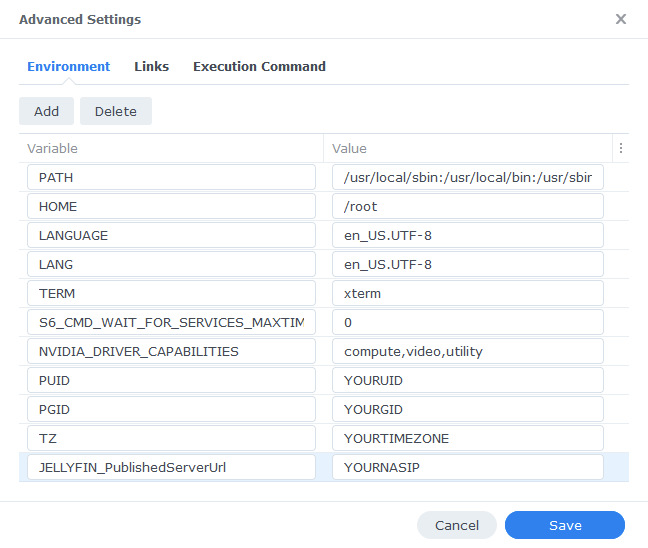
Links / Execution Command
You do not need to set up anything on these tabs.
Press ‘Save’ to go back to the initial setup screen, then press ‘Next’
Port Settings
We are now going set up the containers ports, to start you can repeat the ones shown on the right side of the settings page ‘Container Port’ onto the left side ‘Local Port’
You will then need to click ‘Add’ and then fill out the details for another port of 7359, again repeat the port number and set it to UDP (this is used for apps to discover Jellyfin on your network) – Your settings will match the screenshot below.
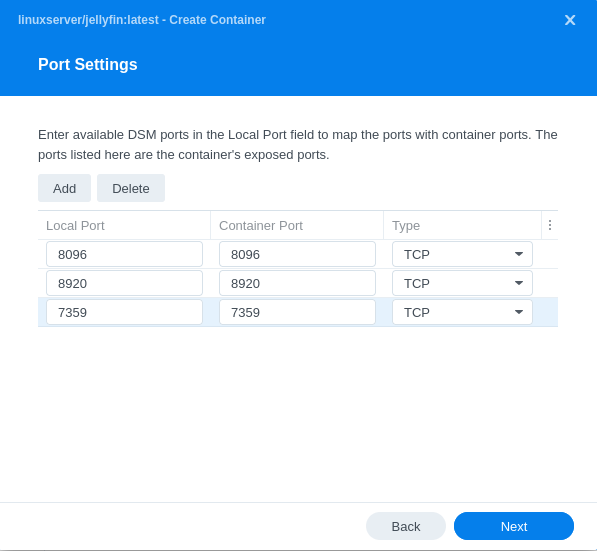
Once you have done this press ‘Next’.
Volume Settings
We will now be specifying the directories where Jellyfin will store its configuration files and where to find our media.
Click on ‘Add Folder’ select the ‘docker’ folder and create a new sub-folder called ‘jellyfin’ select this folder and click ‘select’
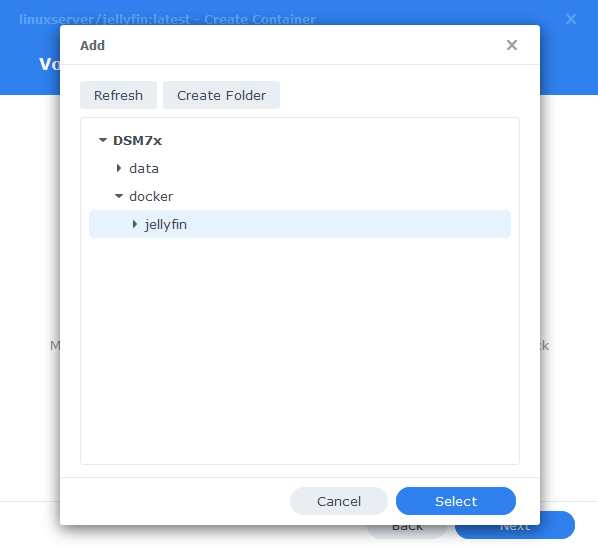
You will now add the below settings into the ‘Mount path’ section
| File/Folder | Mount path |
|---|---|
| docker/jellyfin | /config |
| data/media | /data/media |
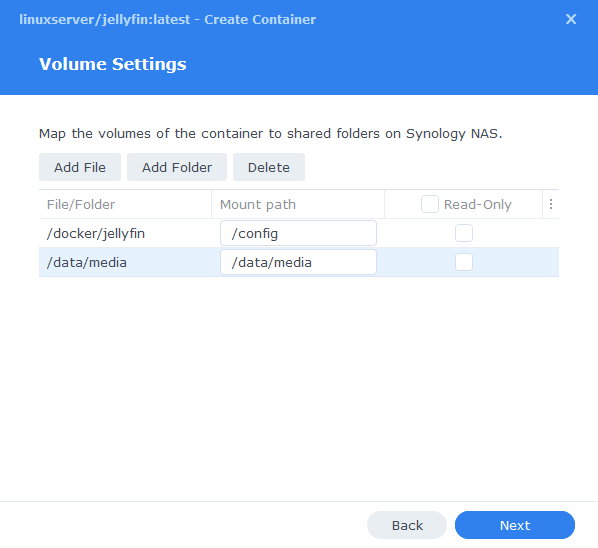
Click Next to move to the final screen.
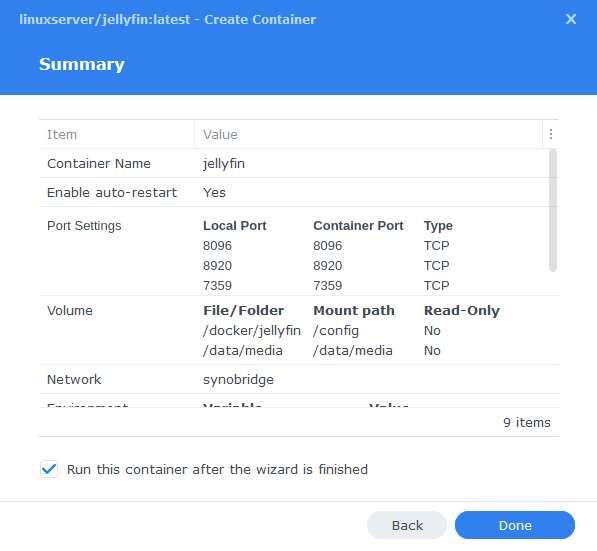
Summary
You have now completed the setup of the container.
You will be shown an overall summary of the settings we have specified, this is a good time to double-check everything is correct. Finally, click on Done and the container should start to boot.
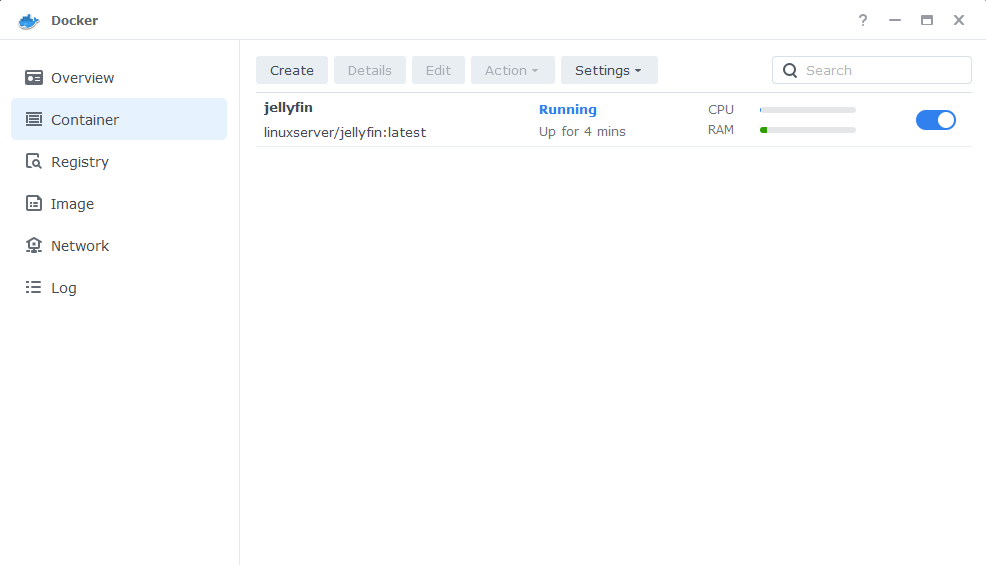
When the container has started you should be able to see Jellyfin running in the list of containers in the Synology GUI.
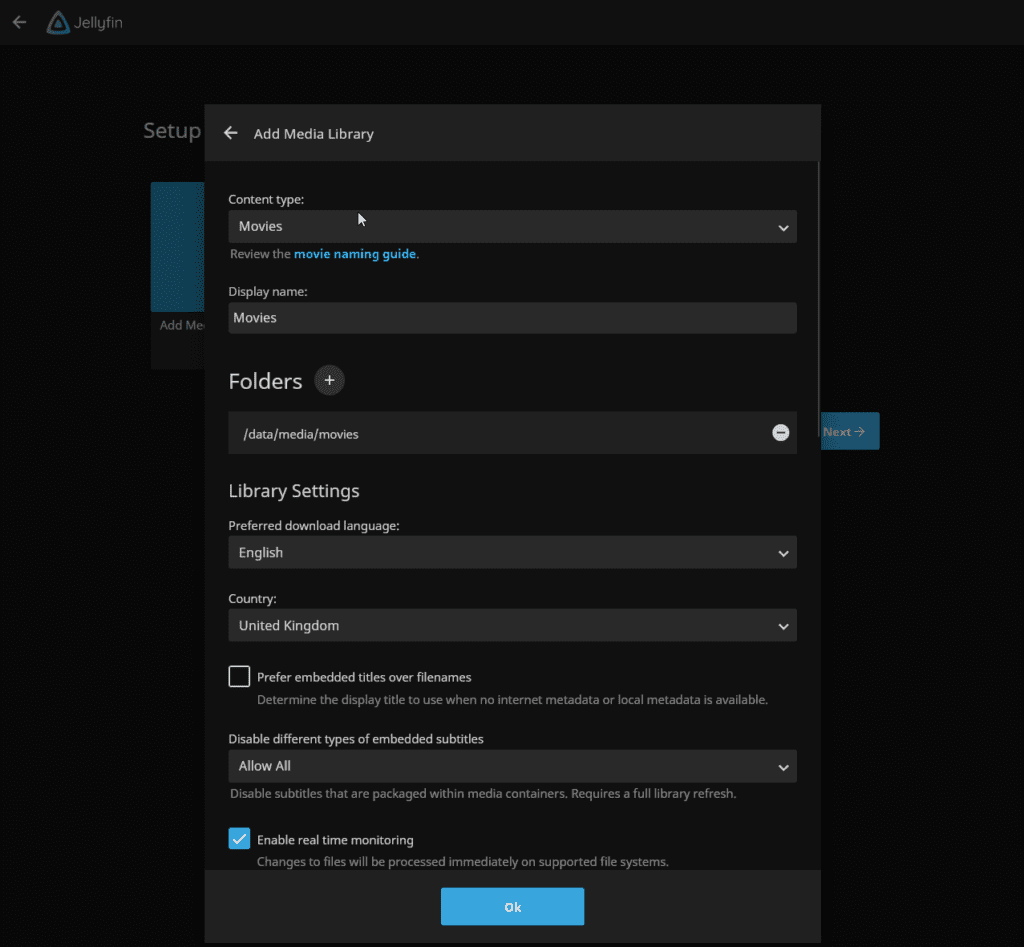
Jellyfin Initial Setup
After a few minutes you should be able to access the server and go through the initial Jellyfin setup by going to the IP of your NAS in your browser followed by port 8096.
e.g. 192.168.0.30:8096
When adding movies or shows they will be located in the /data/media folder.
External Access
You have some choices when it comes to making your new container accessible from outside your home network, these come with different levels of security and convenience. This mini section is generic but covers the basics of getting this guide up and running and is entirely optional.
- Synology’s DDNS (Dynamic Domain Name System) with a TLS Certificate and Reverse Proxy
This is useful if you have some family members or friends that need access to something like Overseerr or Jellyseer and is covered below. - Tailscale or Wireguard VPN
If just you are accessing these services, and you don’t want to expose them to the internet this would be the more secure choice. See my other separate guides. - Cloudflare Tunnels
I don’t currently use these, so I would recommend watching the Wundertech guide on how they work.
A note on Double NAT or CGNAT
Unfortunately more ISPs are moving to these methods of address allocation as the IPv4 address space is getting low on available addresses. If your ISP is doing this your choices are more limited.
You can test if this is the case by checking the WAN IP on your Router/Modem settings and then comparing it to the one shown on portchecker.co. If they are different you are likely Double NAT and will either need to see if you can pay your ISP for a standard IPv4 address or use Tailscale or Cloudflare Tunnels for access.
Using the built-in tools on DSM
The first step of this process is to forward port 443 on your Router to your NAS IP Address, how you do this will depend on your router model, so please refer to its manual.
Router (External):443 > NASIP (Internal):443
Next make sure you have registered for a Synology Account as we are going to be using their DDNS service. https://account.synology.com/en-uk/register/ If you already have this set up move to the next step.
DDNS (Dynamic Domain Name System)
A DDNS address allows you to get external access to your container via an address provided by Synology, this is useful on home internet connections where your ISP will change your IP address on a semi-regular basis.
In the DSM Control panel go to ‘External Access’ and then to the ‘DDNS’ tab
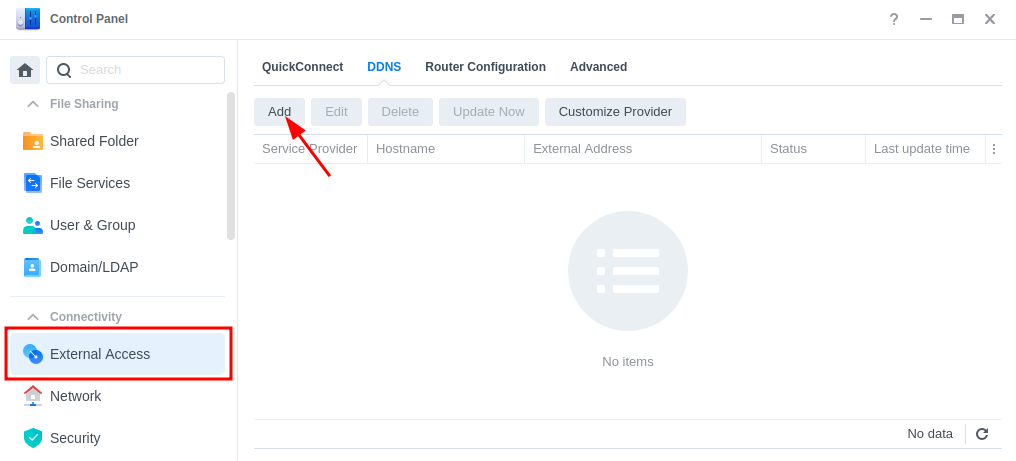
Click on ‘Add’, then fill out the following sections.
| Section | Value |
|---|---|
| Service Provider | Synology |
| Hostname | This will be the unique address just for you so keep the name generic. minecraft.synology.me = BAD myawesomenas.synology,me =GOOD |
| Email: | Log into your Synology account |
| External Address (IPv4) | This should be filled in automatically |
| External Address (IPv6) | This should be filled in automatically if your ISP is using IPv6 |
| Get a Cert from Let’s Encrypt | Tick this box |
| Enable Heartbeat | Tick this box |
Now press OK, DSM will apply your settings. It can take a few moments to set up and the DSM interface will refresh. You will likely receive a certificate error which you will need to accept to get back into DSM.
Reverse Proxy
We are going to set up a reverse proxy subdomain for the address you just register. This means you and your users can access the container without using a port number as it will route all traffic through the secure 443 port.
Go back into the Control Panel and access the ‘Login Portal’ then in the ‘Advanced’ tab click ‘Reverse Proxy’ and then click on ‘Create’.
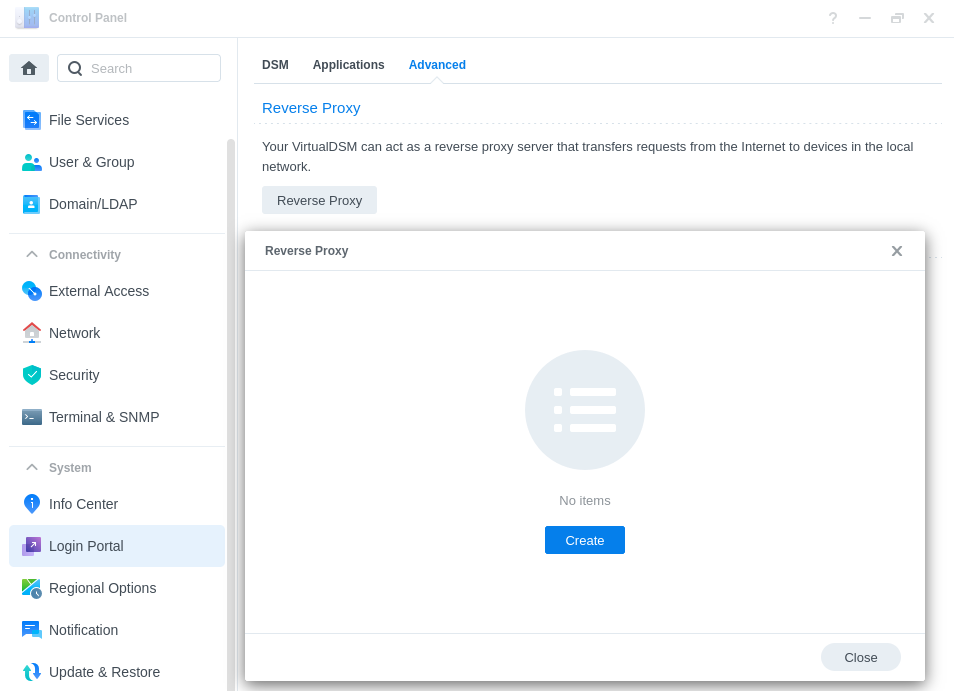
We are now going to enter some rules, so when you or your users access the URL specified the request will automatically be sent to the containers web UI.
Use the settings below, you will need to amend the Hostname sections in line with the hostname you registered earlier, and the IP of your NAS.
| Setting | Value |
|---|---|
| Reverse Proxy Name: | Give it a meaningful name in line with the container you are setting up. |
| Protocol: | HTTPS |
| Hostname: | containername.xxx.synology.me ‘containername‘ will be the name you want to use to access this container ‘.xxx.synology.me‘ will be the exact name you registered earlier |
| Port: | 443 |
| Protocol: | HTTP |
| Hostname: | ‘localhost’ or your NAS IP address |
| Port: | The UI Port Number from the yaml in the guide you are following |
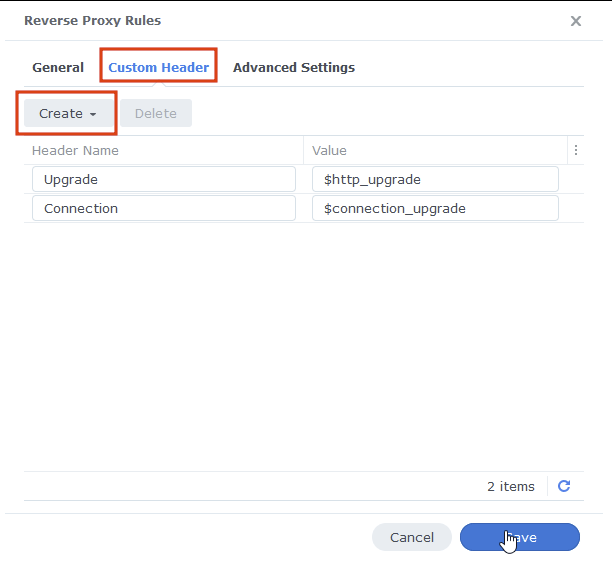
On the second tab ‘Custom Header’ click on Create then WebSocket, this will add two entries for WebSockets to function correctly, you can now press save.
You should now be able to access the web UI of the container by going to the address you just set up in the reverse proxy, it will be a secure connection, and you should have no certificate errors.
You should now be able to access the Jellyfin login screen to https://jellyfin.yourhostname it will be a secure connection, and you should have no SSL errors.
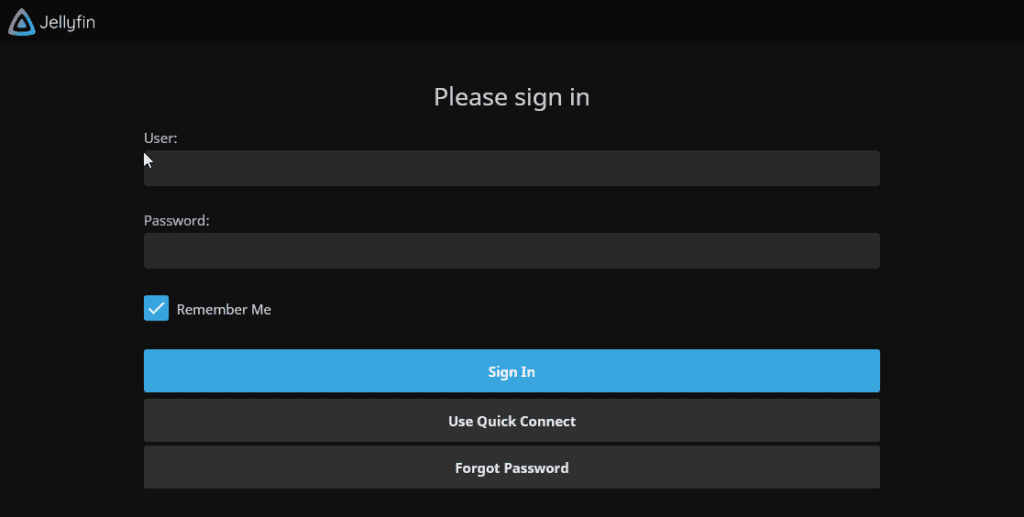
You can now log in with the username and password you created earlier, the same address is used in the Android and iPhone apps.
| Historic Updates | Date |
|---|---|
| New guide released | 03/09/2022 |
Looking for some help, join our Discord community
If you are struggling with any steps in the guides or looking to branch out into other containers join our Discord community!

Buy me a beverage!
If you have found my site useful please consider pinging me a tip as it helps cover the cost of running things or just lets me stay hydrated. Plus 10% goes to the devs of the apps I do guides for every year.


Hello, thank you for your guide.
I am currently using Jellyfin server 10.9.11 in a Synology DS918+ docker.
I had initially set-up 2 users:
– an admin user with no remote connection enabled
– a regular user, with no password, that uses the libraries on my local network only (it’s my go-to viewer account that has all my favorites and on-progress status)
I want to set-up the following 3-users org:
1- admin user with no remote connections, as before
2- regular user with no no remote connections, no password, and no ability to change the server settings, as before (my viewing account)
3- a remote user for a family member, with remote connection enabled, and no ability to change the server settings.
So I have set-up a reverse proxy Using your guide and I got it working but no matter what I try, I can’t get the client’s original ip address; Jellyfin only sees my gateway’s ip address for any external connection., and therefore anyone from outside my network can connect by selecting the user 2 …
Here is what I tried so far:
I added these lines in the reverse proxy custom header section:
Host host
X-Real-IP $remote_addr
X-Forwarded-For $proxy_add_x_forwarded_for
X-Forwarded-Proto $scheme
X-Forwarded-Protocol $scheme
X-Forwarded-Host $http_host
In the Jellyfin server Known Proxies setting, I added:
192.168.0.9,192.168.0.1
where 192.168.0.9 is my synology IP address (that runs the jellyfin docker and the reverse proxy), and 192.168.0.1 is my gateway IP address.
I also added 192.168.0.1 and 192.168.0.9 to Synology’s trusted proxies list.
… to no avail… any external connection shows up as 192.168.0.1 instead of the original ip and I cannot leverage Jellyfin’s user access restriction feature…
Would you know how to address this issue ?
Hey Serge
I only recently started using Jellyfin full-time, and I am still getting used to all the various settings vs my previous Plex setup, I actually still leave it running for remote users and purely have Jellyfin for local. The built-in Syno reverse proxy has limited functionality in the UI and it’s likely those extras are not passing through correctly. You would likely need to set up a more fully feature proxy service such as nginx proxy manager. Which is fairly straight forward but ideally it’s run on port 443 and 80.
Refer to this post on how to move the ports so DSM is not holding onto them.
https://www.reddit.com/r/synology/comments/1hdfc66/comment/m2031yb/
As for the user setup, until I get a lot more used to this you might want to jump on the official Jellyfin forum.
https://forum.jellyfin.org/
Sorry, it’s not an exact answer to your query but hopefully gets you onto the right path..
Howdy. I’ve been trying to set up jellyfin on my synology. I’ve got it installed and followed your instructions to set up a reverse proxy, but I seem to have made a mistake that I can’t figure out. When I try to access remotely, :5001 is added to the end of the url which causes it to land on the nas login, rather than jellyfin. Any thought’s? Thanks.
This is a classic problem, double check that you have forwarded port 443 to the NASIP:443 and if so and the proxy looks correct in line with the screenshots, Also try using a Private browser window as they can tend to cache the address and keep forwarding you, and make sure you use https:// for the address.