Skip to content

Pi-hole in Docker on a Synology NAS

Last updated on 27 October 2023

Please note if you are using DSM7.2 or higher you should use the Container Manager version of this guide from the menu.
UpdateDate
Updated the environment variables from ‘FTLCONF_REPLY_ADDR4’ to ‘FTLCONF_LOCAL_IPV4’10/10/2022
Historic updates now at the end of the guide.


What is Pi-hole?

If you are looking to get advertising and tracking blocked across all the devices on your network a Pi-hole will have you covered. It’s a locally hosted Domain Name Server and uses block lists to stop adverts.

Let’s Begin

Couple of things to note and common questions:

  • Pi-hole is not able to block YouTube ads
  • You will need to change the DNS settings either on your Router or whatever device is managing your DHCP/DNS settings
  • You will not be able to use this in conjunction with the DHCP server built into DSM if you have that enabled you will need to turn it off before continuing.

In order for you to successfully use this guide please complete these two steps first.

Downloading the Pi-hole Image

Open up Docker within DSM and navigate to the ‘Registry’ section and search for ‘pihole’ in the search box. Download the official version.

The pop-up box will ask which version you want to download, make sure you choose ‘Latest’ from the list of available versions.

You can check the status of the download over on the ‘Image’ tab.

Setting up the container

In Docker click on the ‘Image’ tab, in the list of your containers select the ‘PiHole’ image and click on ‘Launch’

The first screen will ask how you want to set up the Docker network, to keep things simple we will be using the Docker Host option which means we will not need to set up any additional ports. Click Next once you have selected the option.

General Settings

Next you will be greeted with the General Settings screen, this is where you can start specifying some of your preferences.

You can change the name of the container to anything you like, and you may want to enable Auto Restart as this will ensure Pi-hole starts automatically if you reboot your NAS.

You will also notice a Configure capabilities button — don’t change anything in here!

Keep in mind if you turn off your Diskstation or stop the container you will lose internet access as there will be no way for devices to resolve DNS queries.

Next up we are going to click on the ‘Advanced Settings’ button, this will take you to a new window with a number of tabs which we are going to work through.

Environment

Next we are going to set up a some environment variables that docker will use to allow the container to access our local file system by telling it the IDs to use for file permissions

For each of the items in the table below you will need to click on ‘Add’ button then type each of the below in the ‘variable’ and ‘value’ sections.

VariableValue
PIHOLE_UIDThe UID you obtained in the user setup guide
PIHOLE_GIDThe GID you obtained in the user setup guide
WEB_UIDThe UID you obtained in the user setup guide
WEB_GIDThe GID you obtained in the user setup guide
TZYour timezone wikipedia.org/wiki/List_of_tz_database_time_zones
WEBPASSWORDA password of your choice for the Pi-hole web interface
DNSMASQ_USERpihole
DNSMASQ_LISTENINGlocal
WEB_PORT8000

Once you have entered the above scroll down the Environment Variables and you will be able to see one called FTLCONF_LOCAL_IPV4 you need to enter the IP address of your NAS.

VariableValue
FTLCONF_LOCAL_IPV4Enter the IP of you NAS

You do not need to set up anything on these tabs.

Press ‘Save’ to go back to the initial setup screen, then press ‘Next’

Volume Settings

We will now be specifying the directories where Pi-hole will store its configuration files.

We first click on ‘Add folder’ so we can create some folders for the config files to live, first create one called ‘pihole’ inside your /docker share.

Then within that folder create two new folders called ‘dnsmasq.d’ and ‘pihole’

You will now add each of these folders in line with the table / screenshot below

File/FolderMount Path
/docker/pihole/dnsmasq.d/etc/dnsmasq.d
/docker/pihole/pihole/etc/pihole

Click Next to move to the final screen.

Summary

You have now completed the container setup.

You will be shown an overall summary of the settings we have specified, this is a good time to double-check everything is correct. Finally, click on Done and the container should start to boot.

After about 30 seconds or so you should then be able to access the Pi-hole web interface via you NAS IP followed by port 8000, and log in with the password you set earlier.

e.g. 192.168.0.46:8000
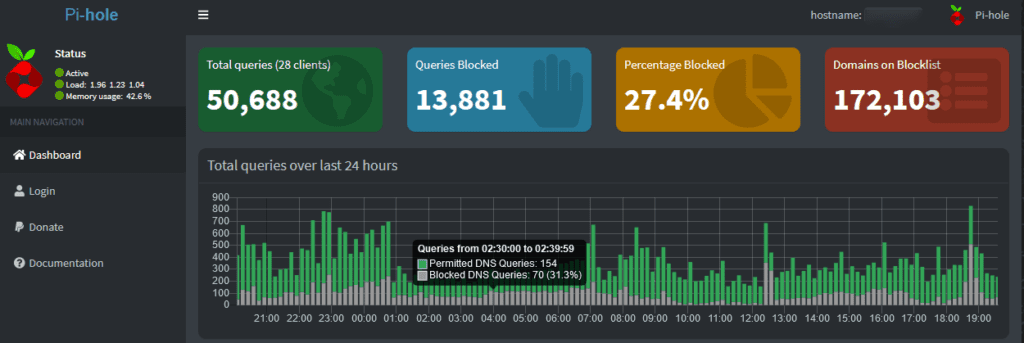
You will now need to add the IP address of your NAS as your DNS address in your router or other DHCP server. It can take some time for all of your devices to move over the new DNS settings so be patient, and you will gradually start to see your stats begin to start.

Also note as we are not using Pi-hole as the DHCP server you will not be able to see the names of the devices in the statistics just their IP addresses.

That’s it!


Historic UpdatesDate
New guide released20/09/2021
Fixed a typo in the Environment Variables and added note around DHCP25/11/2021
Additional environment variable added to fix a start-up error due to changes in the 2022.01 release and onward of PiHole.14/01/2022
Environment Variables updated to the latest requirements – Now runs as your locally created docker user rather than root07/04/2022
Updated screenshots and steps for DSM7.111/06/2022
Restored the guide to 11/06 network setup due to an error on my part and updated environment variables22/08/2022
Historic Updates

Looking for some help, join our Discord community

If you are struggling with any steps in the guides or looking to branch out into other containers join our Discord community!

Buy me a beverage!

If you have found my site useful please consider pinging me a tip as it helps cover the cost of running things or just lets me stay hydrated. Plus 10% goes to the devs of the apps I do guides for every year.
Published inAd-Blocking / DNS 7.1DockerSynology

82 Comments

  1. Paul Sankowski Paul Sankowski

    Getting error when trying to run ‘sudo docker-compose -f /volume1/docker/pihole.yml up -d’
    ERROR: for pihole Cannot create container for service pihole: Conflict. The container name “/pihole” is already in use by container “20532c54cd30b7b7feea3285e3dd369ab941e6a79a3b99cefc757386c78ae8a8”. You have to remove (or rename) that container to be able to reuse that name.

    • Dr_Frankenstein Dr_Frankenstein

      Hey Paul

      Is this the first time running the container – or do you already have pihole running but setup via the UI – If the latter you will need to delete the existing container (not the files) and you should be able to use the compose method.

  2. Gene Gene

    Trying to setup pi-hole and got stuck on “XXX you obtained in the user setup guide” I must of missed something. Where is the user setup guide?

  3. Rosco Rosco

    Same problem here.

    Stopping lighttpd
    lighttpd: no process found
    repeated on the console

    DNS resolution is working, but I cant access the web interface. It was fine until the last update.

    • Dr_Frankenstein Dr_Frankenstein

      What version did you update to the latest? Might be worth rolling back or downloading the image again as the latest version is from 25 days ago.

      • Rosco Rosco

        **RESOLVED**

        There was an update of the :LATEST image early this morning (18/03/23) but that had the same issue.

        I’ve reverted to the 2023.1 image and all is fine again.

        Not sure what (other than bugfixes) I’m missing by not being on the latest image, but at least now I can admin it.

    • Dr_Frankenstein Dr_Frankenstein

      You can it’s usually recommended to setup pihole on the host network but using the bridge will work just make sure you fill in the ports section when the screen appears

      • Simon O Simon O

        So….I was eventually able to get this working. I can’t explain why this combination of variables worked, but I wanted to share them here in case others encounter similar issues to me.

        Setting DNSMASQ_USER to ‘pihole’ just would not work. Now that it is up and running, if I go back and update this variable to that value, Pi-hole itself throws this error in it’s own diagnosis:

        DNSMASQ_CONFIG – FTL failed to start due to failed to create listening socket for port 53: Permission denied. That error disappears when I change the user to ‘root’.

        The other thing which worked for me was to ignore the following 4 environment variables, PIHOLE_UID, PIHOLE_GID, WEB_UID & WEB_GID.

        Leaving those four out, and having the user as root has meant this is now up and running on the host network.

        Only variables I had to configure:

        FTLCONF_LOCAL_IPV4
        WEBPASSWORD
        WEB_PORT
        TZ
        DNSMASQ_USER – Change to root

        Again, thank you for the great guides, all have been extremely useful. Looking forward to more coming in the future!

        • Dr_Frankenstein Dr_Frankenstein

          Thanks for the update, the original version of the guide used the same method with the root user as it would not work as any other due to not being able to the UIDs, When they were added it by the PiHole team it allowed for the use of the PiHole user as it has the same folder permissions as our dockerlimited one. Sometime these things just don’t like to co-operate. Thanks for the coffee!

  4. Simon O Simon O

    Hi, firstly thank you for another great guide! I’m having a little trouble getting this one working though. I have followed the guide step by step, updated the DNSMASQ_user to root, but every time I start the container I see this in the logs and can’t access the admin interface on either NASIP:8000 or NASIP:8000/admin

    [i] Ensuring basic configuration by re-running select functions from basic-install.sh
    [i] Installing configs from /etc/.pihole…
    [i] Existing dnsmasq.conf found… it is not a Pi-hole file, leaving alone!
    [i] Installing /etc/dnsmasq.d/01-pihole.conf…
    [✓] Installed /etc/dnsmasq.d/01-pihole.conf
    [i] Installing /etc/.pihole/advanced/06-rfc6761.conf…
    [✓] Installed /etc/dnsmasq.d/06-rfc6761.conf
    [i] Installing latest logrotate script…
    [i] Existing logrotate file found. No changes made.
    [i] Custom WEB_PORT set to 8000
    [i] Without proper router DNAT forwarding to NASIP:8000, you may not get any blocked websites on ads
    [i] Assigning password defined by Environment Variable
    [✓] New password set
    [i] Added ENV to php:
    “TZ” => “Australia/Melbourne”,
    “PIHOLE_DOCKER_TAG” => “”,
    “PHP_ERROR_LOG” => “/var/log/lighttpd/error-pihole.log”,
    “CORS_HOSTS” => “”,
    “VIRTUAL_HOST” => “pihole”,
    [i] Using IPv4 and IPv6
    [i] WARNING: running in host network mode forces lighttpd’s bind address to $FTLCONF_LOCAL_IPV4 (NASIP).
    [i] This behaviour is deprecated and will be removed in a future version. If your installation depends on a custom bind address (not 0.0.0.0) you should set the $WEB_BIND_ADDR environment variable to the desired value.
    [i] Preexisting ad list /etc/pihole/adlists.list detected (exiting setup_blocklists early)
    [i] Existing DNS servers detected in setupVars.conf. Leaving them alone
    [i] Applying pihole-FTL.conf setting LOCAL_IPV4=NASIP
    [i] FTL binding to default interface: eth0
    [i] Enabling Query Logging
    [i] Testing lighttpd config: Syntax OK
    [i] All config checks passed, cleared for startup …
    [i] Docker start setup complete
    [i] pihole-FTL (no-daemon) will be started as root
    s6-rc: info: service _startup successfully started
    s6-rc: info: service pihole-FTL: starting
    s6-rc: info: service pihole-FTL successfully started
    s6-rc: info: service lighttpd: starting
    s6-rc: info: service lighttpd successfully started
    s6-rc: info: service _postFTL: starting
    s6-rc: info: service _postFTL successfully started
    Checking if custom gravity.db is set in /etc/pihole/pihole-FTL.conf
    s6-rc: info: service legacy-services: starting
    s6-rc: info: service legacy-services successfully started
    Stopping lighttpd
    lighttpd: no process found
    Stopping lighttpd
    lighttpd: no process found
    Stopping lighttpd
    lighttpd: no process found

    • Dr_Frankenstein Dr_Frankenstein

      Hey you should be able to run as ‘pihole’ not ‘root’, I am away at the moment so little limited on time, but looking at the log did you set your actual NAS IP in the environment variable FTLCONF_LOCAL_IPV4

      I notice they are saying this is going to be depreciated which is odd as it replaced the old one which I updated back in October and the documentation doesn’t mention a replacement on my brief read.

      • Simon O Simon O

        I just did a clean install and this is the log. I am updating the environment variable for my NAS IP, although in this instance it doesn’t seem like it’s getting that far. One thing I did notice, is that in your screenshots, on the general settings screen during the container setup, yours shows port 53 (greyed out), but mine shows port 80. Why would that be different?

        Here is the full log following the fresh install:

        s6-rc: info: service s6rc-oneshot-runner: starting
        s6-rc: info: service s6rc-oneshot-runner successfully started
        s6-rc: info: service fix-attrs successfully started
        s6-rc: info: service legacy-cont-init: starting
        s6-rc: info: service legacy-cont-init successfully started
        s6-rc: info: service cron: starting
        s6-rc: info: service cron successfully started
        s6-rc: info: service _uid-gid-changer: starting
        [i] Changing ID for user: www-data (33 => 1029)
        [i] Changing ID for group: www-data (33 => 100)
        [i] Changing ID for user: pihole (999 => 1029)
        s6-rc: info: service _uid-gid-changer successfully started
        s6-rc: info: service _startup: starting
        [i] Starting docker specific checks & setup for docker pihole/pihole
        [i] Setting capabilities on pihole-FTL where possible
        [i] Applying the following caps to pihole-FTL:
        * CAP_CHOWN
        * CAP_NET_BIND_SERVICE
        * CAP_NET_RAW
        Failed to set capabilities on file `/usr/bin/pihole-FTL’ (Operation not supported)
        The value of the capability argument is not permitted for a file. Or the file is not a regular (non-symlink) file
        [!] ERROR: Unable to set capabilities for pihole-FTL. Cannot run as non-root.
        If you are seeing this error, please set the environment variable ‘DNSMASQ_USER’ to the value ‘root’
        s6-rc: info: service _startup successfully started
        s6-rc: info: service pihole-FTL: starting
        s6-rc: info: service pihole-FTL successfully started
        s6-rc: info: service lighttpd: starting
        s6-rc: info: service lighttpd successfully started
        s6-rc: info: service _postFTL: starting
        s6-rc: info: service _postFTL successfully started
        Checking if custom gravity.db is set in /etc/pihole/pihole-FTL.conf
        s6-rc: info: service legacy-services: starting
        s6-rc: info: service legacy-services successfully started
        Installation Failure: /etc/pihole/setupVars.conf does not exist!
        Please run ‘pihole -r’, and choose the ‘reconfigure’ option to fix.
        2023-02-17 08:23:32: network.c.369) can’t bind to socket: 0.0.0.0:80: Address already in use
        Stopping lighttpd
        lighttpd: no process found
        Stopping pihole-FTL
        pihole-FTL: no process found
        Stopping pihole-FTL
        pihole-FTL: no process found
        2023-02-17 08:23:33: network.c.369) can’t bind to socket: 0.0.0.0:80: Address already in use
        Stopping lighttpd
        lighttpd: no process found
        Stopping pihole-FTL
        pihole-FTL: no process found

        This section then just continues to repeat:

        2023-02-17 08:23:33: network.c.369) can’t bind to socket: 0.0.0.0:80: Address already in use
        Stopping lighttpd
        lighttpd: no process found
        Stopping pihole-FTL
        pihole-FTL: no process found

        • Dr_Frankenstein Dr_Frankenstein

          https://drfrankenstein.co.uk/wp-content/uploads/2022/06/image-31.png

          If you are referring to this screen, don’t worry about that as you need to leave it disabled.

          Unfortunately I am away at the moment and trying to do this on my test environment via a mobile is a bit of a pain.

          Can you delete the PiHole image and download it fresh it makes me wonder if there is a bug as nothing has changed for the install from what I can see.

          I am back home on Sunday so will have access to my desktop which makes things a lot easier.

          Other thing to check is the Docker user you are using for the PUID does has permissions to write to the config folder.

        • Simon O Simon O

          I have been doing some reading and I suspect I need to unbind port 80/443 from Nginx. It uses it as a redirect to DSM on port 5000/5001. I’ve found some code snippets you can add to a script which runs on each reboot.

          • Dr_Frankenstein Dr_Frankenstein

            You should not need to do that at all. As this does not require the ports. The alternative is to set this into bridge mode by selecting a bridge on the first network screen it will then give you a ports screen where you can amend the External Ports.. (not internal leave them)

Leave a Reply

Your email address will not be published. Required fields are marked *

This site uses Akismet to reduce spam. Learn how your comment data is processed.

drfrankenstein.co.uk – writing Synology Docker Guides since 2016 – Join My Discord!