Please note if you are using DSM7.2 or higher you should use the Container Manager version of this guide from the menu.
This guide has reached the end of its updates as most people are now on the latest DSM update - This guide is correct as of 08/12/2023 however no further updates will be added.
| Update | Date |
|---|---|
| Removed docker compose section as rarely used | 18/07/2023 |
What is Radarr?
Radarr is used to search, download and organise your Movies in conjunction with your preferred Usenet or Torrent downloaders and indexers.
Let’s Begin
In this guide I will take you through the steps to get Radarr up and running in Docker.
In order for you to successfully use this guide please complete the three preceding guides
- Step 1: Directory Setup Guide
- Step 2: Setting up a restricted Docker user
- Step 3: Setting up a Docker Bridge Network
Downloading the Radarr Image
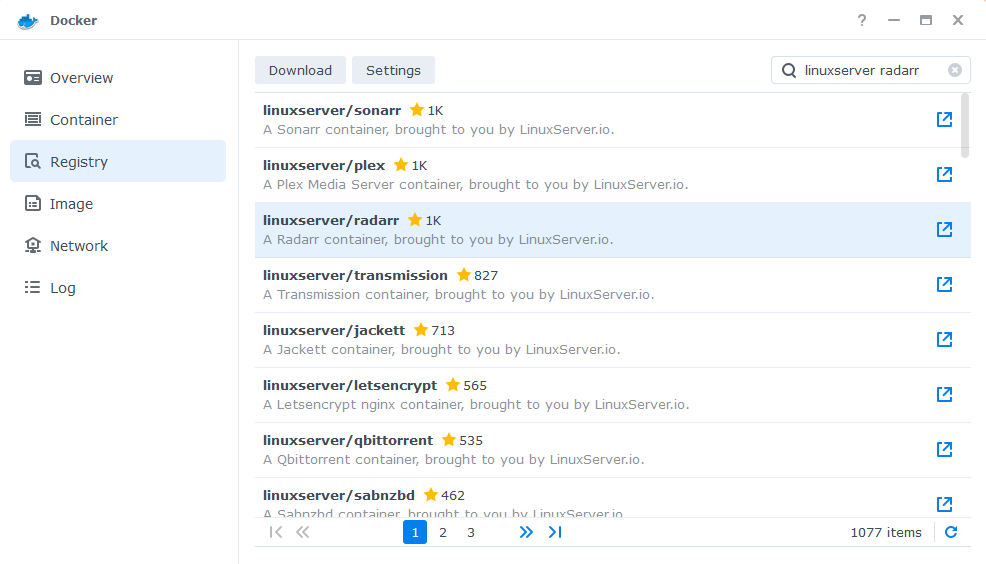
Open up Docker within DSM and navigate to the ‘Registry’ tab and search for ‘Radarr’. In the list of available containers select the one made by Linuxserver as shown below then click ‘Download’.
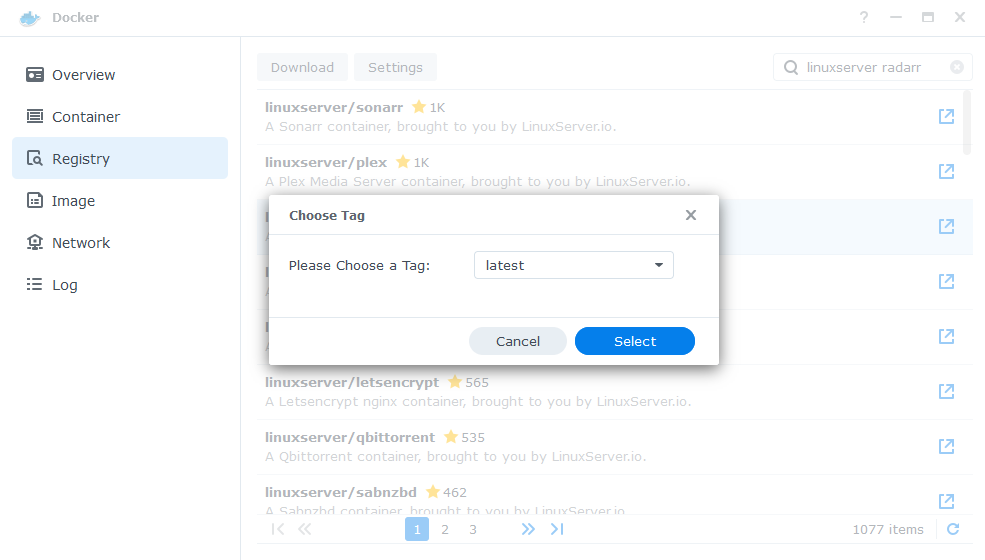
The pop-up box will ask which version you want to download, make sure you choose ‘Latest’ from the list of available versions.
You can check the status of the download over on the ‘Image’ tab.
Setting up the container
In Docker click on the ‘Image’ tab, in the list of your containers select the ‘Linuxserver Radarr’ image and click on ‘Launch’
You will be greeted with the Network screen, we will be using the ‘synobridge’ network we created earlier select it from the list and click Next.

General Settings
Next you will be greeted with the General Settings screen, this is where you can start specifying some of your preferences.
You can change the name of the container to anything you like, and you may want to enable Auto Restart as this will ensure Radarr starts automatically if you reboot your NAS.
You will also notice a Configure capabilities button — don’t change anything in here!
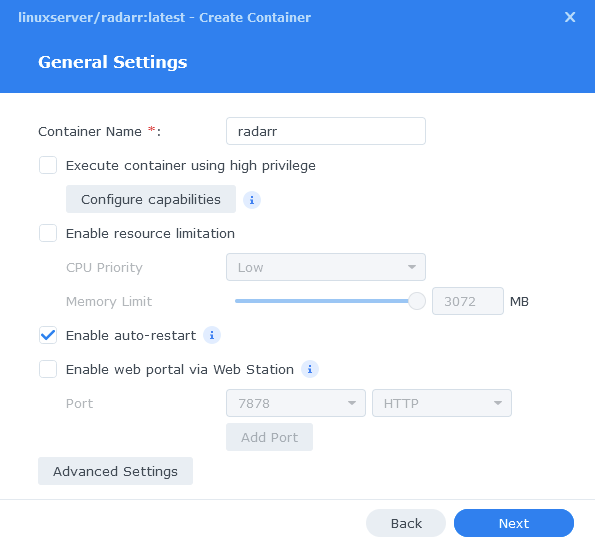
Next up we are going to click on the ‘Advanced Settings’ button, this will take you to a new window with a number of tabs which we are going to work through.
Environment (PGID, PUID and Timezone)
Next we are going to set up a couple of environment variables that docker will use to allow the container access to our files and folders and also to tell it where we live in the world.
Click the Add button, and fill in the following details as per the table/screenshot, you will need to do one at a time.
| Variable | Value |
|---|---|
| PUID | The UID you obtained in the user setup guide |
| PGID | The GID you obtained in the user setup guide |
| TZ | Your timezone wikipedia.org/wiki/List_of_tz_database_time_zones |

Links / Execution Command
You do not need to set up anything on these tabs.
Press ‘Save’ to go back to the initial setup screen, then press ‘Next’
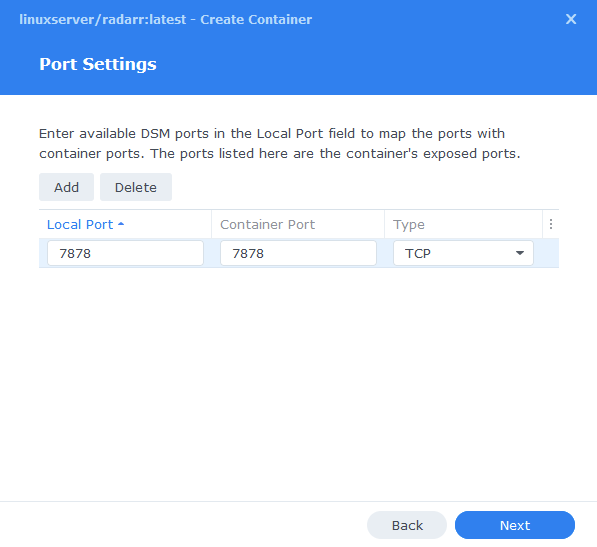
Port Settings
We won’t be changing any of the ports the container uses. You can repeat the ones shown on the right side of the settings page ‘Container Port’ onto the left side ‘Local Port’ once you have done this press ‘Next’.
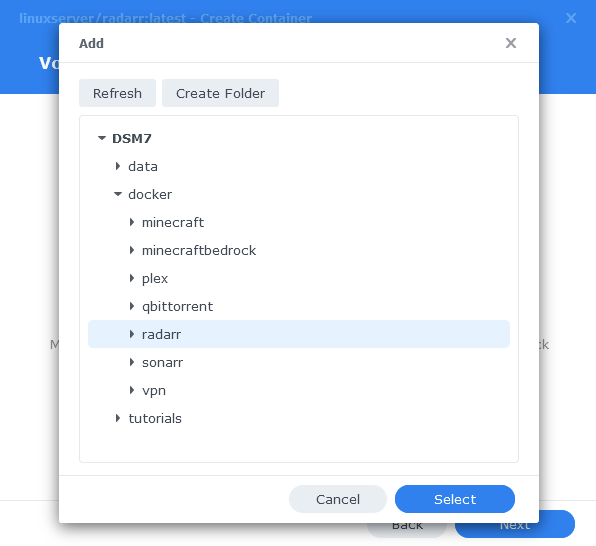
Volume Settings
We will now be specifying the directories where Radarr will store its configuration files and where to find our media and downloads.
Click on ‘Add Folder’ select the ‘docker’ folder and create a new sub-folder called ‘radarr’ select this folder and click ‘select’
Repeat this process to add the /data folder.
You will now add the below settings into the ‘Mount path’ section
| File/Folder | Mount path |
|---|---|
| docker/radarr | /config |
| data | /data |
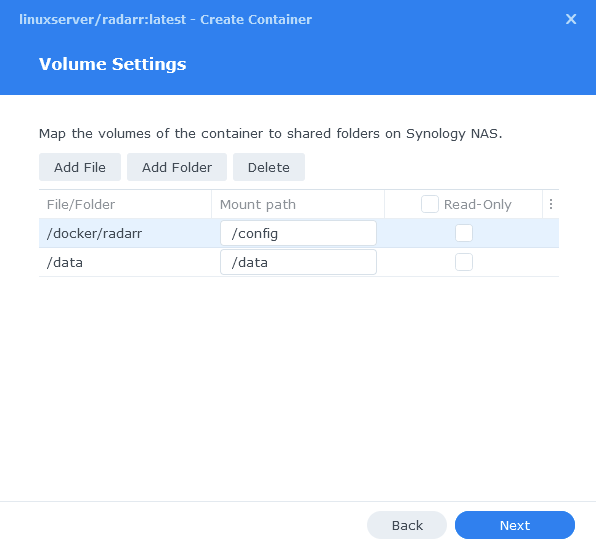
Click Next to move to the final screen.
Summary
You have now completed the setup of the container.
You will be shown an overall summary of the settings we have specified, this is a good time to double-check everything is correct. Finally, click on Done and the container should start to boot.
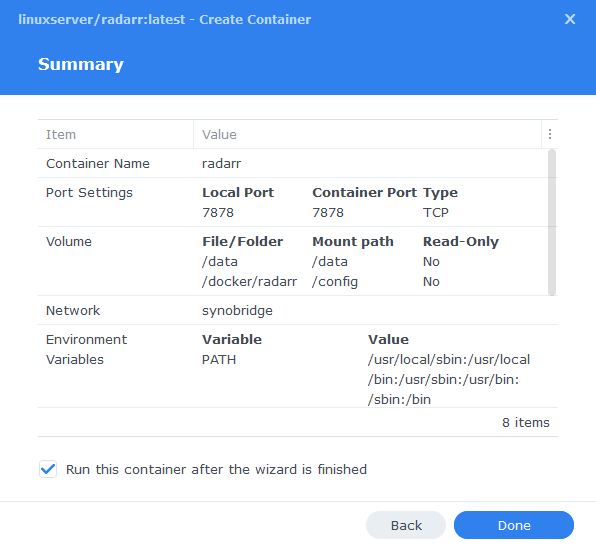
You should now be able to access Radarr via the IP of your NAS followed by the port 7878
e.g., 192.168.0.40:7878
Key Settings and FAQ
Now you have set up Radarr there are some key settings you will need to set as these often catch new users out. I will add more as they come up.
Media Management / Root Folders (Settings>Media Management)
Radarr refers to the place(s) you keep your movies as Root Folders. These are where Radarr will ultimately move your movies to once they finish downloading.
| App | Root Folder |
|---|---|
| Radarr | /data/media/movies |
Download Clients (Settings > Download Clients>Remote Path Mappings)
While most of the settings on this page are self-explanatory something that has caught people out if the Remote Path Mappings setting. If you are hosting all your services on the same NAS do not add any settings here.
I can’t get Radarr to Connect to my Download Client!
When setting up your preferred download client or Prowlarr etc. Usually you will use the IP of your NAS, however if for whatever reason this is not working you can use http://172.20.0.1 which is the IP of the ‘synobridge’ gateway.
| Historic Updates | Date |
|---|---|
| Added Docker Compose details Added new folder mappings to ensure atomic moves and Hard-linking | 03/05/2021 |
| Guide re-written and updated with DSM7 screenshots | 01/08/2021 |
| Updated screenshots and steps for DSM7.1 | 03/06/2022 |
| Added new port settings and Docker Bridge Network | 23/07/2022 |
| Compose version number removed and small wording amendments | 08/04/2023 |
| Amended the path to save the compose file – this is for security, so the container has no access to the file contents. | 14/04/2023 |
Looking for some help, join our Discord community
If you are struggling with any steps in the guides or looking to branch out into other containers join our Discord community!

Buy me a beverage!
If you have found my site useful please consider pinging me a tip as it helps cover the cost of running things or just lets me stay hydrated. Plus 10% goes to the devs of the apps I do guides for every year.


Thanks so much for your guides, these were great. Wondering what your reco would be for downloading a 4k and 1080p version of movies? Would you recommend a second instance of radarr? If yes, any chance you can pull together a compose for bringing it behind gluetun? Little confused re: proper port set up.
So I will be changing all these updated guides again ‘soon’ to use Projects with appropriate compose files and stack them up! As it will reduce maintenance for me and get everyone a faster setup experience.. In the interim I will ping you an email!
Hey doc, great guides. Running into one issue in accessing the media folder – though I have the mount points set, the contents are empty. Not an issue on my sonarr setup.
I do see one different environment variable when I edit
Ps1 is set to $(whoami)@$(hostname):$(pwd)\$ , not sure if it’s related.
Any thoughts on seeing the folder but not the contents? Subfolders should be properly owned but I’ll double check.
My initial thought would be to triple check your PUID/PGID values and they are the correct way around with the PGID being 100.
Thanks for these incredible guides, Doctor.
I noticed you removed the version from your compose files. I’m curious and very much still learning. Can you explain why?
Hey, so I thought that up to compose version 2.0 it required you to define the version number. Turns out its from 1.28 and up and we run 1.29 on our NAS as of writing so they can be removed 🙂
I have some further compose updates incoming, such as moving them all into a single docker-compose.yml for a bit more convenience. They were originally added for a quick bit of info as more people are using them than I originally planned they need a little polish! 🙂
Hey,
I followed your guide, but i forgot to change the local port to 7878, so now i have to use something like 49153. This is fine, except it keeps changing, so this time it is 49153, next time it is 49158 etc. Quite annoying as i have to check docker for the port. Is there anyway to change the local port to 7878 now?
Thanks in advance.
Hey
1) Delete the container and recreate it 🙁
2)
Select the container from the list in Docker – Export it by clicking Settings > Export > Settings Only.
Edit the radarr.json file on your computer, there will be a section just under the part that says “host_port” : 49153, change this to 7878 save the file and then import it back into Docker (you will need to delete the old Radarr container first) and you can then just start it up.
Thanks, i went with option 1, and it worked like a charm.
Thanks again for these posts!
I have been using Radarr based on your guide for quite some time now without any issues. However, today, attempting to open Radarr’s page leads to a pop-up that says: “This site is asking you to sign in” and there’s a username and password prompt. But, as far as I recall, we never set any credentials.
Also, I checked the config.xml file and authentication is set to ‘None’.
Why is this happening and what credentials should I use?
Actually, scratch that, the authentication method was set to ‘Basic’. I was checking Readarr’s config.xml instead of Radarr’s 😀
Ha no problem, they are gradually making signing in on by default on new installations.