Last updated on 6 April 2025
Please note if you are using DSM7.2 or higher you should use the Container Manager version of this guide from the menu.
This guide has reached the end of its updates as most people are now on the latest DSM update - This guide is correct as of 08/12/2023 however no further updates will be added.
| Update | Date |
|---|---|
| Amended the path to save the compose file – this is for security, so the container has no access to the file contents. | 14/04/2023 |
What is SABnzbd?
SABnzbd is a binary newsreader, it is used to download files from Usenet, and where required will also repair and extract releases. It works on its own or in conjunction with other tools such as Lidarr and Radarr.
Let’s Begin
In this guide I will take you through the steps to get SABnzbd up and running in Docker.
In order for you to successfully use this guide please complete the three preceding guides
- Step 1: Directory Setup Guide
- Step 2: Setting up a restricted Docker user
- Step 3: Setting up a Docker Bridge Network
Downloading the SABnzbd Image
Open up Docker within DSM and navigate to the ‘Registry’ tab and search for ‘SABnzbd’.
In the list of available containers select the one made by Linuxserver as shown below, right click on it and select ‘Download’ or click the button at the top of the window.

The pop-up box will ask which version you want to download, make sure you choose ‘Latest’ from the list of available versions.

You can check the status of the download over on the ‘Image’ tab.
Setting up the container
In Docker click on the ‘Image’ tab, in the list of your containers select the ‘Linuxserver SABnzbd’ image and click on ‘Launch’
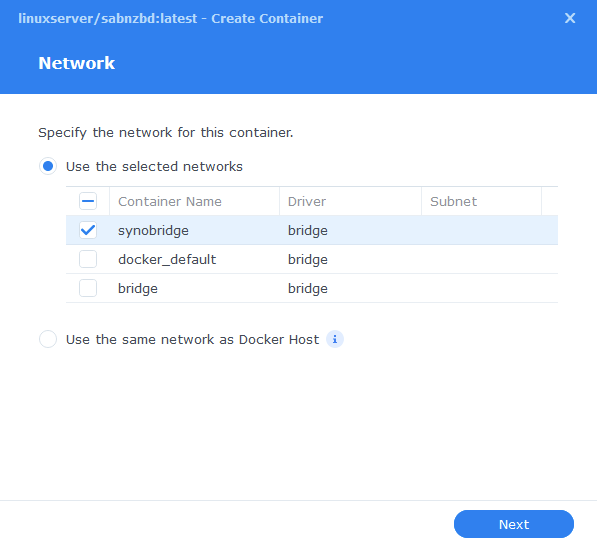
You will be greeted with the Network screen, we will be using the ‘synobridge’ network we created earlier select it from the list and click Next.
General Settings
Next you will be greeted with the General Settings screen, this is where you can start specifying some of your preferences.
You can change the name of the container to anything you like, and you may want to enable Auto Restart as this will ensure SABnzbd starts automatically if you reboot your NAS.

Next up we are going to click on the ‘Advanced Settings’ button, this will take you to a new window with a number of tabs which we are going to work through.
Environment (PGID, PUID and Timezone)
Next we are going to set up a couple of environment variables that docker will use to allow the container access to our files and folders and also to tell it where we live in the world.
Click the Add button, and fill in the following details as per the table/screenshot, you will need to do one at a time.
| Variable | Value |
|---|---|
| PUID | The UID you obtained in the user setup guide |
| PGID | The GID you obtained in the user setup guide |
| TZ | Your timezone wikipedia.org/wiki/List_of_tz_database_time_zones |

Links/Execution Commands
You do not need to set up anything on these tabs.
Press ‘Save’ to go back to the initial setup screen, then press ‘Next’
Port Settings
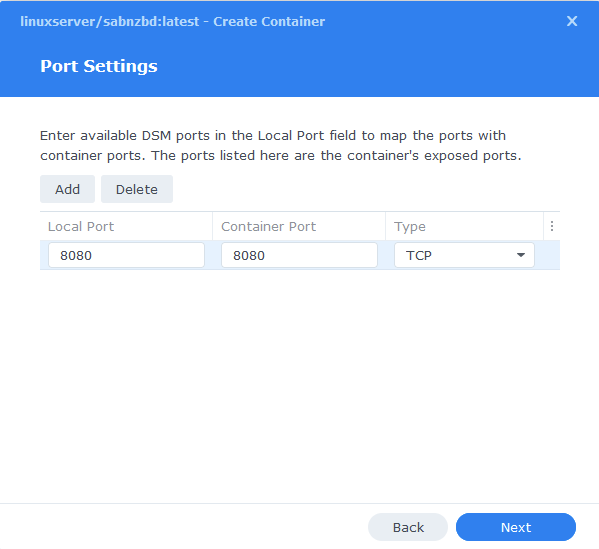
We won’t be changing any of the ports the container uses. You can repeat the ones shown on the right side of the settings page ‘Container Port’ onto the left side ‘Local Port’ once you have done this press ‘Next’.
Volume Settings
We will now be specifying the directories where SABnzbd will store its configuration files and where download files.
Click on Add Folder, click on the docker share and create a new sub-folder called ‘sabnzbd’ select this folder and click ‘select’

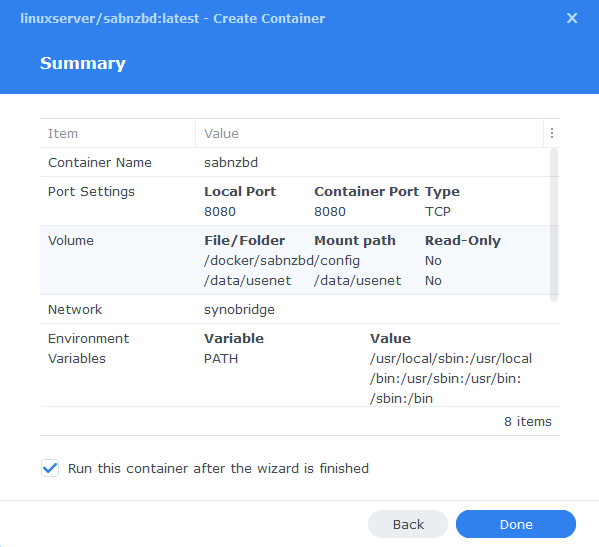
You will now repeat this step but this time adding the /data/usenet folder and then add the Mount Paths as per the table / screenshot below.
| File/Folder | Mount path |
|---|---|
| docker/sabnzbd | /config |
| data/usenet | /data/usenet |

Click Next to move to the final screen.
Summary
You have now completed the setup of the container.
You will be shown an overall summary of the settings we have specified, this is a good time to double-check everything is correct. Finally, click on Done and the container should start to boot.
Some final steps
SABnzbd will now be running on port 8080 you can connect to it by going to the IP address of your NAS with that port
e.g. 192.168.0.40:8080
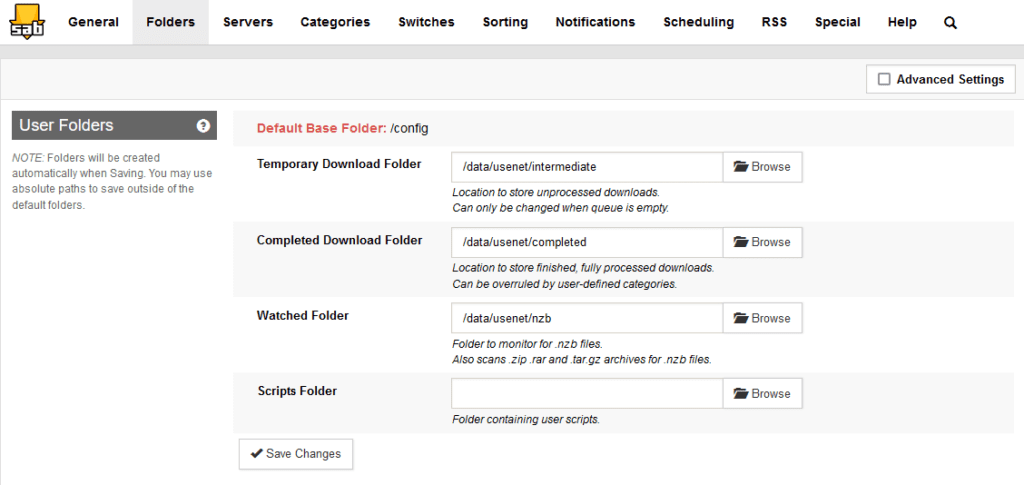
Once you have completed the setup wizard, go into the settings and amend your folders to the following
(Please note, if you have trouble accessing the setup wizard or get an error after the first step. Stop the Docker package in the Package Centre and restart it, or in some cases do a reboot)
After the initial set up you will need to ensure the ‘Folders’ settings are in line with the table/screenshot below.
| Setting | Path |
|---|---|
| Temporary Download Folder | /data/usenet/intermediate |
| Completed Download Folder | /data/usenet/completed |
| Watched Folder | /data/usenet/nzb |
| Historic Updates | Date |
|---|---|
| Added Docker Compose details Added new folder mappings to ensure atomic moves and Hard-linking | 03/05/2021 |
| Guide re-written and updated with DSM7 screenshots | 01/08/2021 |
| Added note about rebooting if you are unable to access the Setup Wizard | 14/01/2022 |
| Updated steps and screenshots for DSM7.1 | 02/07/2022 |
| Added new port settings and Docker Bridge Network | 24/07/2022 |
| Compose version number removed and small wording amendments | 08/04/2023 |
Looking for some help, join our Discord community
If you are struggling with any steps in the guides or looking to branch out into other containers join our Discord community!
Buy me a beverage!
If you have found my site useful please consider pinging me a tip as it helps cover the cost of running things or just lets me stay hydrated. Plus 10% goes to the devs of the apps I do guides for every year.


Thanks for the awesome guide!
Just a small hint you could perhaps add to the guide to avoid some missunderstanding – in case the Synology Firewall is enabled (which is totally recommended) we need to also allow the port 8080 in order for this to work.
Cheers!
I will get a general note added to them all 🙂
Good idea!
Btw. I had another small issue. I did everything according to the guide, but at the end – the step with setting up the folders – I was not able to execute it. The problem was the permissions of the 3 directories inside the container were very restrictive. I had to manually enter the container per terminal and chmod/chown these 3 directories (/data/usenet/intermediate, /data/usenet/completed, /data/usenet/nzb), in order to be able to set them (without a permission denied error) from the SABNZBD interface.
Very odd especially that you could browse to them in the first place.
No, I was not able to browse them via the interface. It didn’t show them due the the weird permissions (400). So I entered them manually in the filed and got the permission err.
Hi Alex, I have exactly the same setup as yours (looks like) and follwed the same instructions as per this page, and end up with the same issue.
Would you mind sharing more about “how you entered the container via ssh” to modify the chmod of these folders. I want to check if I have the same permission issue. I’m a little newbie on linux, so I might need guidance here. Appreciate.
Open the details of the container and go to Terminal
Then click the button create, which creates below the “bash” terminal
I have a different folder as written in this tutorial. You have to change it to your folder structure. Instead of “/data/usenet” I used “downloads”.
Now type these 2 commands into the terminal screen:
chmod 777 downloads/
chown root downloads/
Now go to the webinterface and select the prefered categories. You should now be able to open the directory.
I setup every script as you instructed. Prowlarr, radarr, sonarr, lidarr, qbittorrent, and sabnzbd. Has been running for a little over a week now. I just found that I have many downloads stuck in data/usenet/completed. Any idea why these have not been moved to media directory?
Hi Jason, the best starting point will be to check the logs / system events in Sonarr and Radarr as they should be doing the lifting work. They are found in the system section of both Web interfaces. Look for mentions of the completed file path.
I found the issue. The issue was an error where file names were different than expected. I cant remember verbatim and this was solved a few days ago.
Hi. Thank you for this detailed guide you have provided. Followed the guide and with the screenshots were a great help. Unfortunately, I am not able to connect to my SABnzbd page as I am getting the following error on the browser:
External internet access denied – https://sabnzbd.org/access-denied
The following log error:
WARNING::[interface:374] Refused connection from: ::ffff:172.34.0.1
I am not running the firewall module, so I should be good. I am wondering if I am missing a step. If can get this up and running, I will be using your guide to setup Sonarr on my DS1621+ for a complete solution along with qBittorrent. 🙂
I have tried searching the issue, but found it to be cryptic and its my first foray into using Docker, but learning loads!!
Any help would be appreciated.
Thanks!!
Hey, this could be a new change with SAB let me check and come back shortly..
So I just set up the container from fresh on my test VM and after start up I reach the Wizard page, have you even managed to get to that or is this on the first ever start up? And are you visiting the page via the NASIP:8080?
Yes. just using the NAS IP:8080. By the looks of the message it seems that SAB is outputting the message.
OK – I have being doing some digging – Stop the container and in the /docker/sabnzbd folder edit the sabnzbd.ini, there is a setting called ‘inet_exposure’ make sure this is set to 0. Then start the container again
inet_exposure = 0
I have no idea how yours is defaulting to any other value?
I checked the ini file and the settings are correct. I am wondering if this would be a permissions thing? I am just not sure why I would get this error? Tried to change it to 1, but the same error comes up and no access to the GUI.
If it was a permissions issue the settings file wouldn’t even be created
Stop the container again delete the sabnzbd folder and create it again, then start the container up.
No joy there. BTW Happy New Year!! I know you are in the UK!! 🙂
Thanks and Happy New Year to you!
OK two more things to check then
1) – While unlikely you don’t still have the a Package Center version of Sab?
2) – Back in the setting ini check this setting and set it to 0 from 1
api_warnings = 1
Thanks
The warning has gone away when changing the api_warning = 0, but the page is blank with no error message.
I did try to start the image with elevated priviledge, but that didnt work either. I am wondering if the network bridge is a problem. I don’think that would be the case considering I did get qbittorrent have its GUI come up no problem. Buth some sort of permissions error might be likely. I will deal with that later.
Hmm – Ping me a message via my Help page on the menu or jump on the Discord server will be easier to troubleshoot, never had this before now. It might be worth downloading the image again as well.
On Discord now. 🙂
I followed your guide to set this up and Plex. I went to go setup my categories and have TV shows and Movies go to the relatvie /data/media/ folders, but they aren’t visible to SABnzbd. I can on docker we data/usenet instead of /data. I know I can move the map point up a level to get folder access, but I wanted to see if there is a reason you didn’t do that originally and if there is a ‘best practice’ way I am missing. Thanks for the guides!
Hey, so we try to limit what each container can see to avoid any issues should a container ever get breached.
Sab should not need access to any of the media folders as the various Arrs do all the movements post downloads.
If you have no intention of using Radarr or Sonarr then you can amend you map to /data to /data and let Sab do your file moves.
Hey, I had sonarr setup already and used your guide to setup SABNZBD, I got stuff downloaded but for some reason Sonarr is having some import issues after download.
Import failed, path does not exist or is not accessible by Sonarr: /config/Downloads/complete/The.Traitors.UK.S01E04.1080p.WEB-DL.AAC2.0.H264-BTN/. Ensure the path exists and the user running Sonarr has the correct permissions to access this file/folder
Not sure why there’s a /config there since my synology path is /Downloads/complete?
Would appreciate any assistance you could give!
Sounds like you are using different mount points / paths vs the guides. Make sure in SAB in the Folder settings you have a path set that Sonarr has access to as It is telling Sonarr it is placing them in the path in your comment. I would recommend changing a folder layout as used across the guides as it is consistent.