Last updated on 6 April 2025
Please note if you are using DSM7.2 or higher you should use the Container Manager version of this guide from the menu.
This guide has reached the end of its updates as most people are now on the latest DSM update - This guide is correct as of 08/12/2023 however no further updates will be added.
| Update | Date |
|---|---|
| Aligned the Plex Claim environment variable with the other guides. | 01/05/2023 |
In this guide I am going to take you through the setup of Plex in Docker.
Do I need Hardware Transcoding?
The version of this guide you follow will depend on whether you want hardware transcoding, this is available to Plex Pass holders and requires your Synology CPU to have Intel Quick Sync capabilities.
Generally, if you are only using Plex at home with devices that can direct play your media you likely won’t need this. However, if you have users that share your server outside your household, or plan on streaming to mobile devices you will want hardware transcoding as this will speed up the process of changing media between codecs and resolutions quickly.
You can find the hardware transcoding guide here, if you want the standard setup continue on below…
Let’s Begin
In order to use this guide successfully you will need to complete the two proceeding guides which will get your folder structure and Docker, user setup. In addition, if you already have the original Synology Plex Package installed you will need to uninstall it first.
Downloading the Plex Image
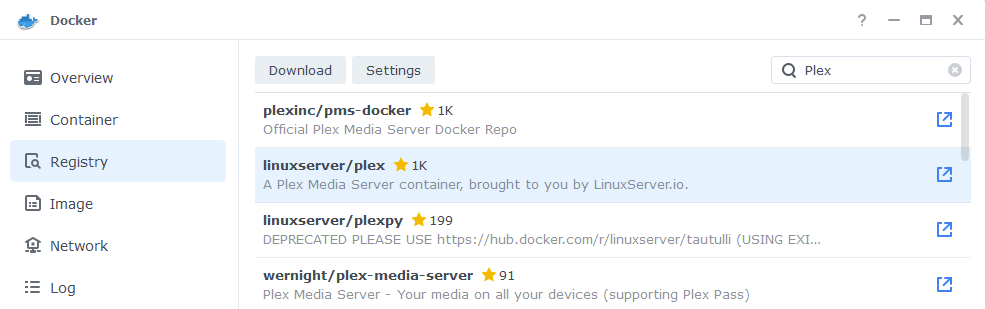
Open up Docker within DSM and navigate to the ‘Registry’ tab, then search for ‘Plex’.
In the list of available containers select the one made by Linuxserver as shown below, right click on it and select ‘Download’ or click the button at the top of the window.
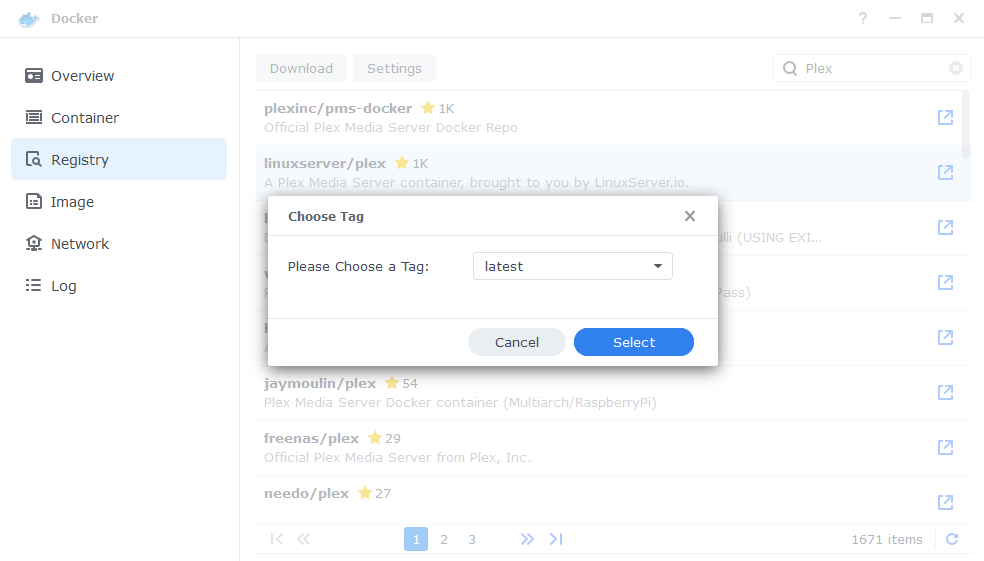
When the dialogue pops up asking you to choose a version, make sure you choose ‘Latest’ from the list.
You can check the status of the download over on the ‘Image’ tab, it will take a few minutes depending on the speed of your internet connection.
Setting up the container
In Docker click on the ‘Image’ tab, in the list of your containers select the ‘Linuxserver Plex’ image and click on ‘Launch’
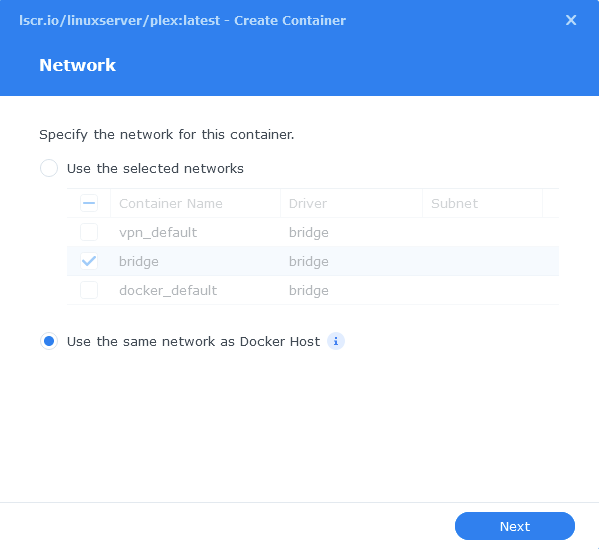
A note on Network Mode
You will notice that for Plex we don’t put it on the normal bridge network, this is because DSM reserves the DLNA ports Plex requires in order to use DLNA. So we run in Host mode, so it can share the ports.
General Settings
Next you will be greeted with the General Settings screen, this is where you can start specifying some of your preferences.
You can change the name of the container to anything you like, and you may want to enable Auto Restart as this will ensure the server starts automatically if you reboot your NAS.
You will also notice a Configure capabilities button — don’t change anything in here!
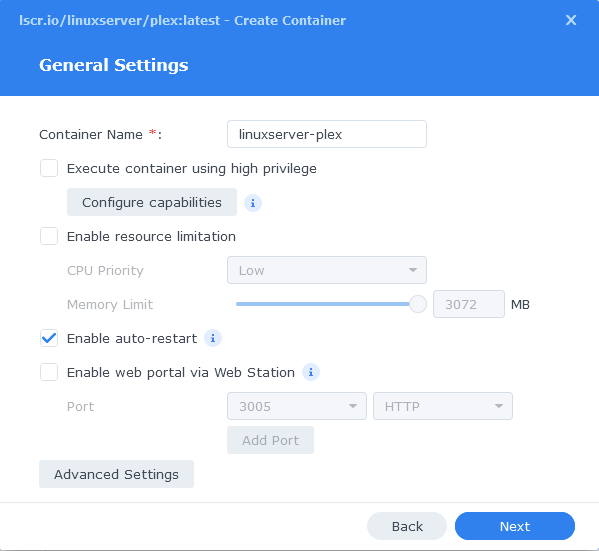
Next up we are going to click on the ‘Advanced Settings’ button, this will take you to a new window with a number of tabs which we are going to work through.
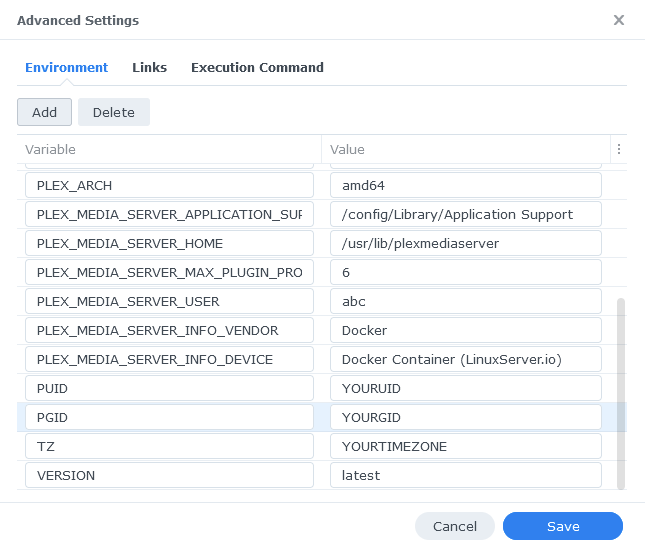
Environment
Next we are going to set up a couple of environment variables that docker will use to allow the container access to our files and folders and also to tell it where we live in the world.
Click the Add button, and fill in the following details as per the table/screenshot, you will need to do one at a time.
| Variable | Value |
|---|---|
| PUID | The UID you obtained in the user setup guide |
| PGID | The GID you obtained in the user setup guide |
| TZ | Your timezone wikipedia.org/wiki/List_of_tz_database_time_zones |
| VERSION | latest |
| PLEX_CLAIM | See Note Below |
Please note the PLEX_CLAIM variable is optional and not always required. You can remove if you don’t need it or come back and add it if you are unable to sign in to your server on start up.
To get the code go to https://plex.tv/claim and sign in, then put the code you receive in the PLEX_CLAIM variable. You have 4 mins to finish the guide after doing this, so best to grab it just before running the container.
Links / Execution Command
You do not need to set up anything on these tabs.
Press ‘Save’ to go back to the initial setup screen, then press ‘Next’
Volume Settings
We will now be specifying the directories where Plex will store its configuration files and where to find our media.
Click on ‘Add Folder’ select the ‘docker’ folder and create a new sub-folder called ‘plex’ select this folder and click ‘select’
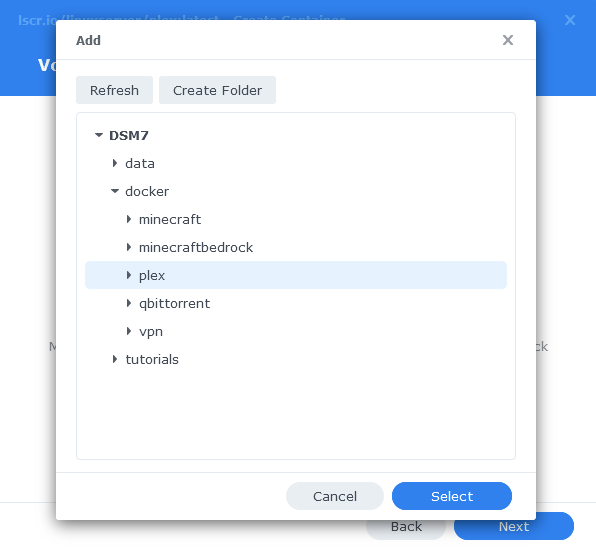
Now add ‘/config’ to the Mount path box

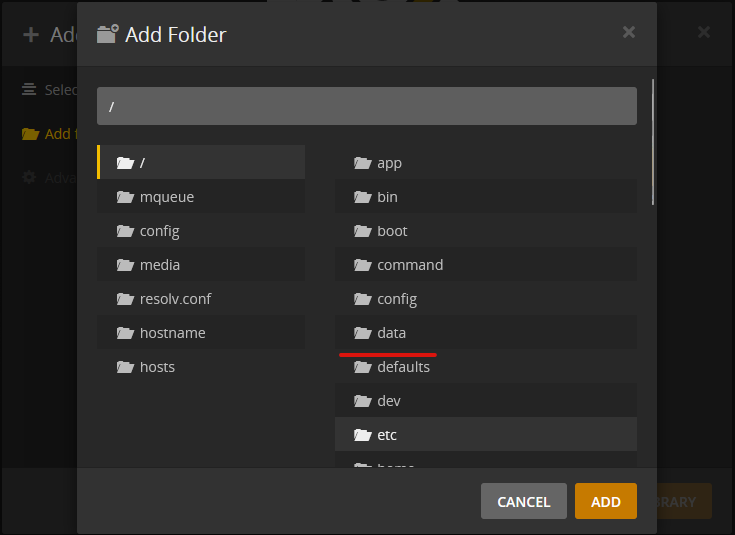
Click Add Folder again and this time select the top level ‘data’ folder and click Select, then enter ‘/data/media’ into the ‘Mount path’ box
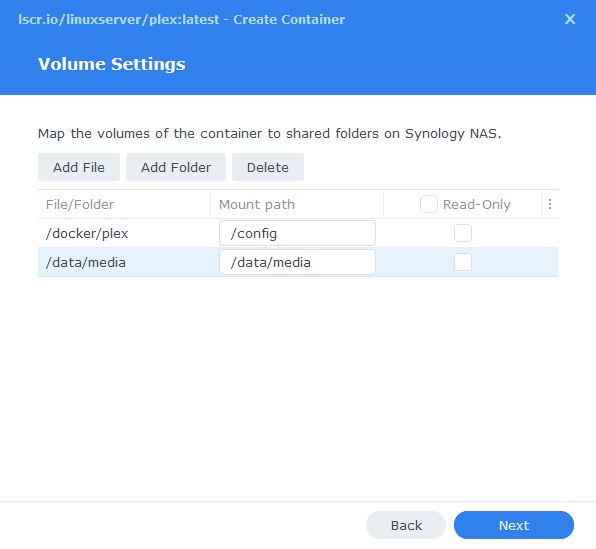
Click Next to move to the final screen.
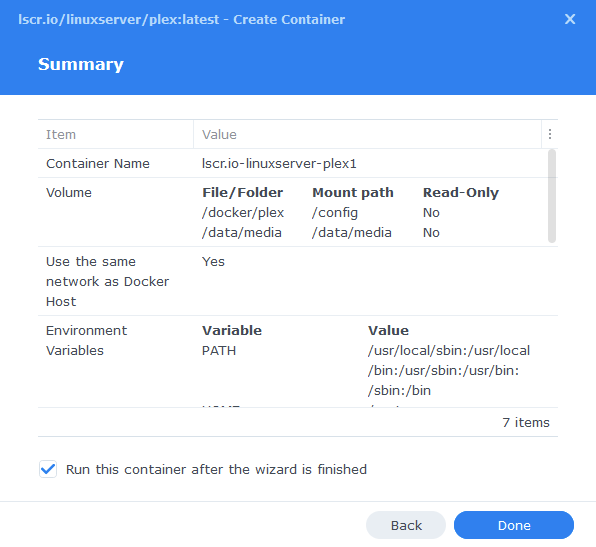
Summary
You have now completed the setup of the container.
You will be shown an overall summary of the settings we have specified, this is a good time to double-check everything is correct. Finally, click on Done and the container should start to boot.
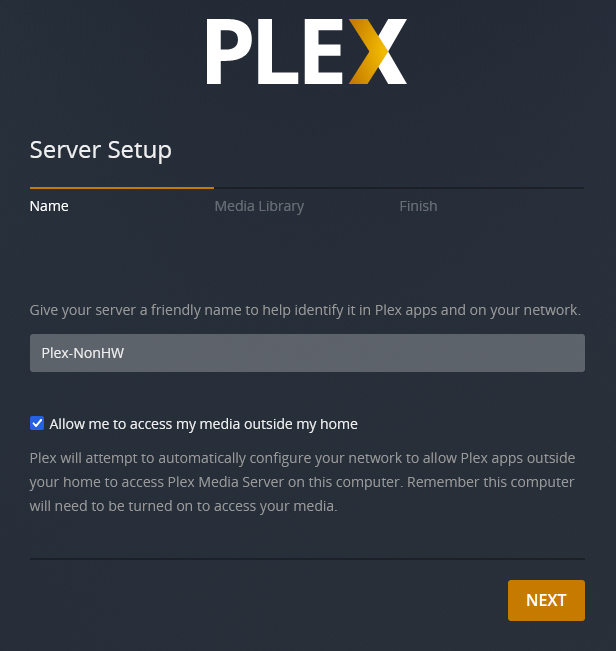
Initial Plex Setup
After a few minutes you should be able to access the server and go through the Plex setup by going to the IP of your NAS in your browser followed by port 32400/web/
e.g. 192.168.0.45:32400/web/
You will be asked to sign in or sign up for an account if you don’t have one already.
You should now be able to add your media which will be in the /data folder within Plex
You have now completed the setup.
| Historic Updates | Date |
|---|---|
| New guide released | 06/12/2021 |
| Updated Environment Variables to ensure server is updating to the latest version | 02/02/2022 |
| Updated with DSM7.1 Steps and Screenshots | 28/05/2022 |
| Amended the mount path for media | 12/08/2022 |
Looking for some help, join our Discord community
If you are struggling with any steps in the guides or looking to branch out into other containers join our Discord community!

Buy me a beverage!
If you have found my site useful please consider pinging me a tip as it helps cover the cost of running things or just lets me stay hydrated. Plus 10% goes to the devs of the apps I do guides for every year.


Hi Dr_Frankenstein,
Thanks for the detailed tutorials! I managed to get most containers running except for radarr and prowlerr. Both given me the following error:
failed to load external entity “/config/config.xml”
After that the container stays running and keeps on repeating the same error. Meanwhile I can’t access the container on the specified port.
I’ve tried running the containers on my local macbook and everything is working as expected. I then tried to copy paste the generated config into the synology container, double checked permissions, network (also tried host network). But unfortunately to no avail.
Do you have any idea what might be the issue?
Hey – It sounds like a potential permissions issue. Initially I would try grabbing the latest container again just to make sure it’s not something to do with a bad image.
Do the logs suggest any permissions issues? The start of the log should look like this https://paste.drfrankenstein.co.uk/?da73ba6c0a2e94cf#5h93FPPqvdBXC3ChSjALiMmEzJowA8t93sQtoAC26yD1
Hi there doc, I’m having the exact same issue. Here’s what I’m seeing. Any ideas?
https://paste.drfrankenstein.co.uk/?4169988545253587#9992eAPApgovJTfXT9jZTJ4e2koBQpWbjtvKAgcFoppm
/volume1/docker/appdata/radarr is mapped to /config and permissions are fully set for the radarr user (UID 1036). At a loss. Doesn’t seem to matter what I change in networking (bridge, host, etc).
I have added a fix for permissions to the User and Group creation guide, that should fix it for you.
I followed the steps from the Directory Setup and Restricted Docker user plus this guide, but the data folder is not showing up for me in Plex. I did connect to Plex prior to setting up Docker and connected to individual folders.
I’m not sure if that’s the issue but I followed all the steps in this guide including the Plex Claim token and do not see data under the base “/” directory. I see data under /volume1/data, but even from that filepath I do not see media.
Do you know how to resolve this?
It sounds like you are still connected to the Plex Package you have installed – you need to stop the package and uninstall it in order for the container to take over the ports 🙂
You need to add the PLEX_CLAIM environment variable and add the Claim token from https://www.plex.tv/claim/
Hey, it is not always needed as when you log into the server it claims it. I will add a note/option though.
I currently have the Synology version of Plex installed and running perfectly. If I install the Docker version, will I be able to have 2 server instances running at the same time or will there be an IP issue? I currently have 2 Plex instances running, one on my MAC, and one on Synology. Just wondering if I can safely get the 3rd instance going (backup?) or will there be issues because I already use the Synology version of Plex.
Hey, you will have issues due to the conflicting port numbers that are already in use on the one already running.
I am also running Synology’s version of PMS. I am just about to begin this tutorial, what do I need to do to avoid these issues?
Hey
If you are migrating from the package you will need to stop and uninstall it before beginning, as the package will be using the required ports for the Docker container to function correctly.
Other than that you should be good.
When following this guide, before the step about volume mapping i get a page with port mapping with a whole bunch of ports to map. Do i have to map every one of them or is it enough to map only the 32400 one? if i leave the others blank does it expose my ports to outside interference or attacks?
You need to jump back a step and set the network to Host mode rather than bridge as you won’t get past the final step. This is purely internal ports nothing is port forwarded unless you do it yourself on your router.
So in theory, after following almost all of your guides here, the only port i need to forward is the 32400 one so i have access to plex?
Also, as an off-topic, why does the sonarr/radarr indexers not work? Am i doing something wrong? do i need to perform any other steps to make it work? The deluge setup without vpn communicates with sonarr/radarr but does not start the download. Any ideas on those?
Thank you very much for your reply!